

Receiving Goods
Receiving Goods
Receiving to Inventory
When you receive a delivery that relates to a Purchase Order, you can use PurchasePlus to 'receive' the goods (i.e. digitally take note of the items and quantities received), so that you know when your Purchase Order is fulfilled, and you can confidently pay the Supplier's Invoice. This functionality is standard in almost every PurchasePlus configuration.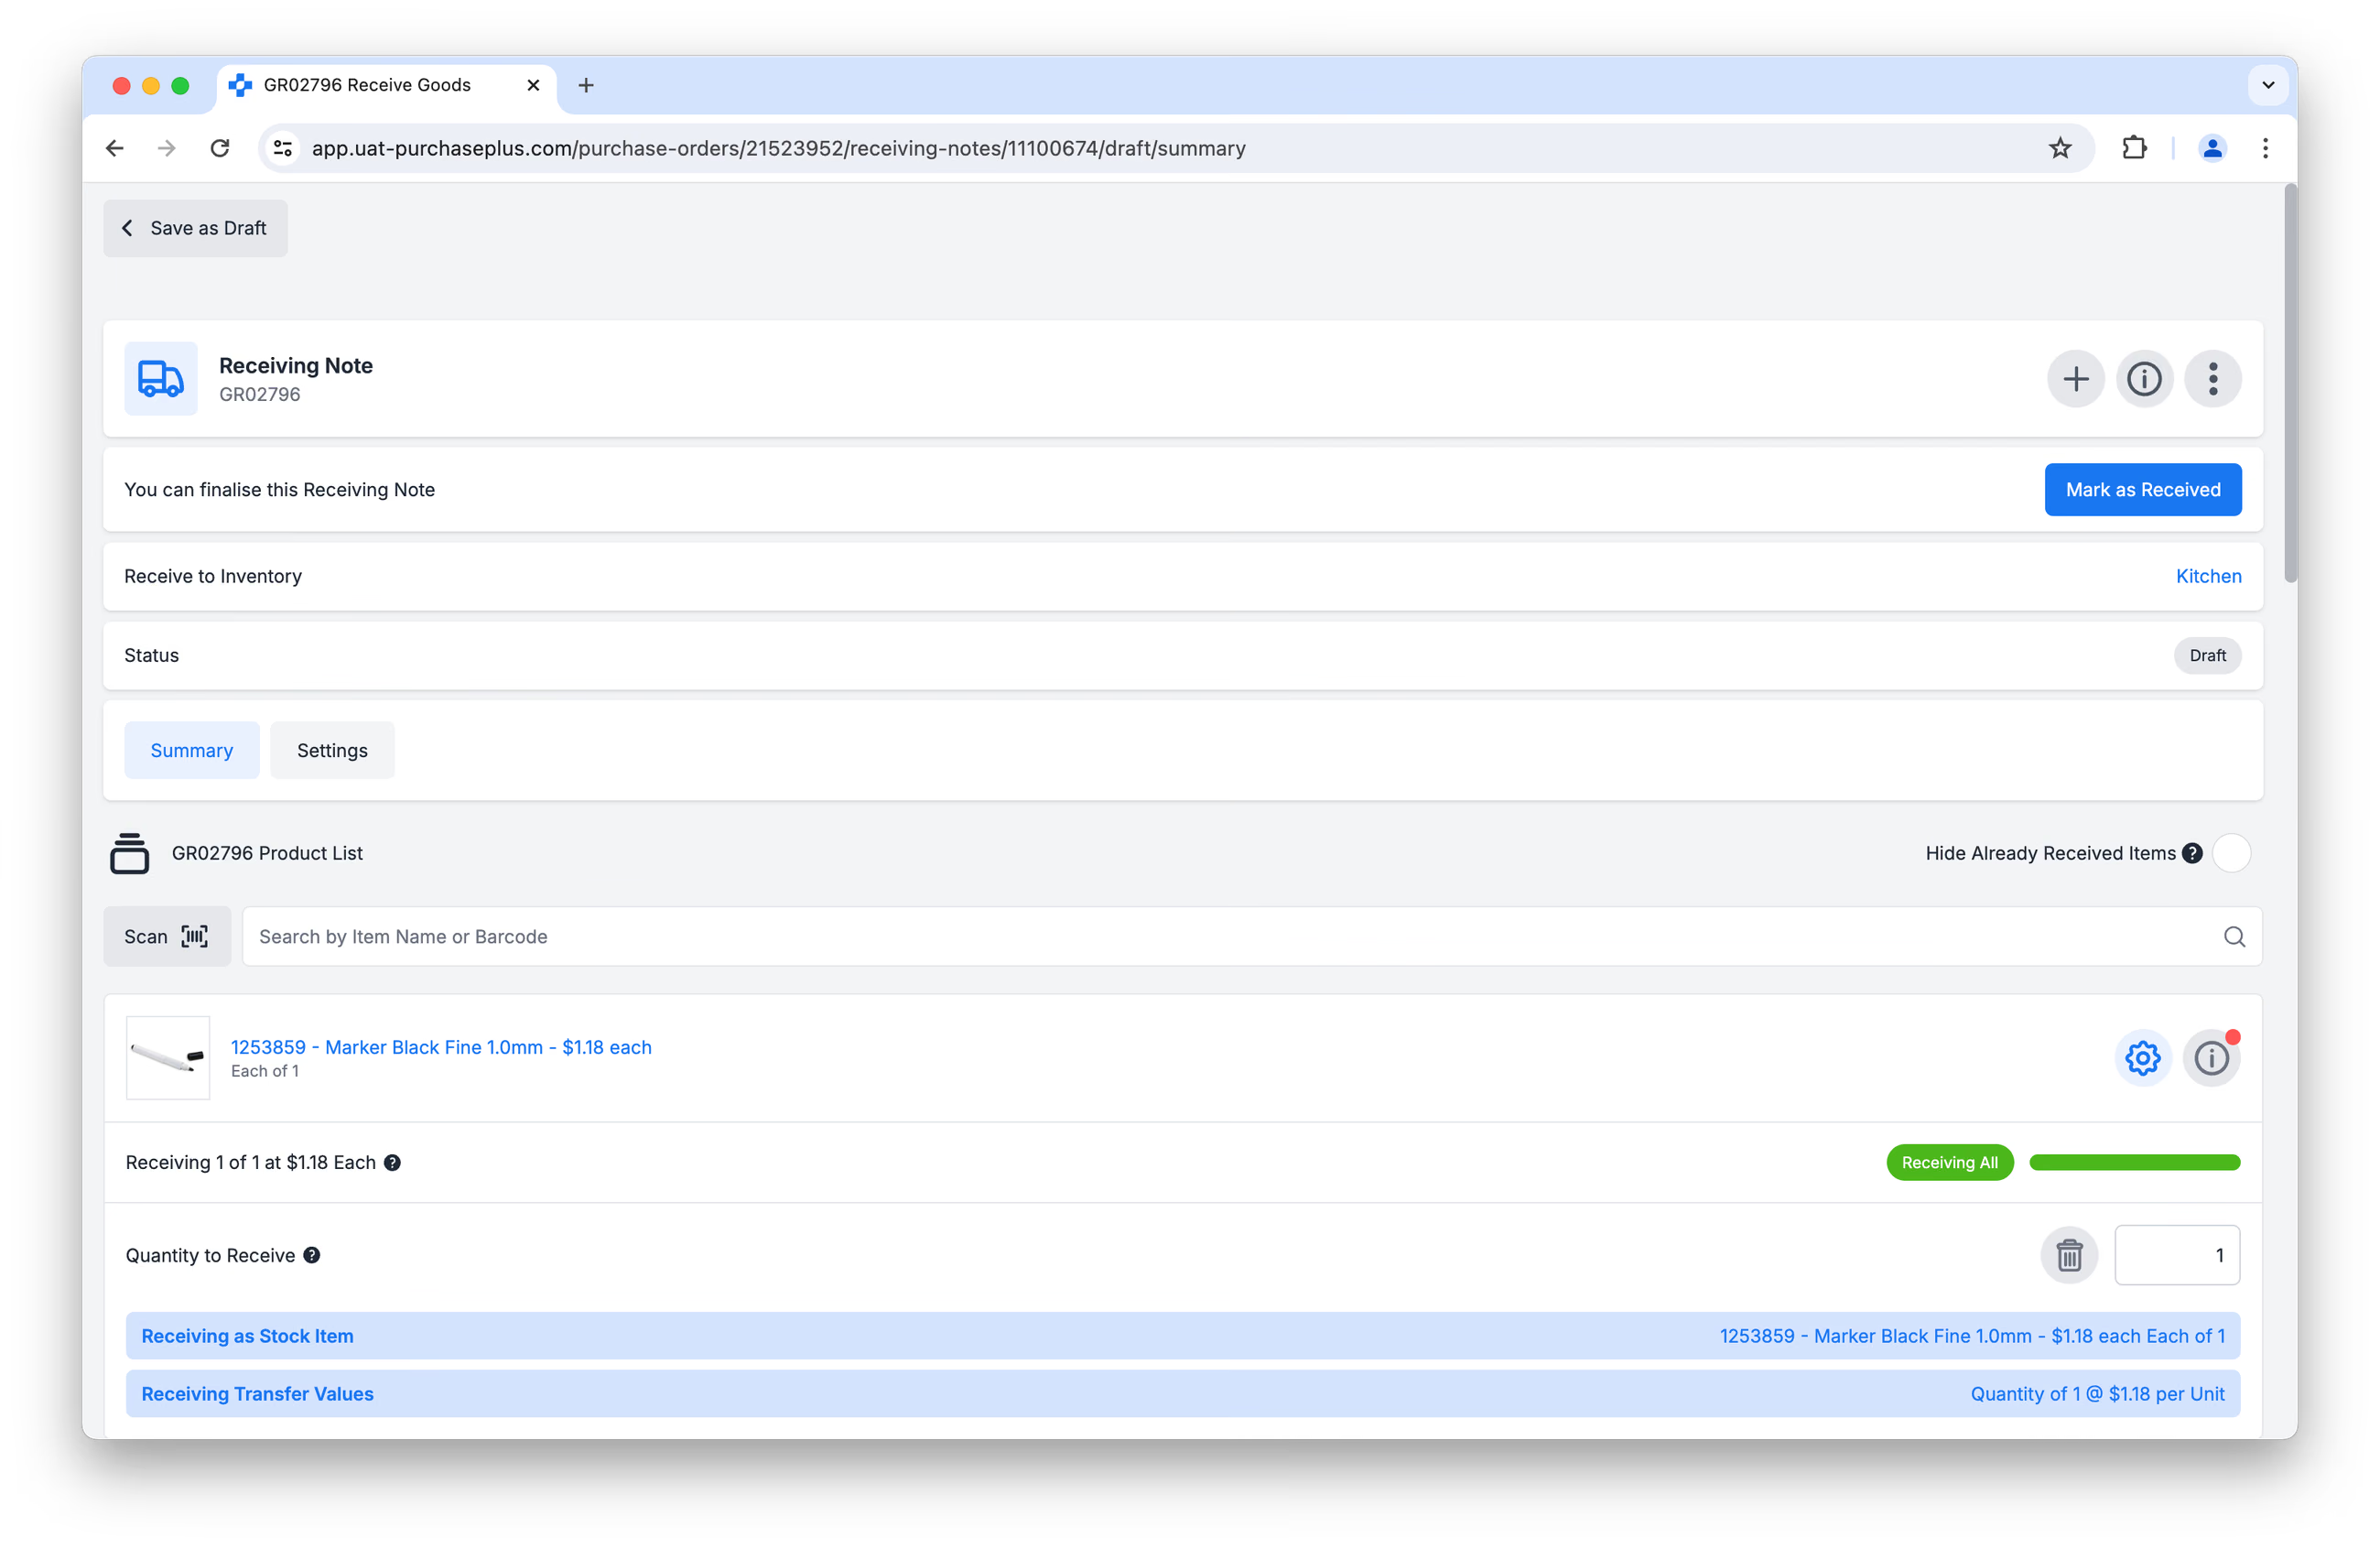
Users of our optional Inventory module can go one step further and elect to 'Receive the Goods to Inventory', meaning the quantities of the Stock Items in a specified Stock Location are updated automatically, and the newly-received goods can immediately be viewed in Reports, used in Transfers, counted in a Stocktake, or re-ordered in a Requisition From a Stock Location.
How it works
In order to harmonise PurchasePlus's decentralised, efficiency-focused purchasing marketplace with the granular stock control required by Inventory managers, there are three important concepts that we have introduced into our platform:
- Stock Item Eligibility
- 'Receive As'
- 'Master Products' and Product Matching
We recommend every Inventory User understands these three principles prior to Receiving Goods to Inventory.
Concept 1: Stock Item Eligibility
When you successfully Receive Goods to Inventory, the outcome is that your Stock Items are incremented (i.e. the count increases) in the specified Stock Location:
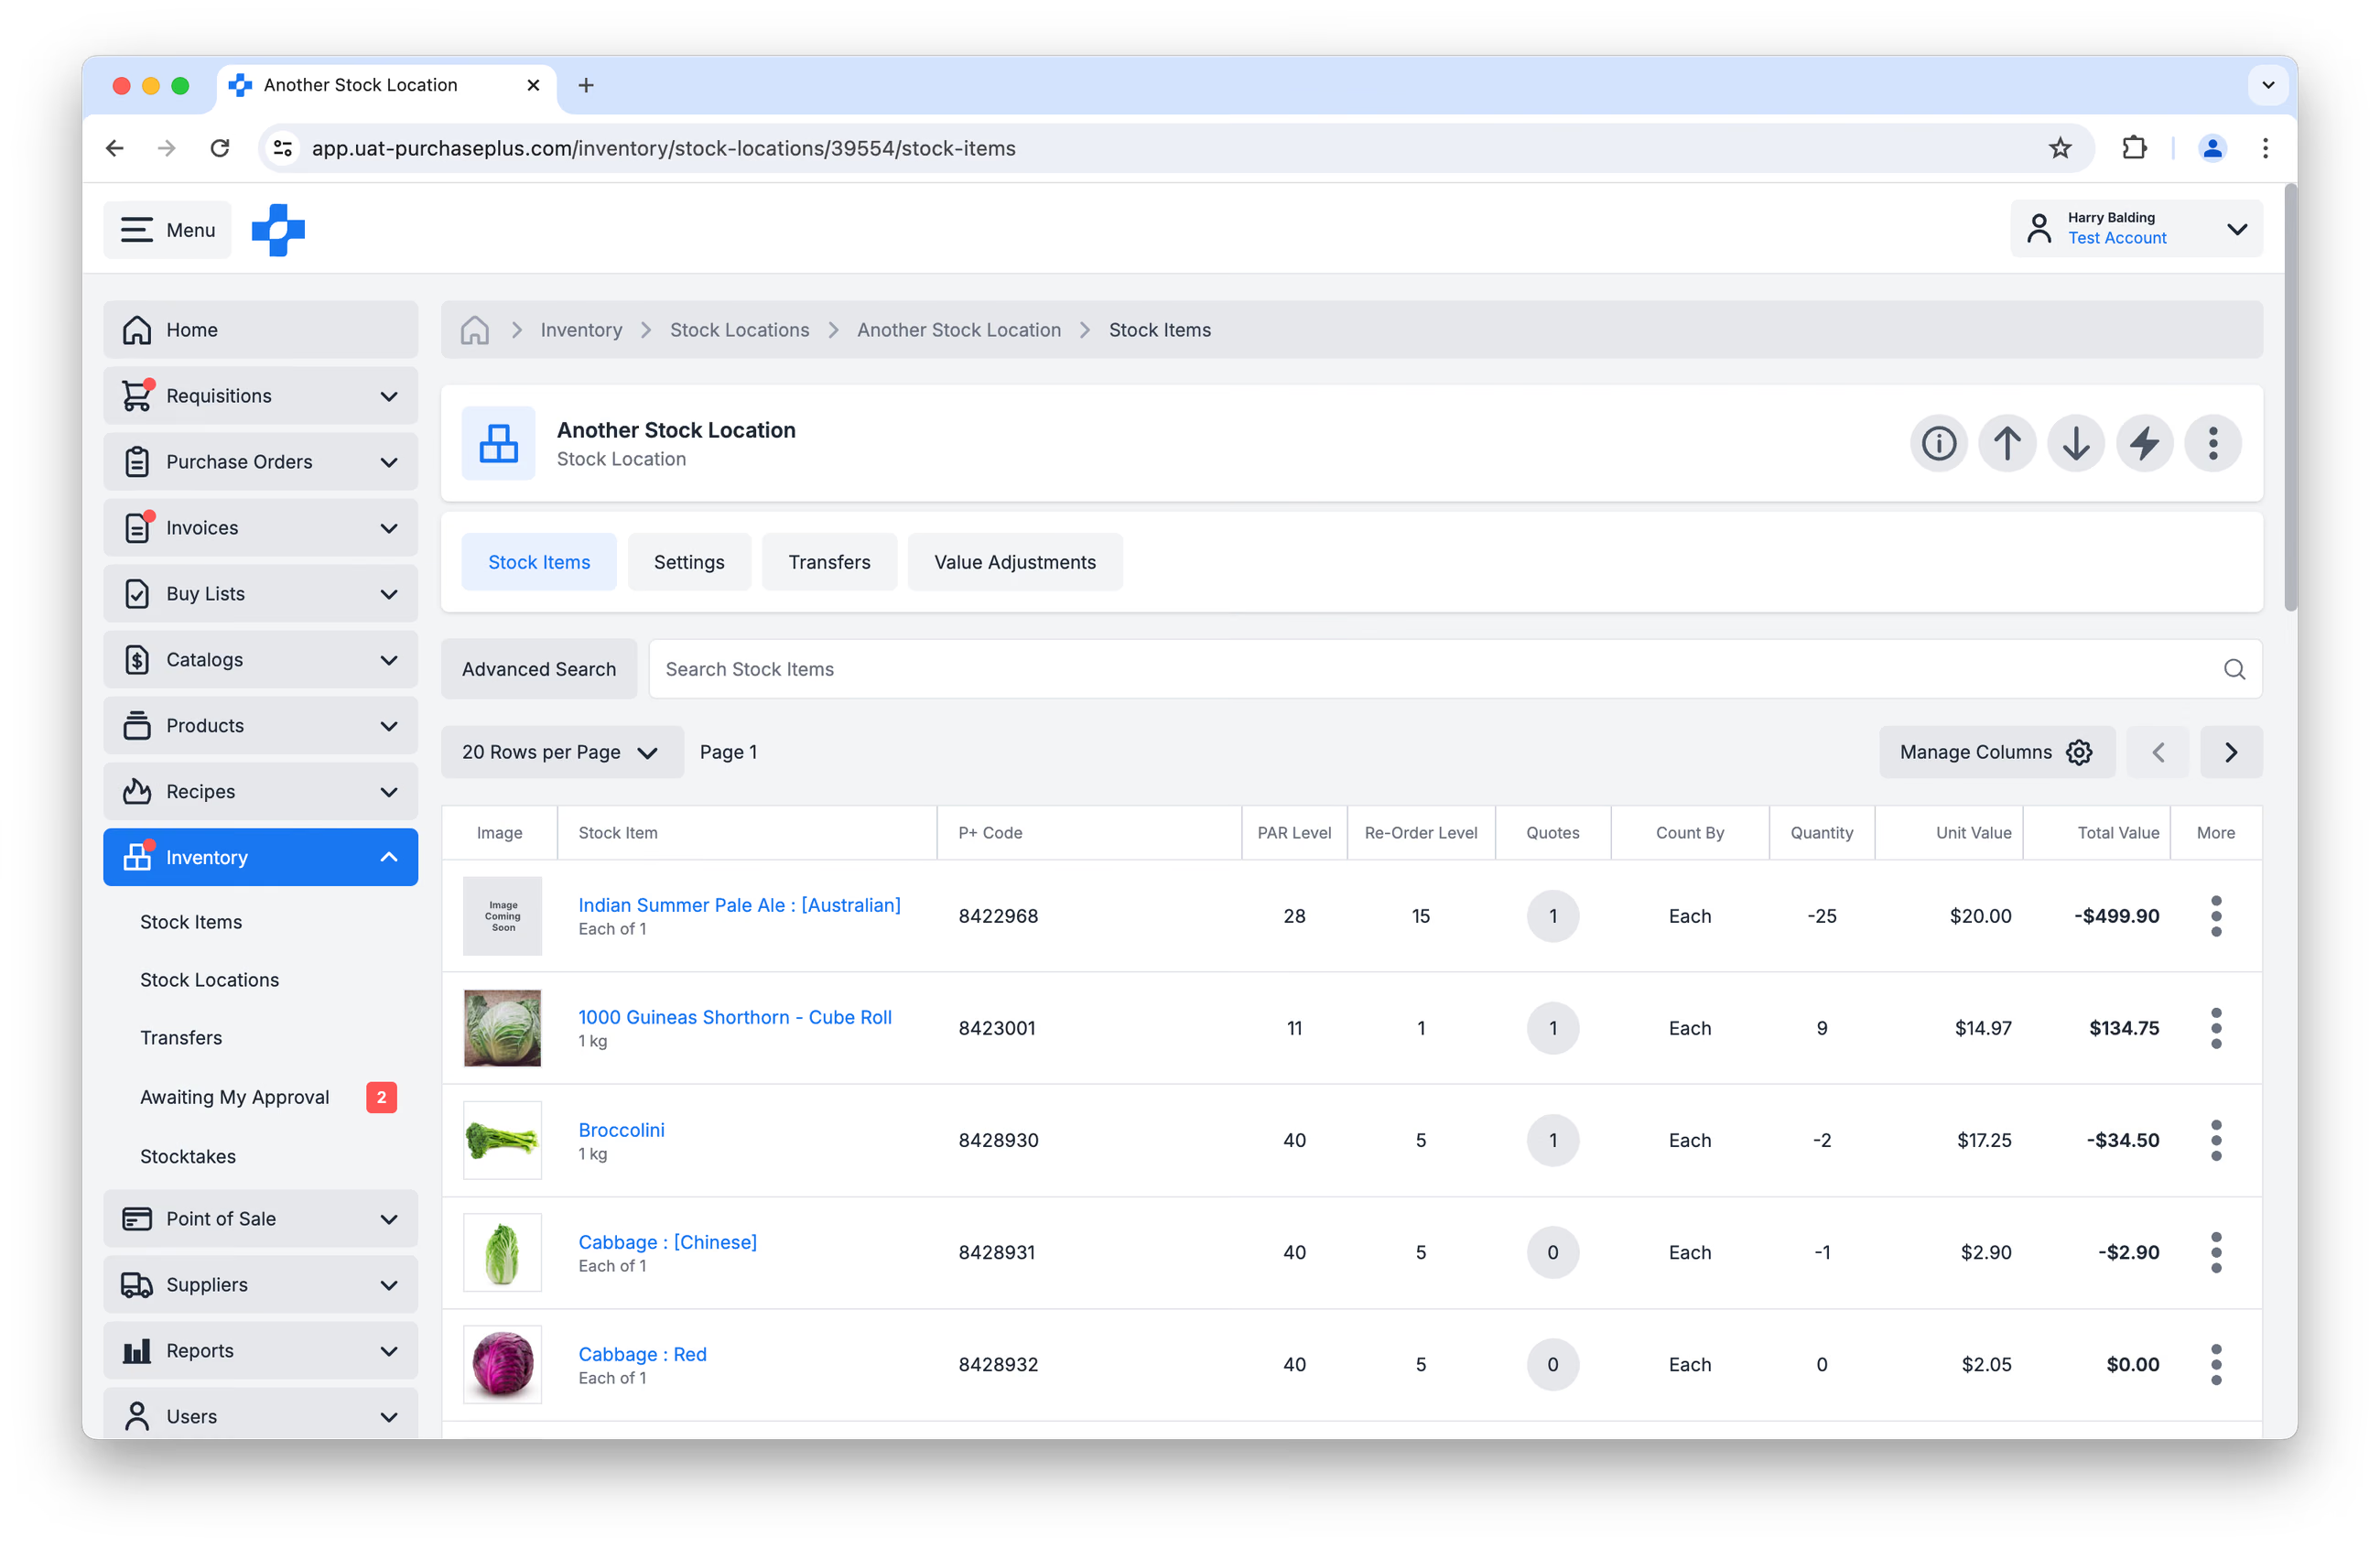 In PurchasePlus, Stock Items must be:
- Products that are 'owned' by your Organisation - i.e., they are 'Purchaser-Owned' Products.
- Products with a Sell Pack of 'Each of 1'.
Regarding Point 1 above, this means that you cannot keep Supplier-owned Products as Stock Items. This is to avoid a situation where a Supplier might update their Supplier-owned Product to have a different name, Sell Pack or Unit of Measure, and then your Inventory Stock Levels and Valuations would all be affected outside of your control.
This restriction means that granular, tight control over your Inventory is possible out of the box, but Creating and Managing Stock Items can take some time upon initial setup on the part of the Purchasers. That said, the process itself is simple, and our team are available to help at any time.
Concept 2: 'Receive As'
When you are Receiving Goods to Inventory, it is an common scenario that the Goods you are Receiving are very close but not identical to the Stock Items that you keep as Inventory.
As a simple example: you may choose to keep a generic 'Tomato' Stock Item. When you order tomatoes from your Supplier, they may send you:
- Roma Tomato
- Beefsteak Tomato
- Celebrity Tomato
...all of which you can Receive As your 'Tomato' Stock Item to increment its Stock Level. It is completely up to you during the Receiving process which items you Receive As your Stock Item; it is even possible to Receive unrelated items (e.g. 'Can of Soda') as your Stock Item (e.g. 'Tomato') and increment it.
TIP: Make your Stock Items quite generic to support flexibility and speed during the Receiving process.
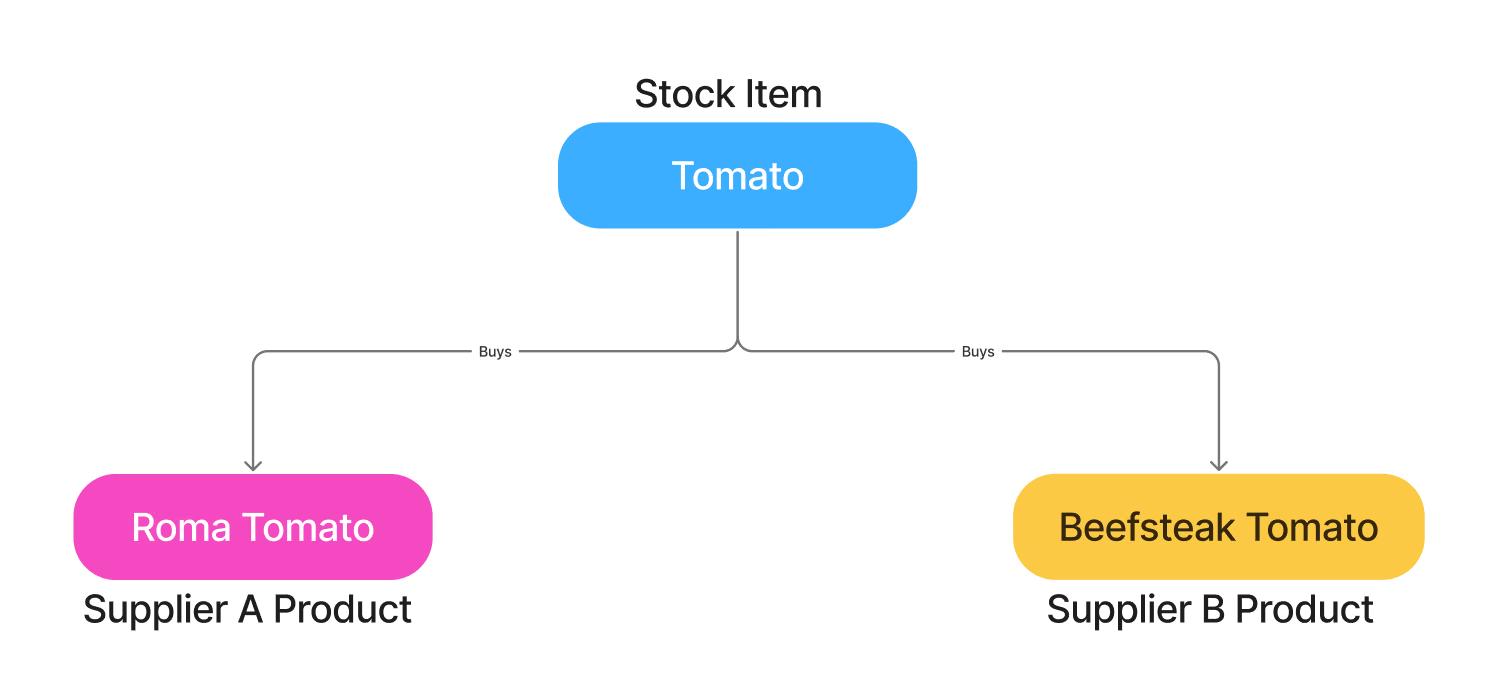
Fear not though - you don't have to manually select the correct Stock Items to be Received As during the Receiving process. PurchasePlus will intelligently suggest and pre-fill Stock Items that strongly match the Supplier's delivered items to accelerate your workflows.
Learn more about this matching strategy in the next section.
Concept 3: Master Products and Product Matching
PurchasePlus houses millions of Purchaser- and Supplier-owned products in our database. Additionally, we internally curate an extensive list of 'Master Products' that we 'own'. You will sometimes see Products with an Owner called 'Marketboomer' - that is the Company behind PurchasePlus!
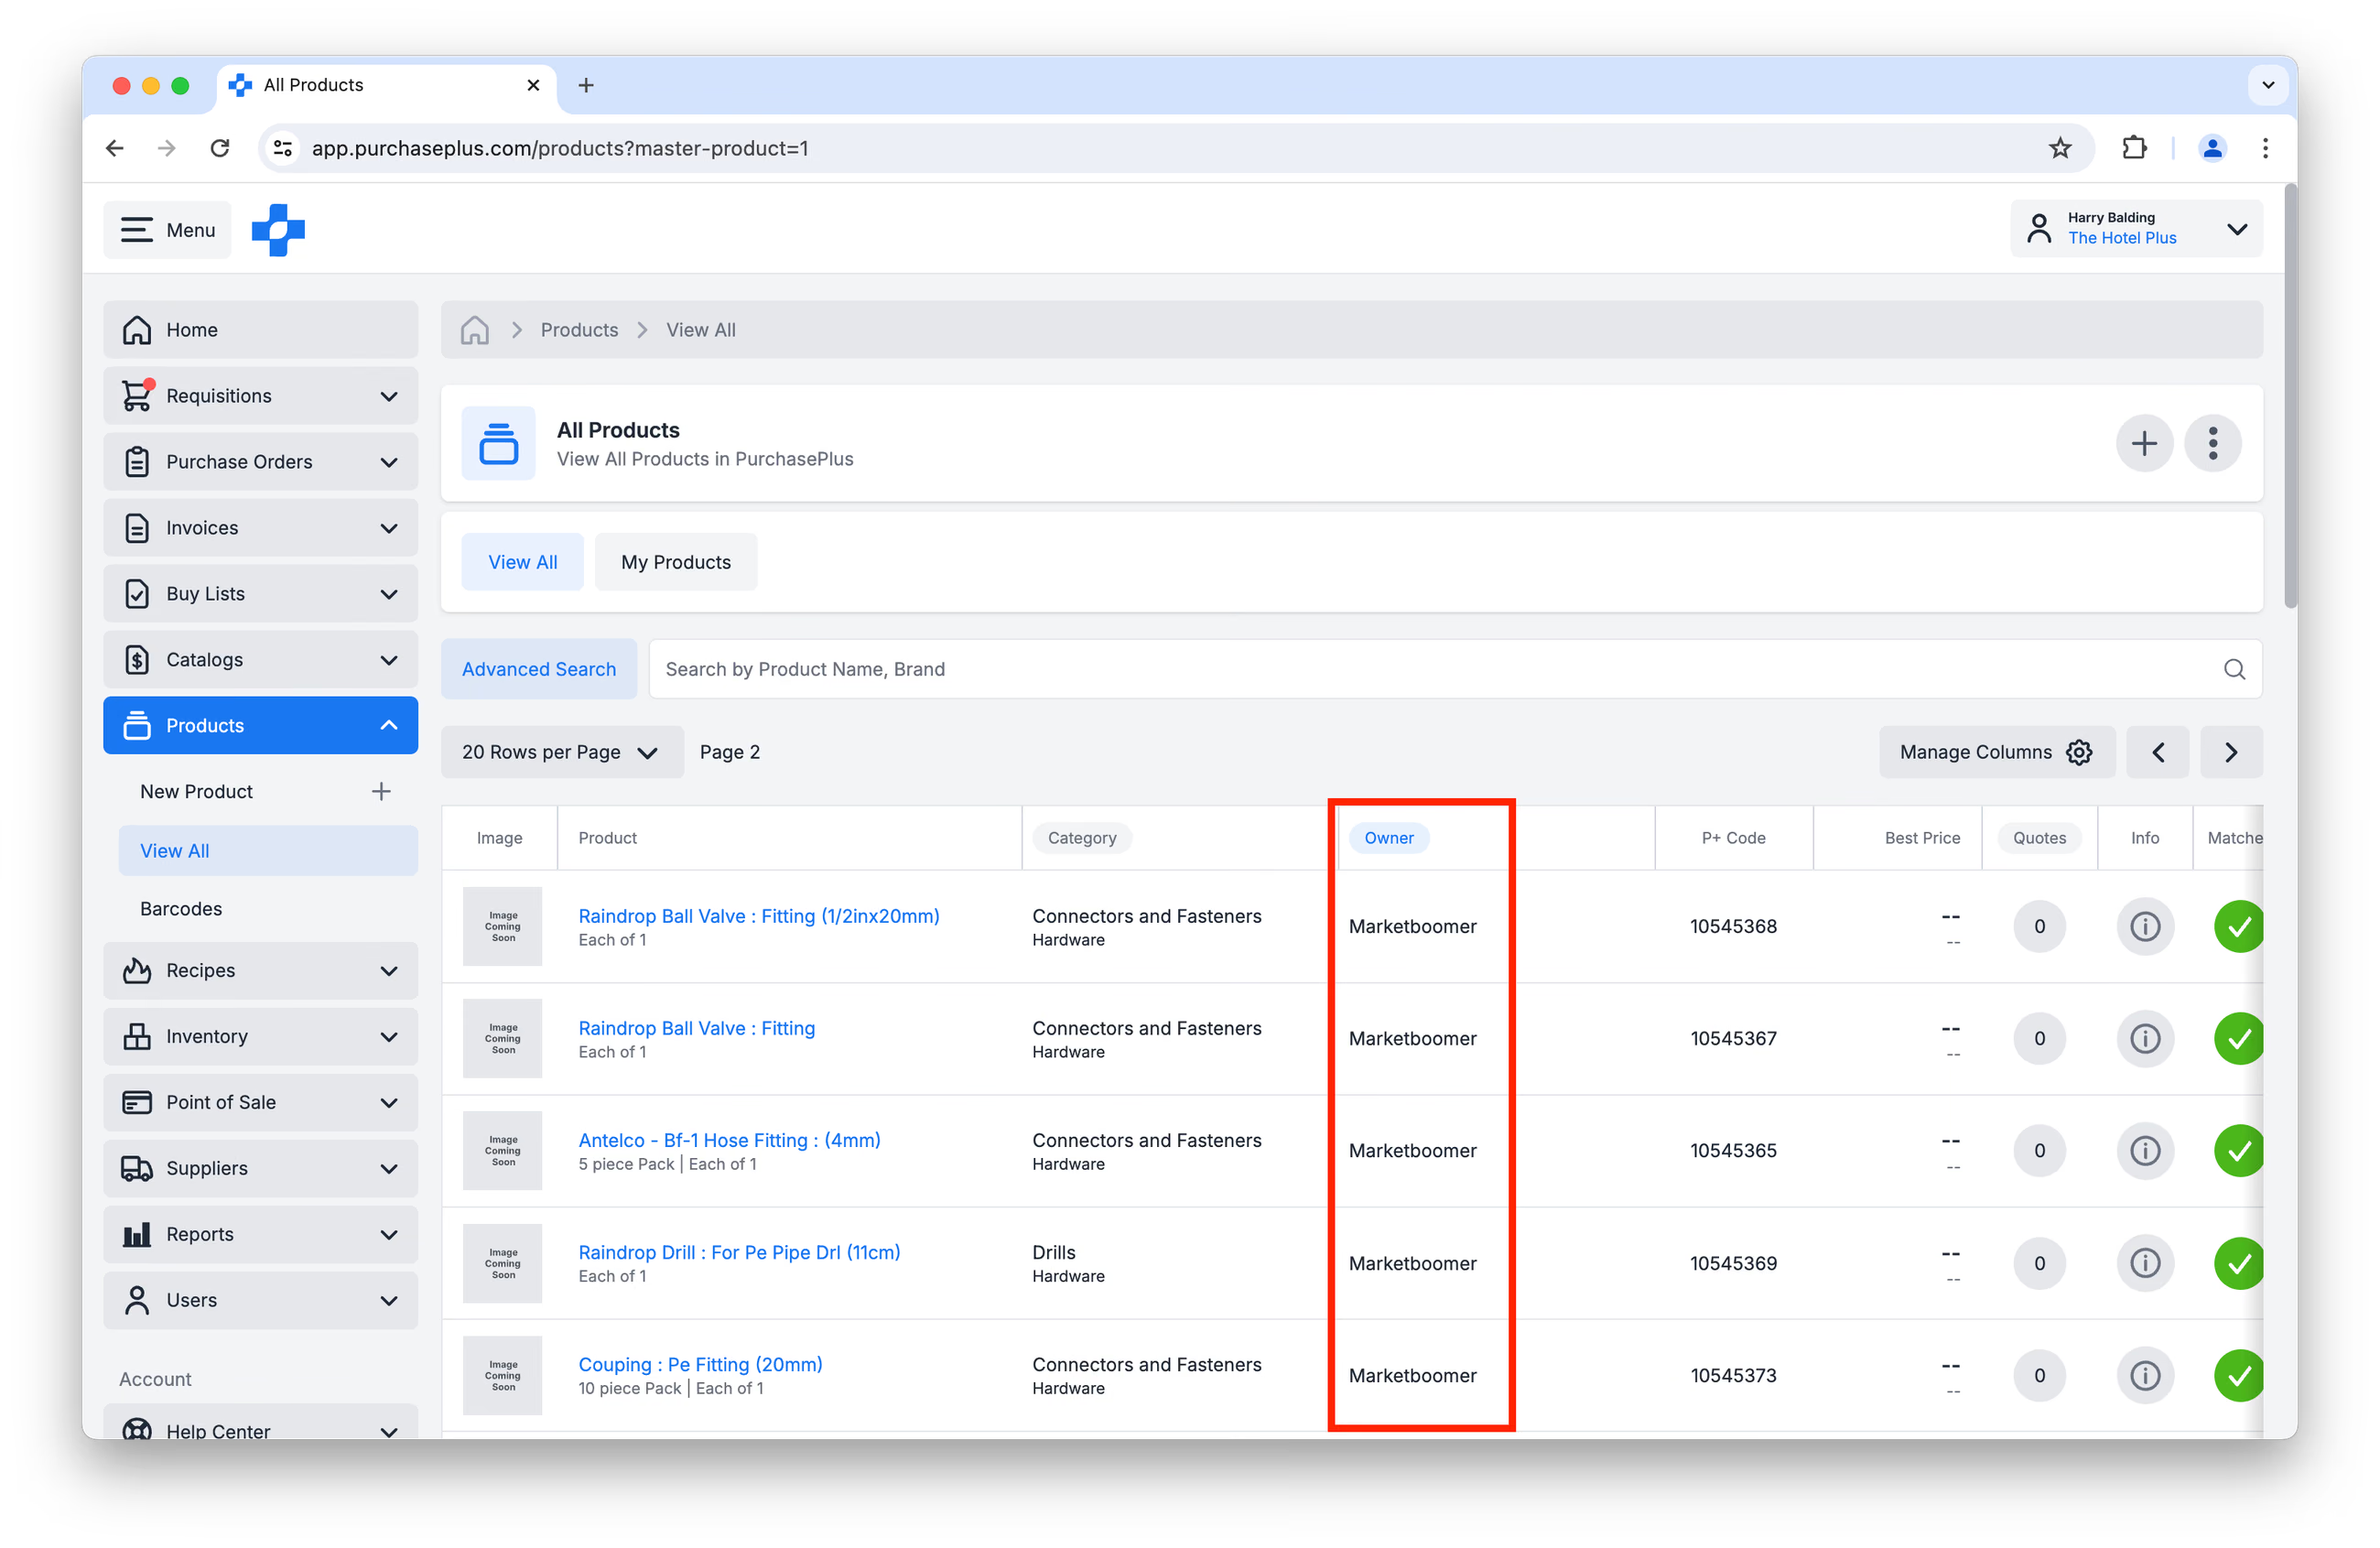
Products that are owned by Purchasers (e.g. Stock Items), or Supplier-owned Products can be 'Matched' to one of our Master Products by our expert team:
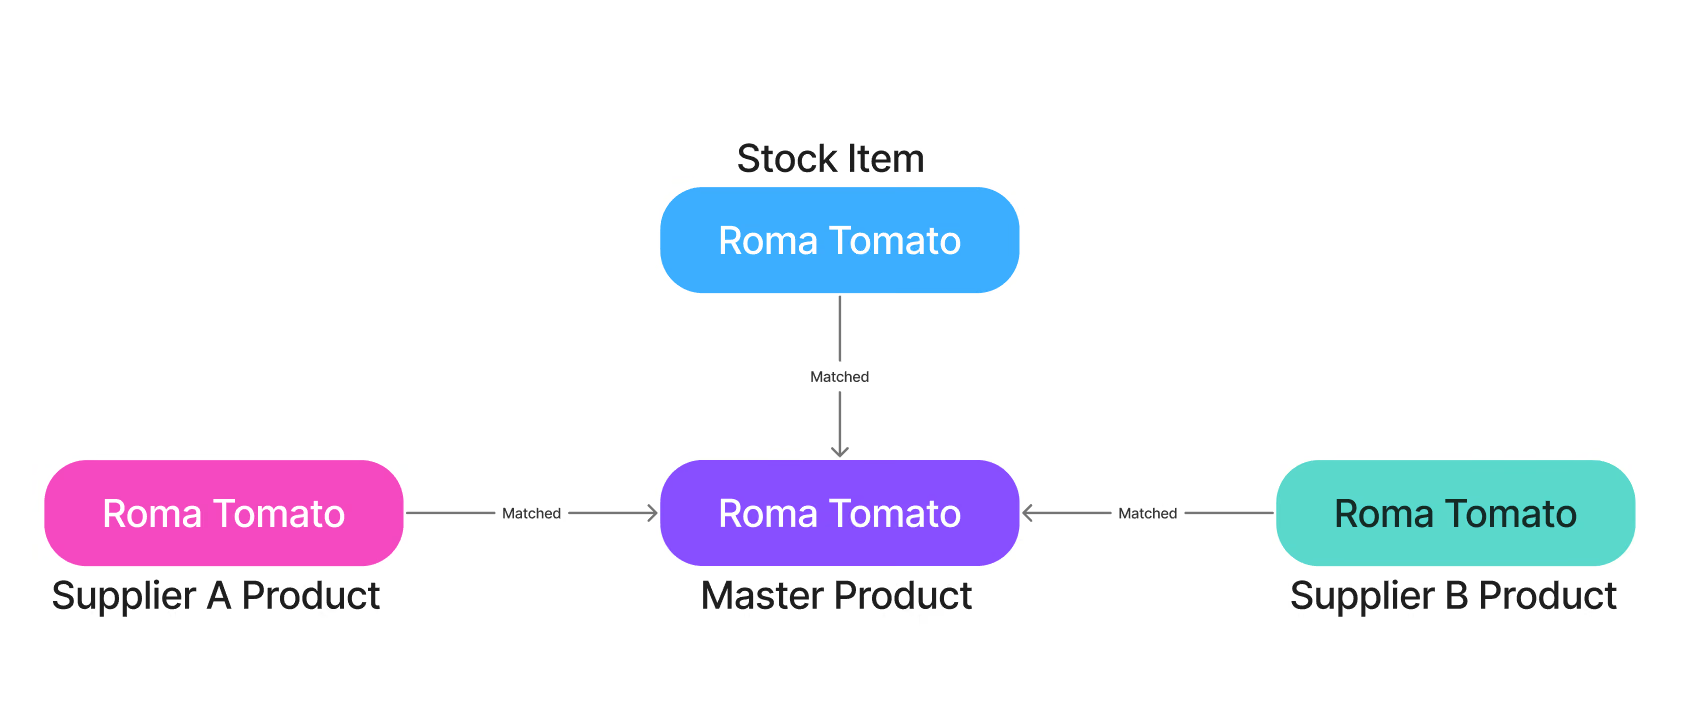
This enables Purchasers to:
- Access real-time price comparisons for the same item sold by multiple Suppliers (e.g. when creating a Requisition),
- Create effective Buy Lists that are easy for users at their Organisation to use, and
- Accelerate the Receiving to Inventory process.
Deep Dive: How Master Products and Substitute Products Accelerate Receiving to Inventory
Receiving to Inventory involves a complex 'assigning' of:
- The Stock Item you want incremented in your Inventory, to
- The actual, unique Product that your Supplier sent you.
The way PurchasePlus facilitates this assignment without the need for the user to manually assign a Stock Item to every single Product on the Purchase Order is through Master-Matched Products and Substitute Products.
- Master Products: If your Stock Items have been Matched to Master by our team, AND your Suppliers have quotes on that Master Product, then when you order a Master Product (say, in a Buy List Requisition), your matched Stock Item is auto-selected when you are Receiving that delivery to Inventory.
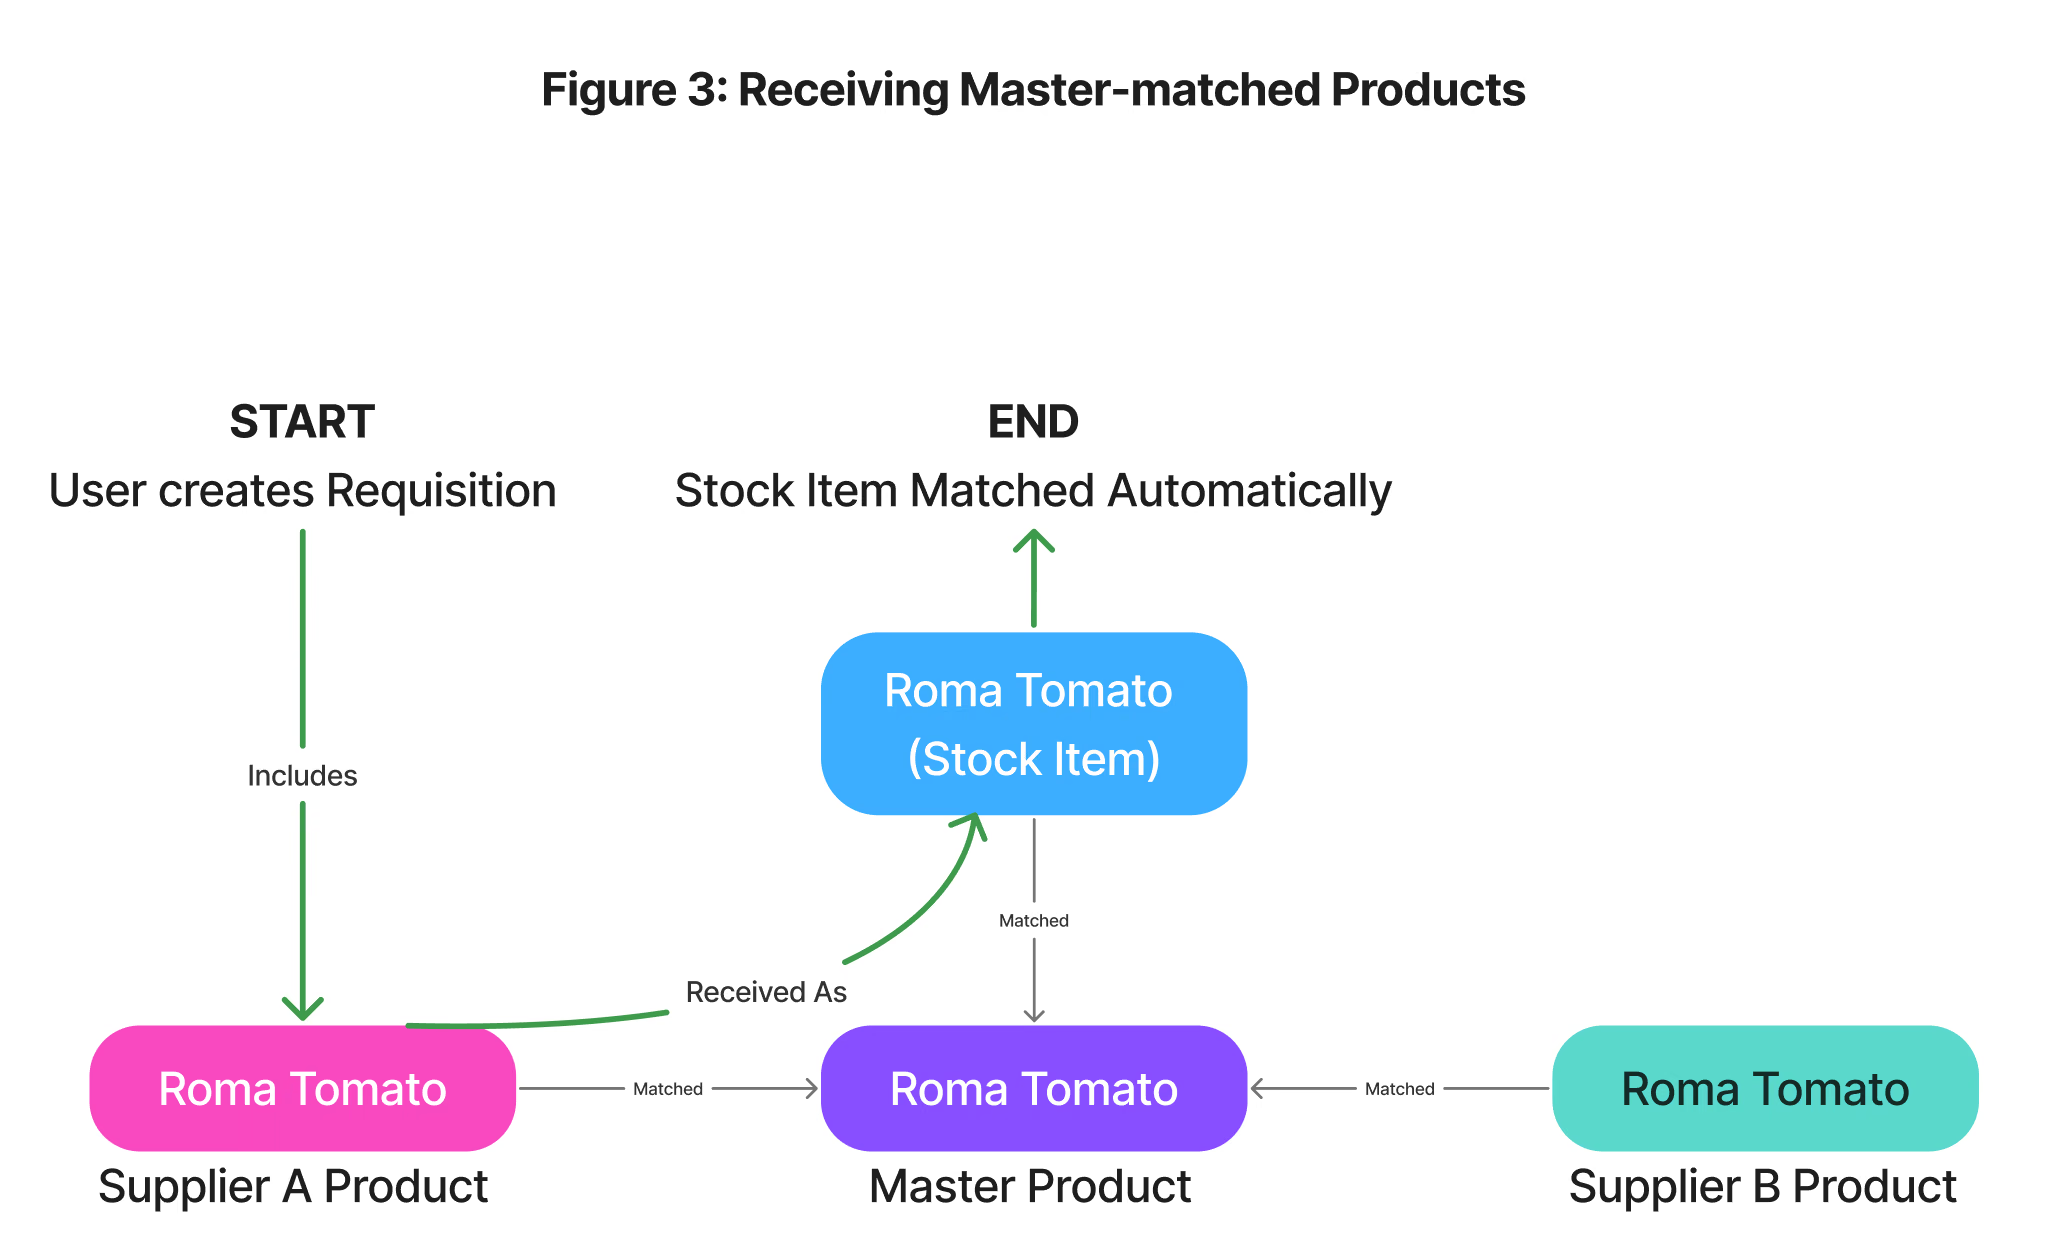
- Substitute Products: as mentioned above, a Stock Item must have a Sell Pack of 'Each of 1'. However, your Supplier's Product may be sold in a Carton of 24. These are considered different Products in our system, but they can be 'linked' for the purpose of Receiving to Inventory by creating a Substitute Product Relationship.
If you are Receiving a delivery to Inventory, and there is no Master match or Substitute Product Relationship in place between the Supplier's Product and your Stock Item, PurchasePlus will do its best to suggest some other matches (based on a number of factors like Product similarity), but it is recommended that you carefully review the matches and perhaps even manually Choose the Stock Item (or Create a totally new Stock Item) yourself. The first time you do this, our system will create the Substitute Product Relationship automatically and remember it for future Receiving to Inventory tasks!
Receiving Goods to Inventory
Receiving to Inventory begins with Creating a new Receiving Note. In PurchasePlus, Receiving Notes must be created against Purchase Orders; there is no way to create a Receiving Note outside of a relationship to a Purchase Order.
To create a new Receiving Note:
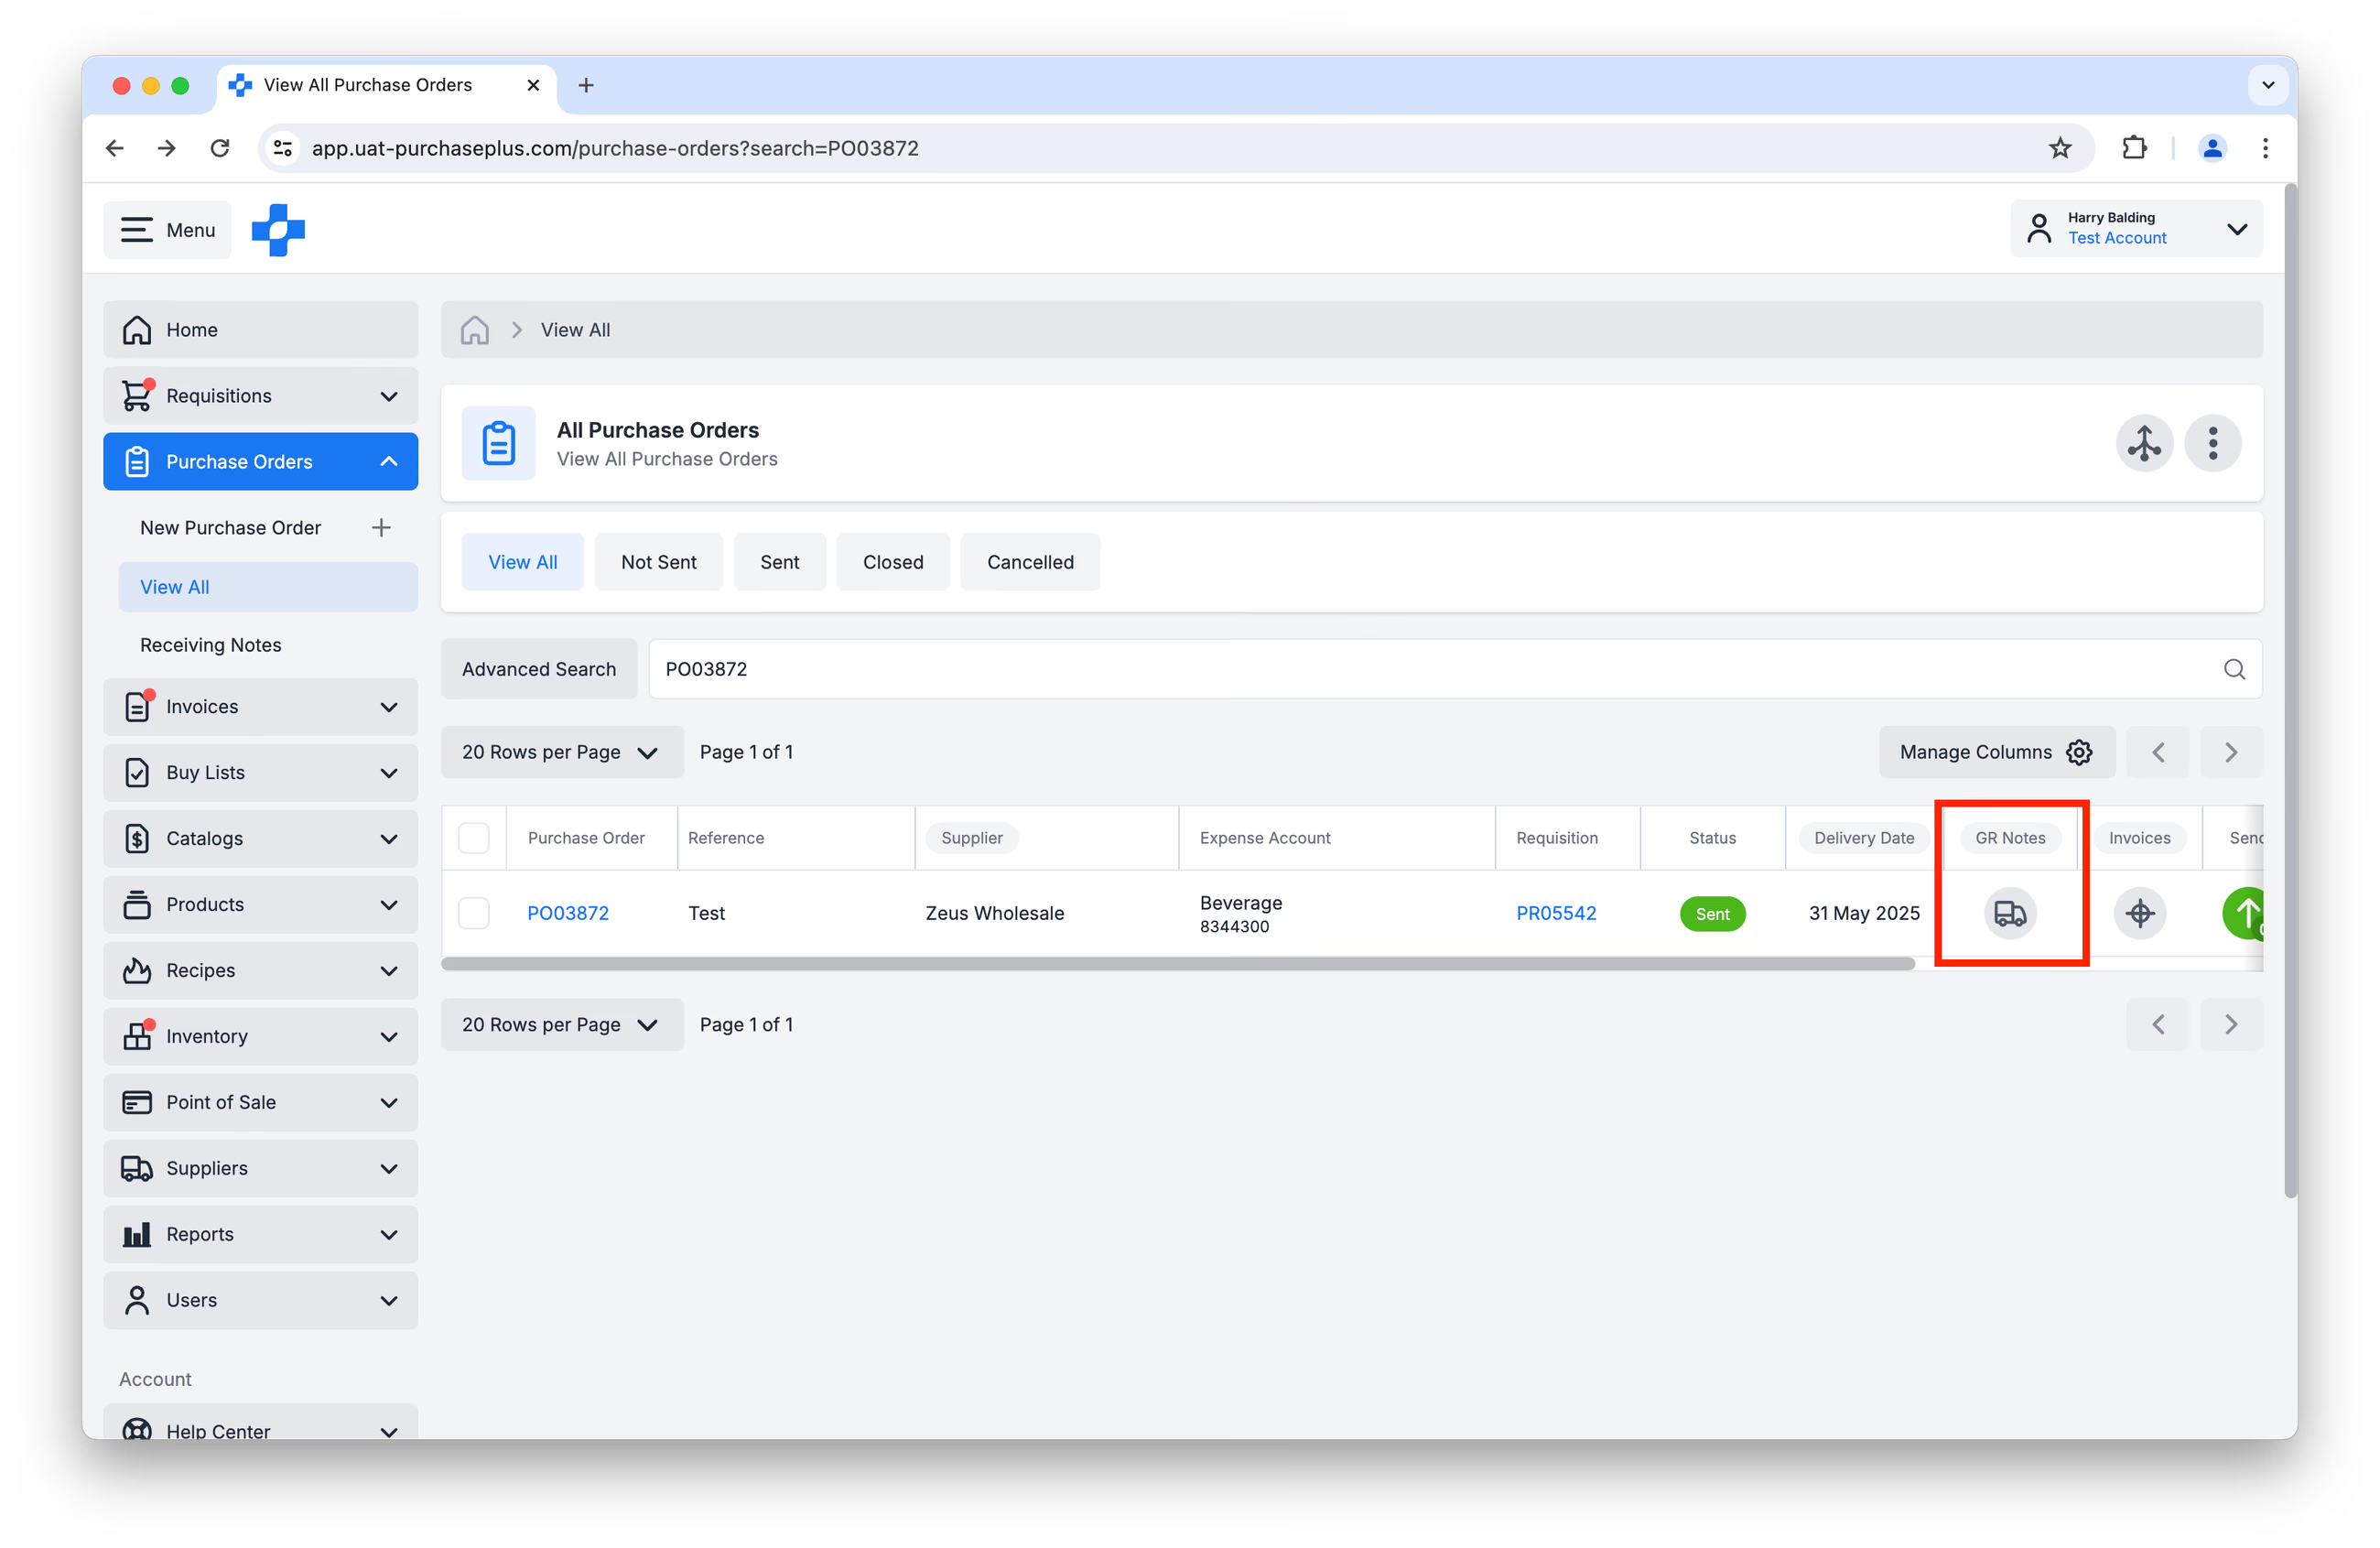
Step 1: Navigate to [Purchase Orders] → [View All], from the side navigation bar. Click the [Truck] icon in the GR Note column, to create a Receiving Note against the Purchase Order:
Step 2: Select [Receive to Inventory]:
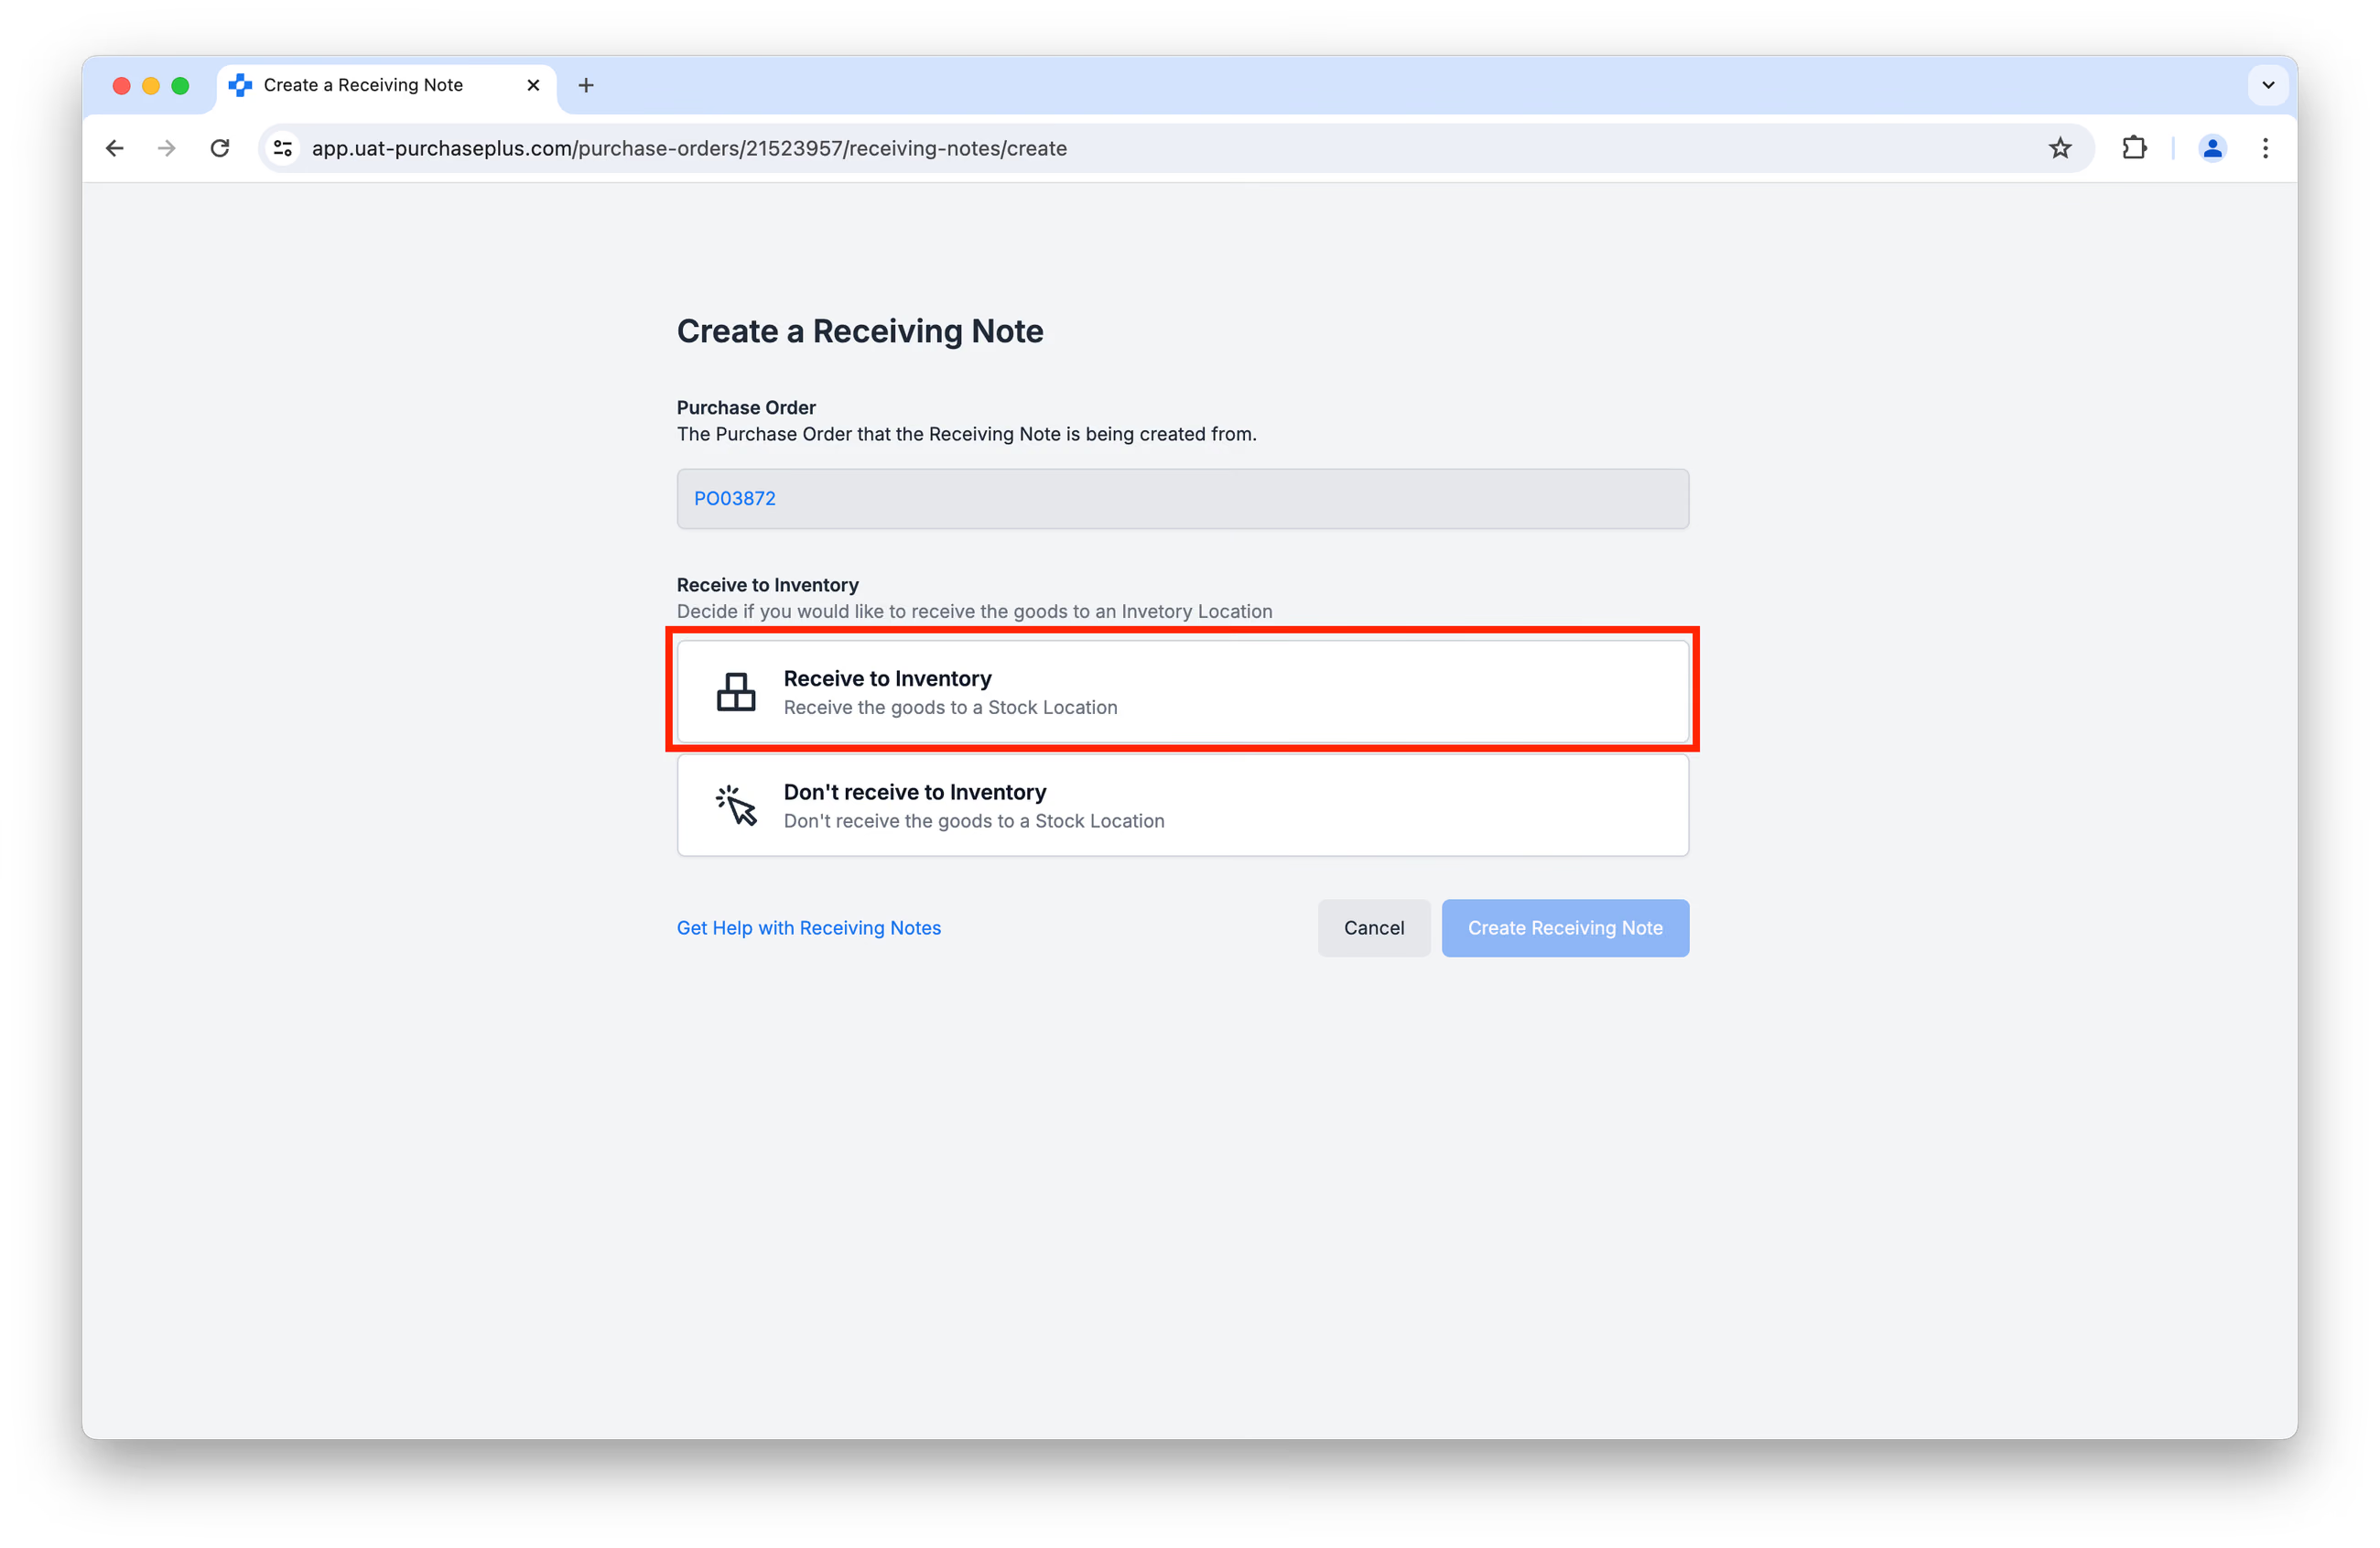
...and complete the fields that appear:
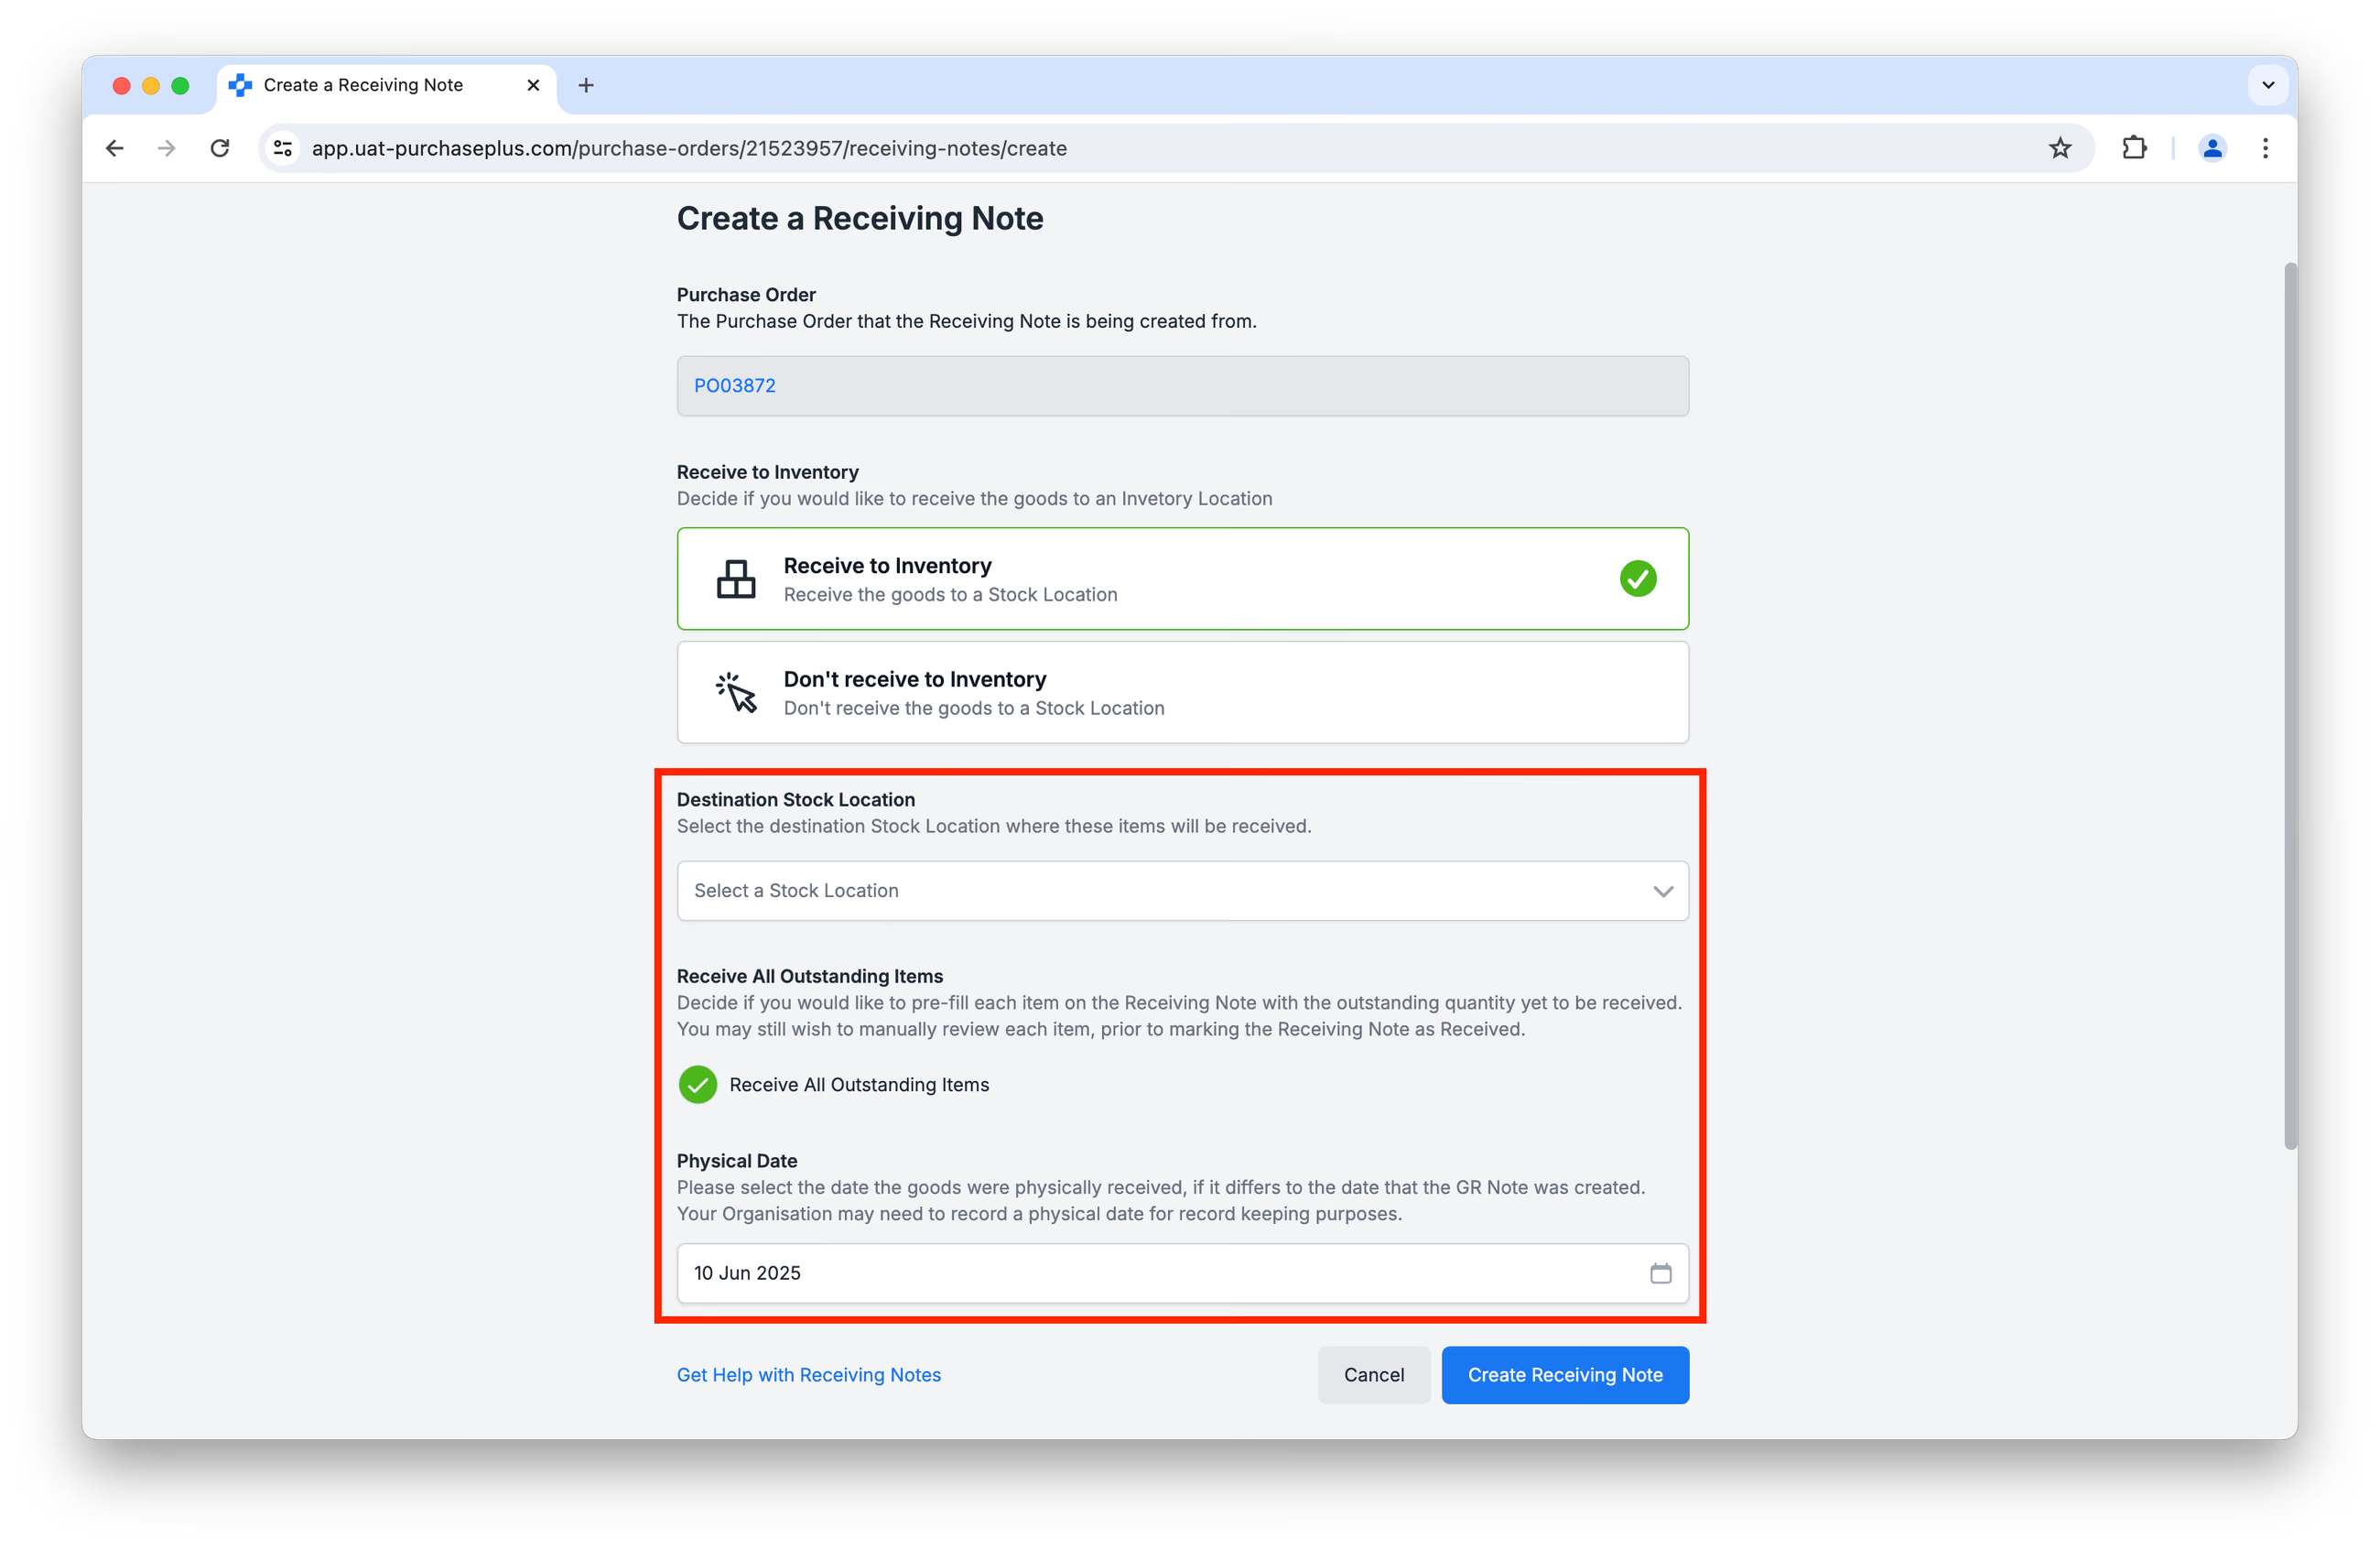
- 'Destination Stock Location' is the Location where the Stock Items will be incremented. The list includes Stock Locations and Expense Locations. Stock Locations are listed first (A–Z), then Expense Locations (A–Z).
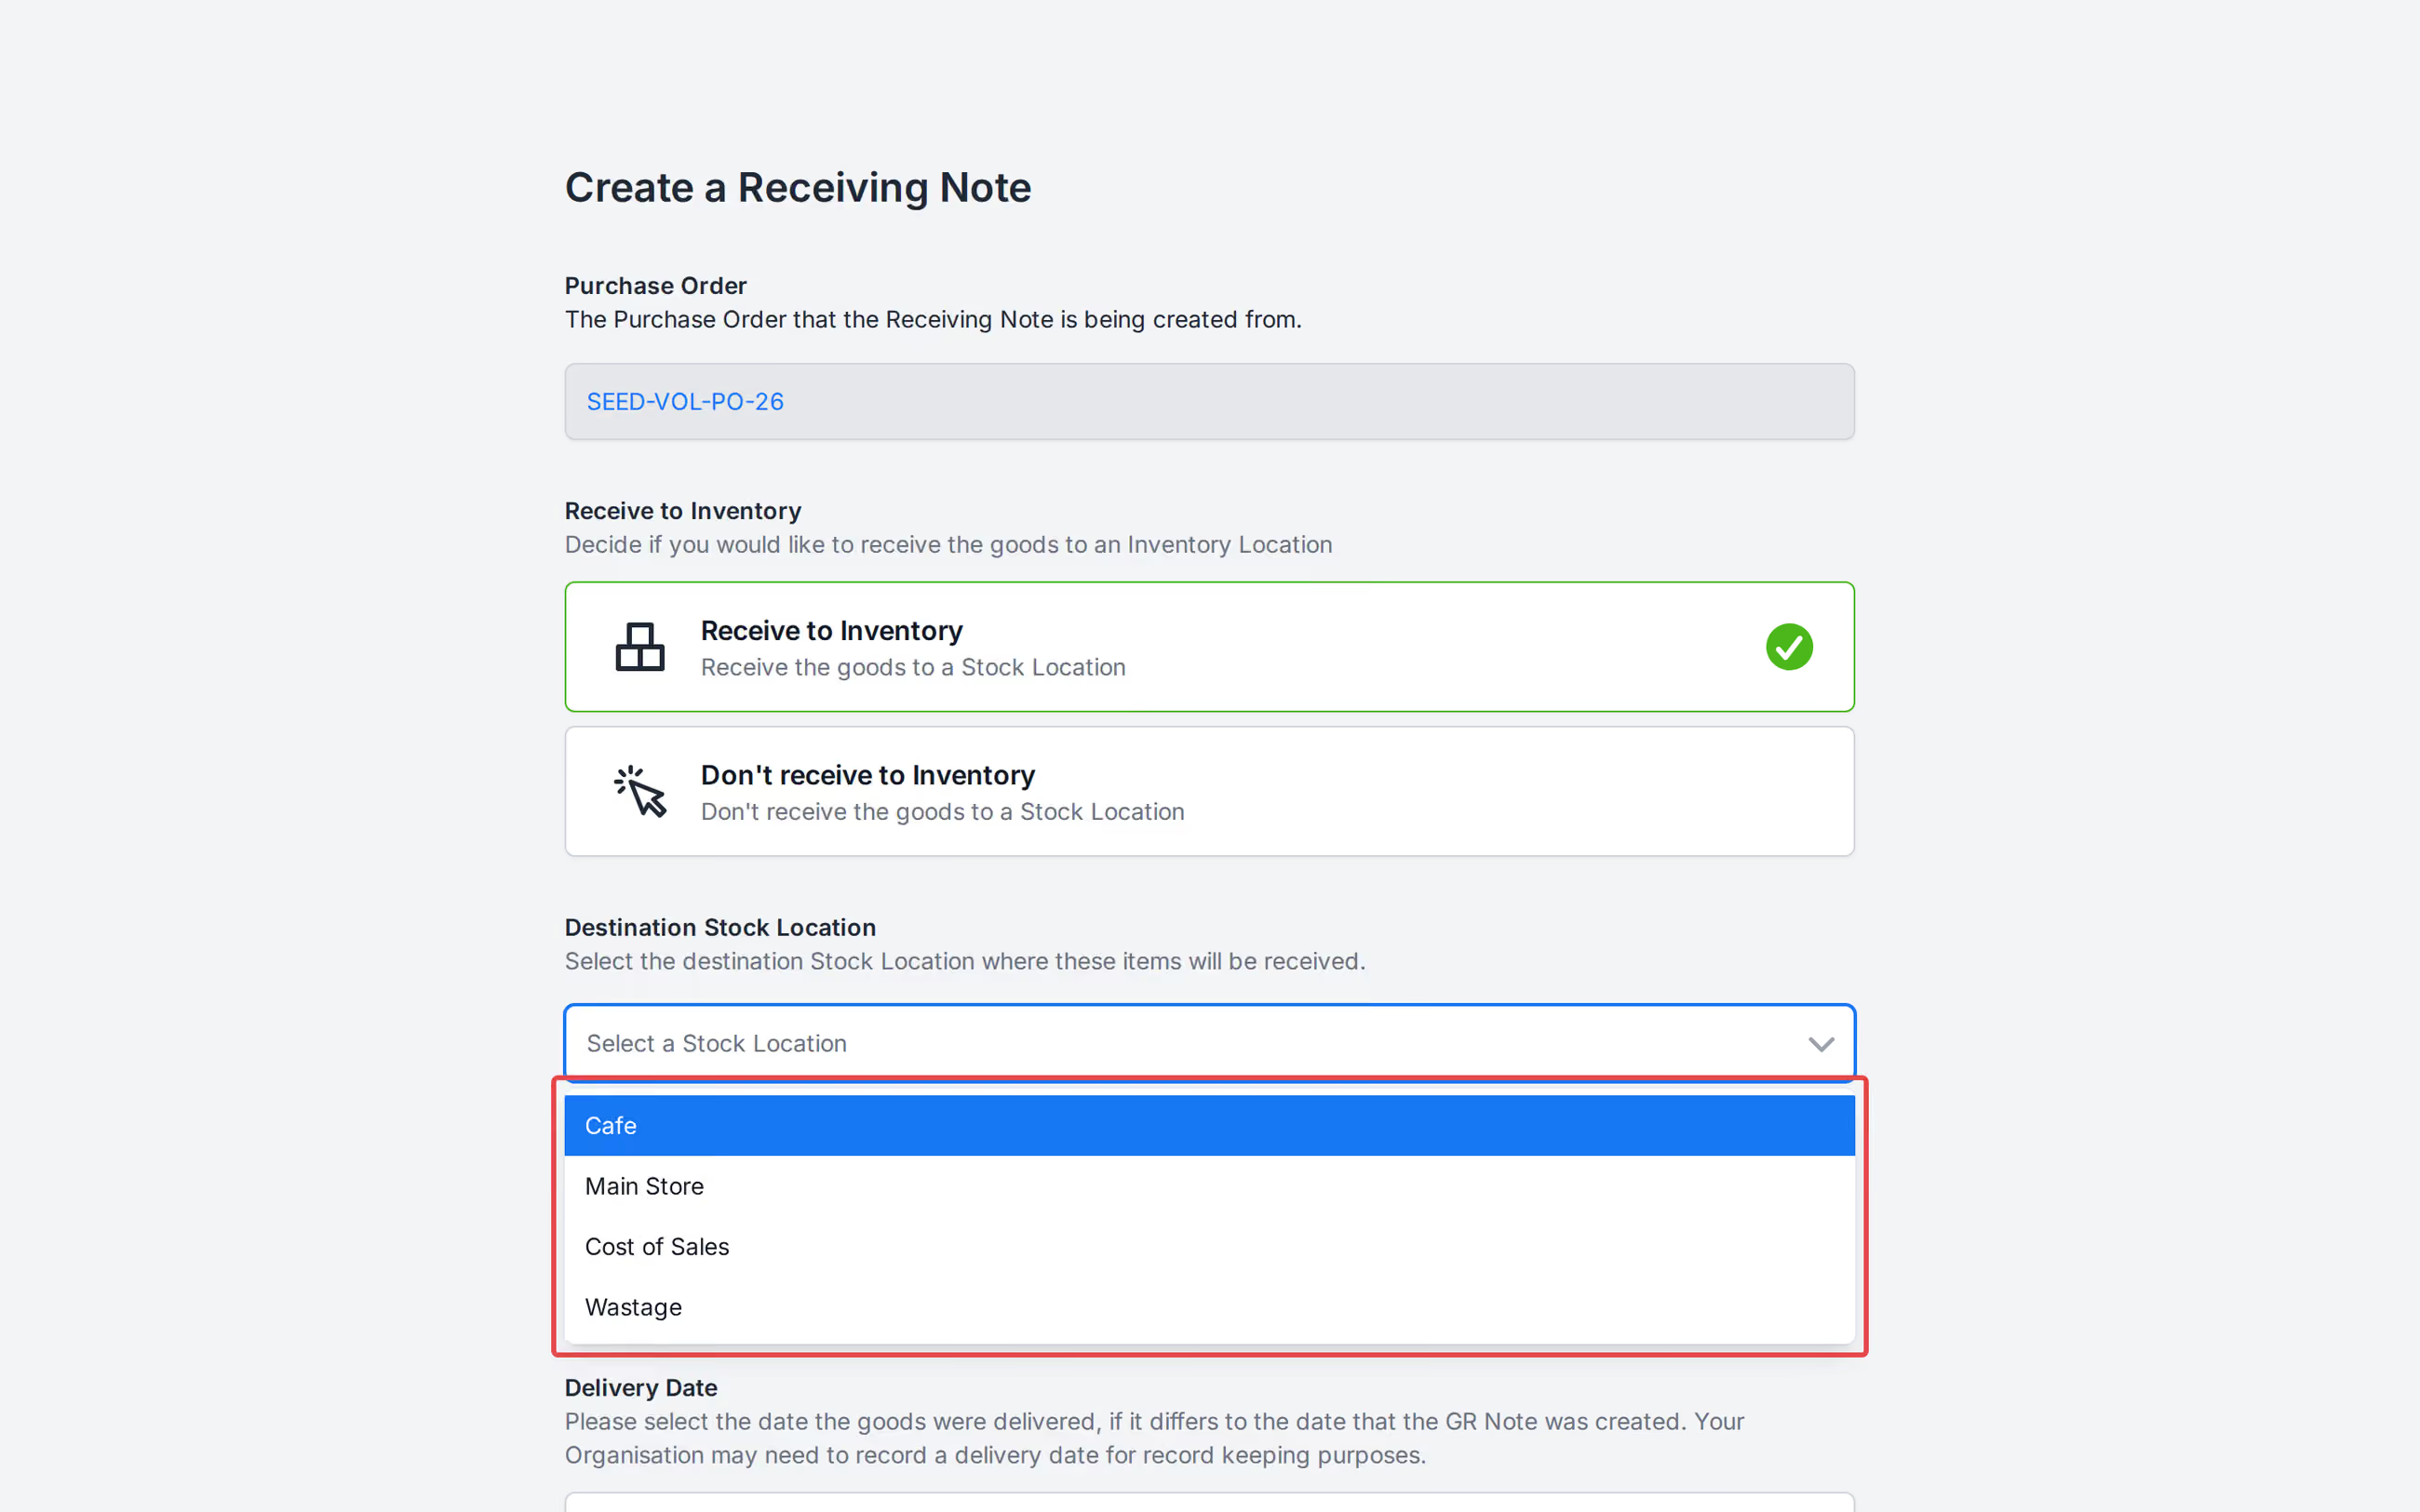
Note - Stocktake, Requisition, and Point of Sale pickers stay Stock Location only.
- 'Receive All Outstanding Items' means that each item on the Receiving Note will be pre-filled with the outstanding quantity yet to be received. You may still wish to manually review each item, prior to completing the Receiving Note.
- 'Delivery Date' means the date that the Goods were physically received, as this can often be different to the creation date of the Receiving Note.
Once you have completed these three fields, click [Create Receiving Note].
Step 3: The resulting page is a Draft Receiving Note. We recommend reviewing each Line on the Receiving Note carefully to ensure that both the Quantity of items you are receiving is correct, and the Stock Item that you are Receiving each item as is correct:
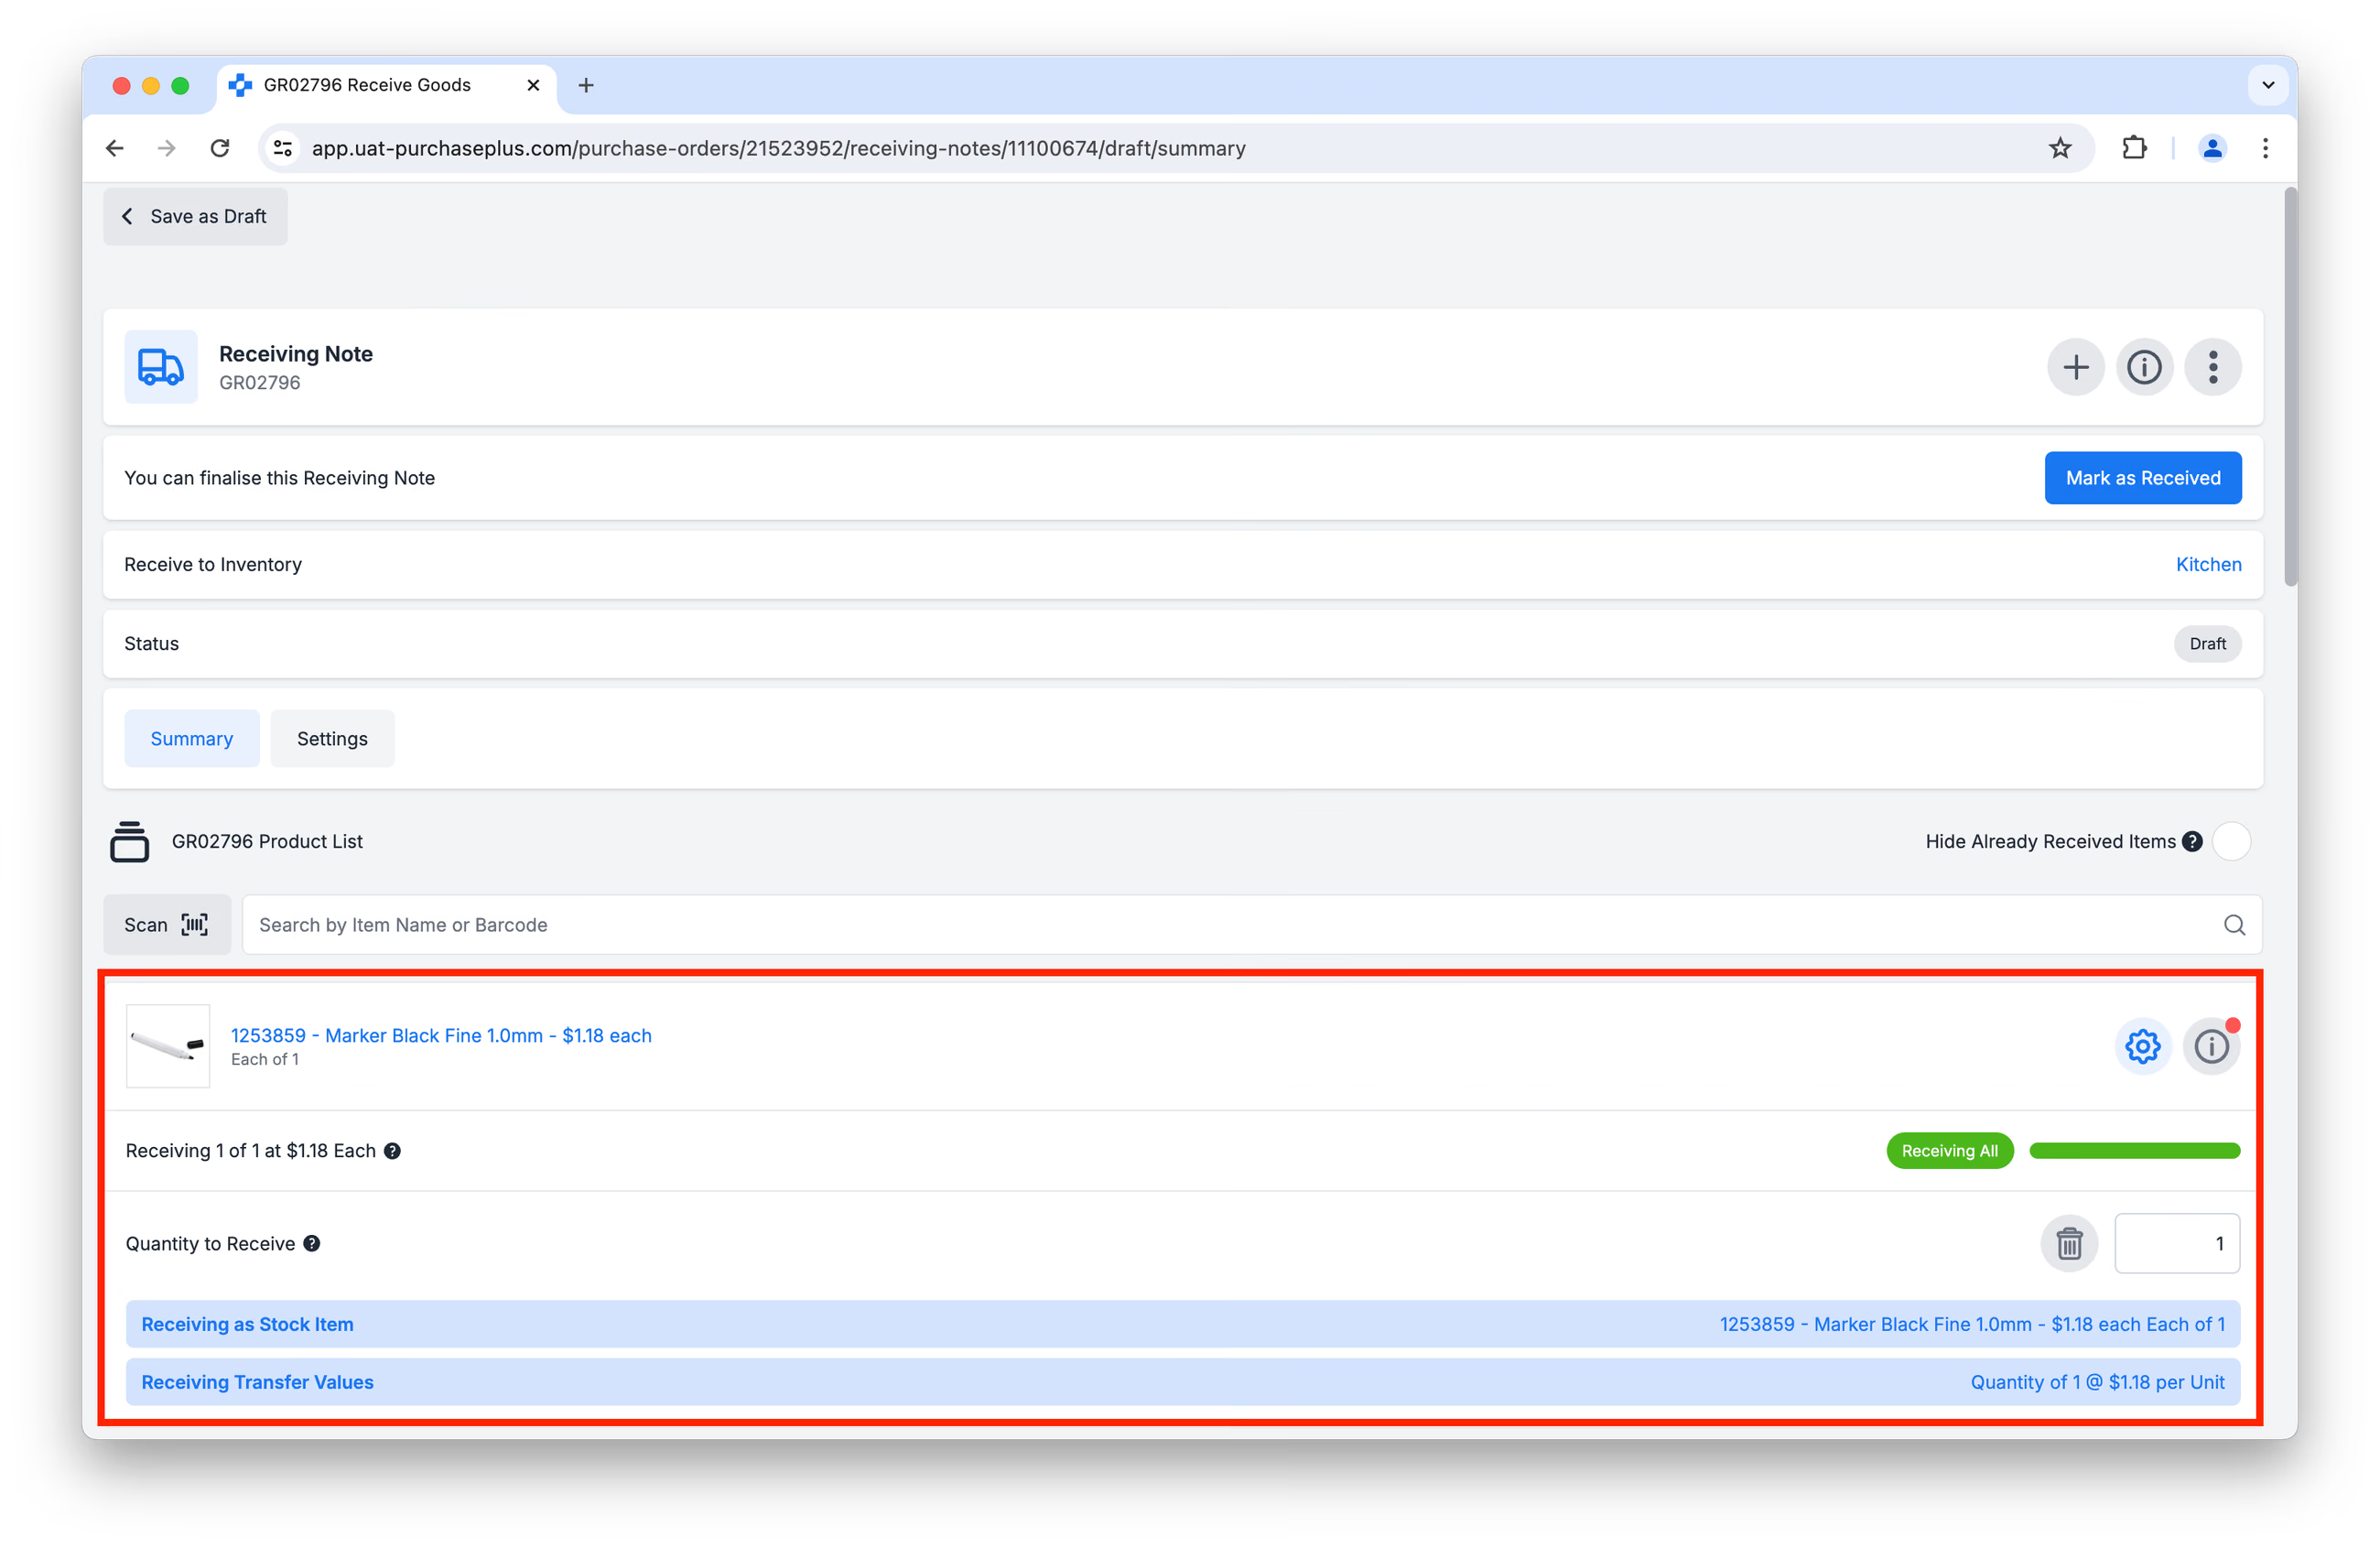
If you selected 'Receive All Outstanding Items' in Step 2 above, you may need to amend the Quantity of Items to Receive in the event that you were over- or under-delivered.
If you need to select a different Stock Item than the one that PurchasePlus selected automatically, first click the [Advanced Options] button on the Line in question (see image below). Note: If this is the first time you have received this Stock Item, you will need to Create a New Stock Item first.
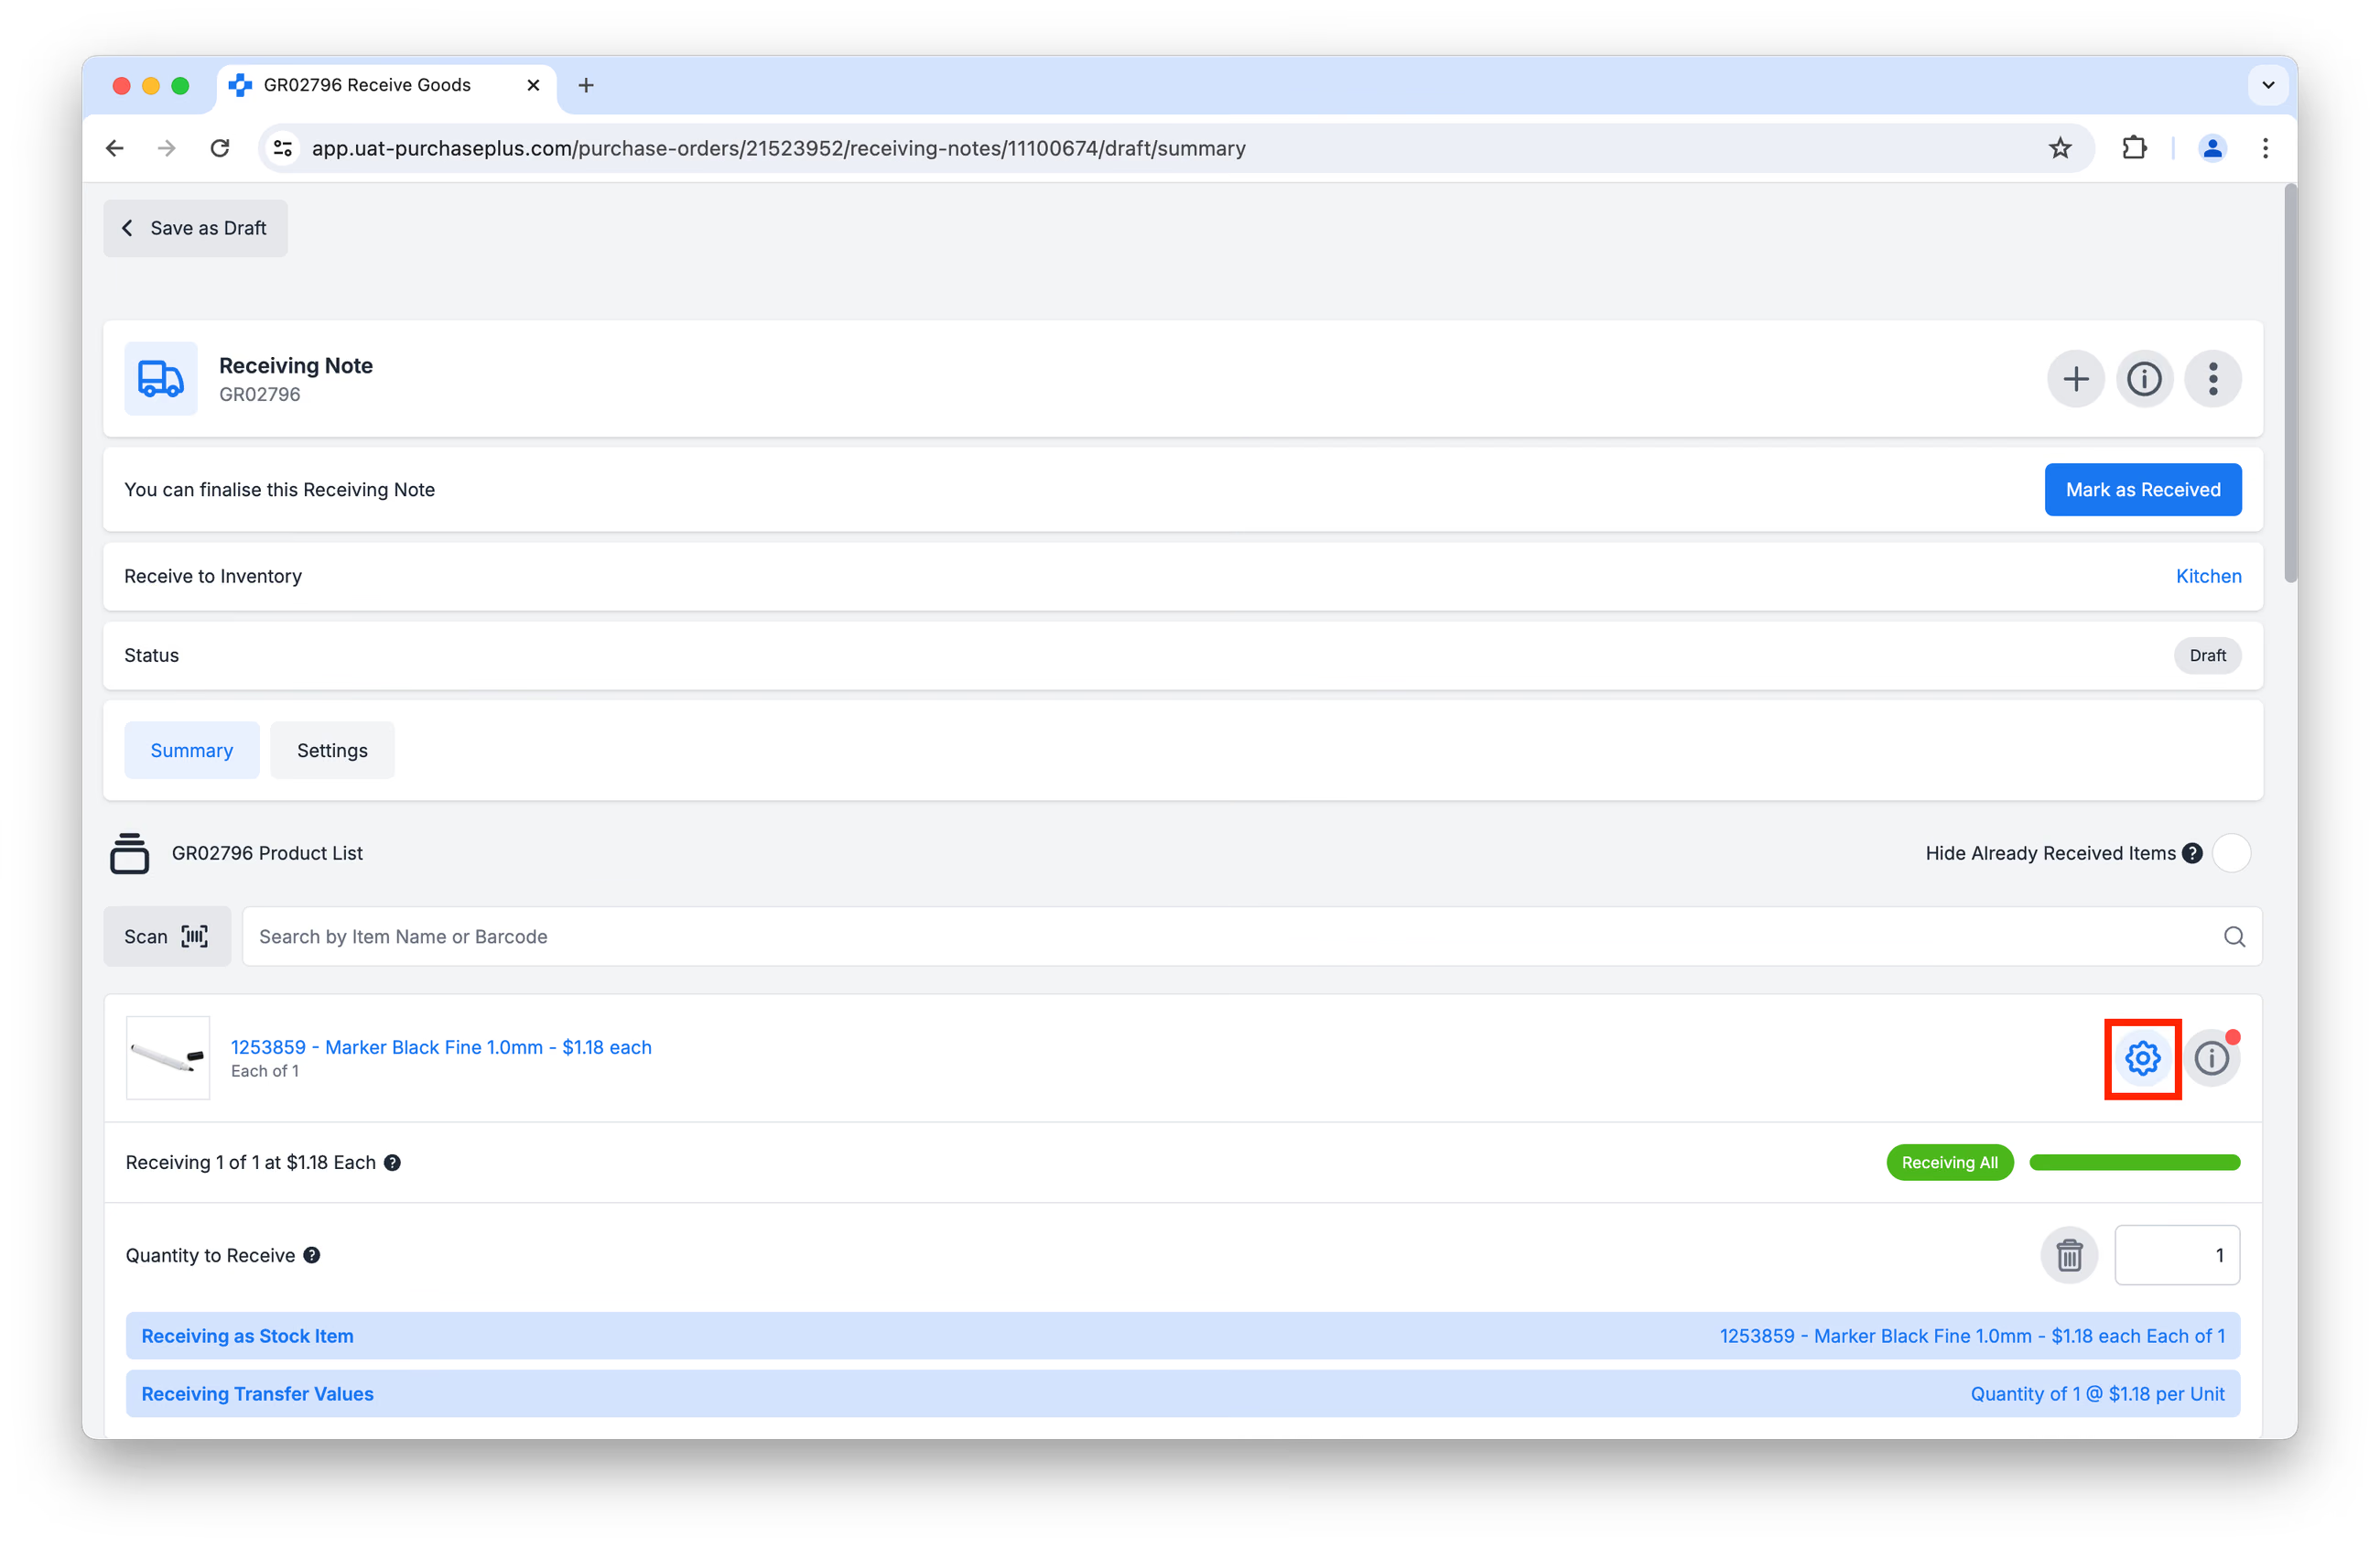
Then, click on the Trash icon to clear the selection:
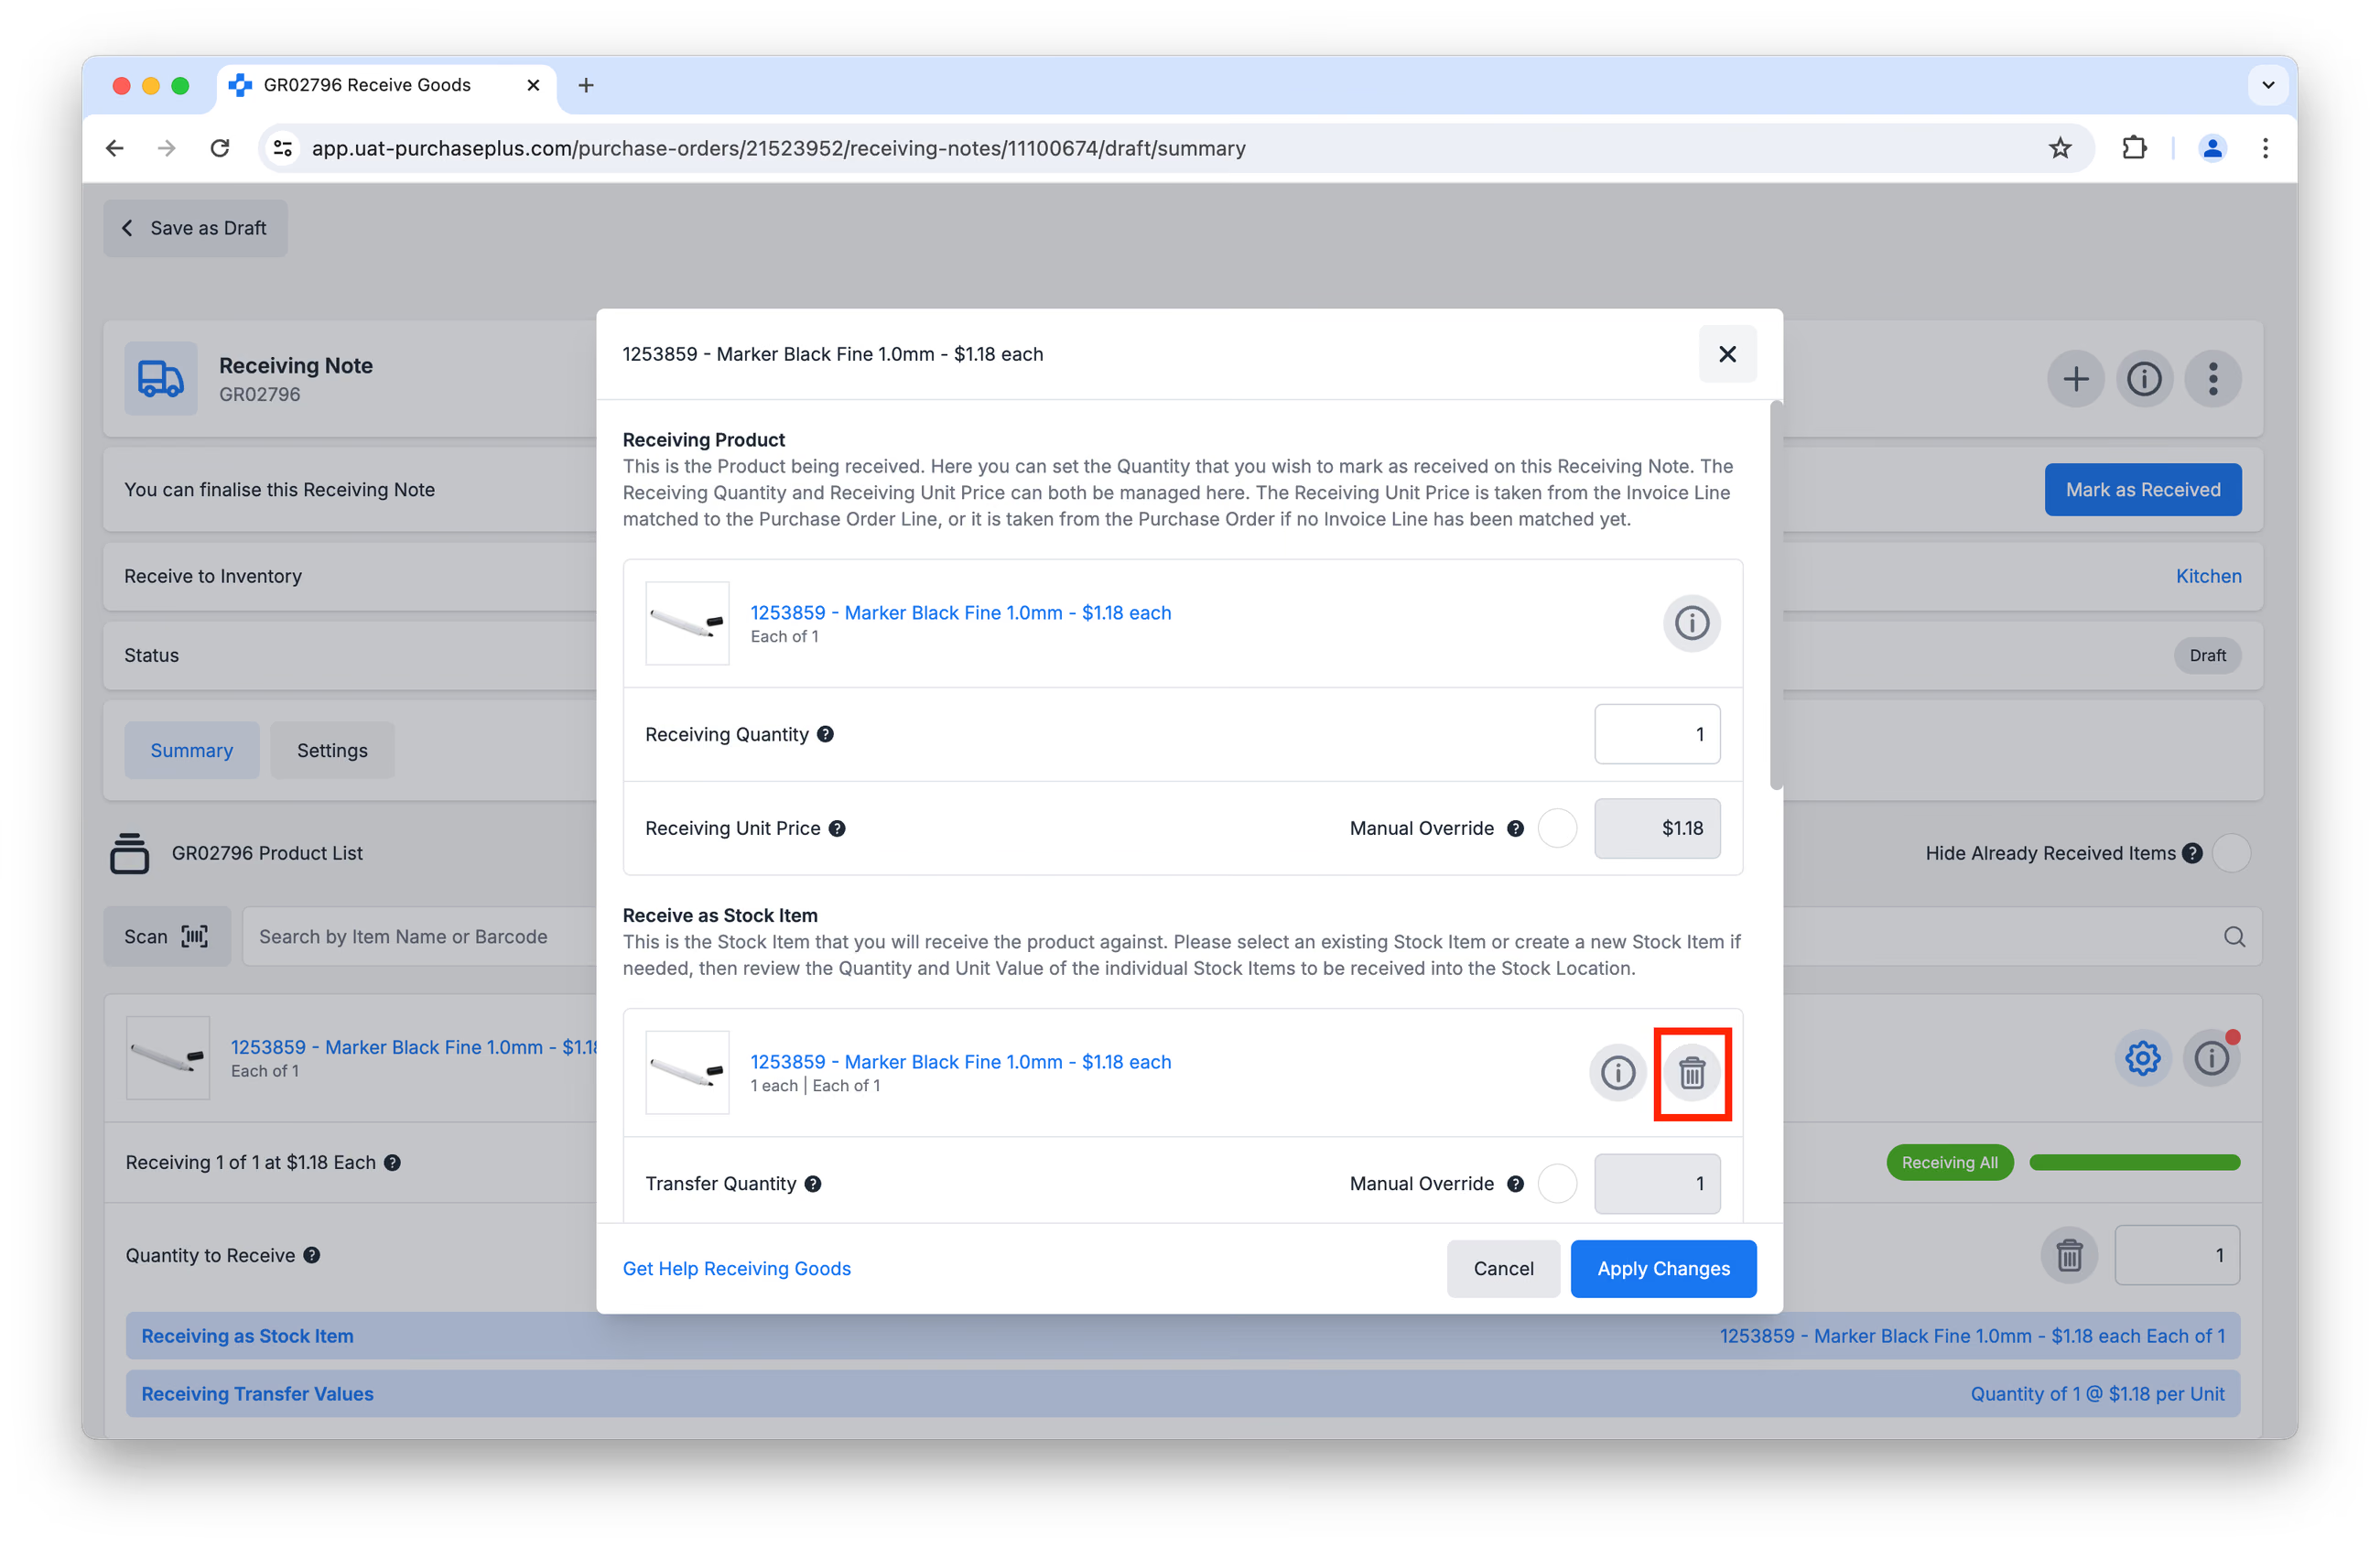
Finally, you will be prompted to select from a Suggested Items list or Search for a specific Stock Item:
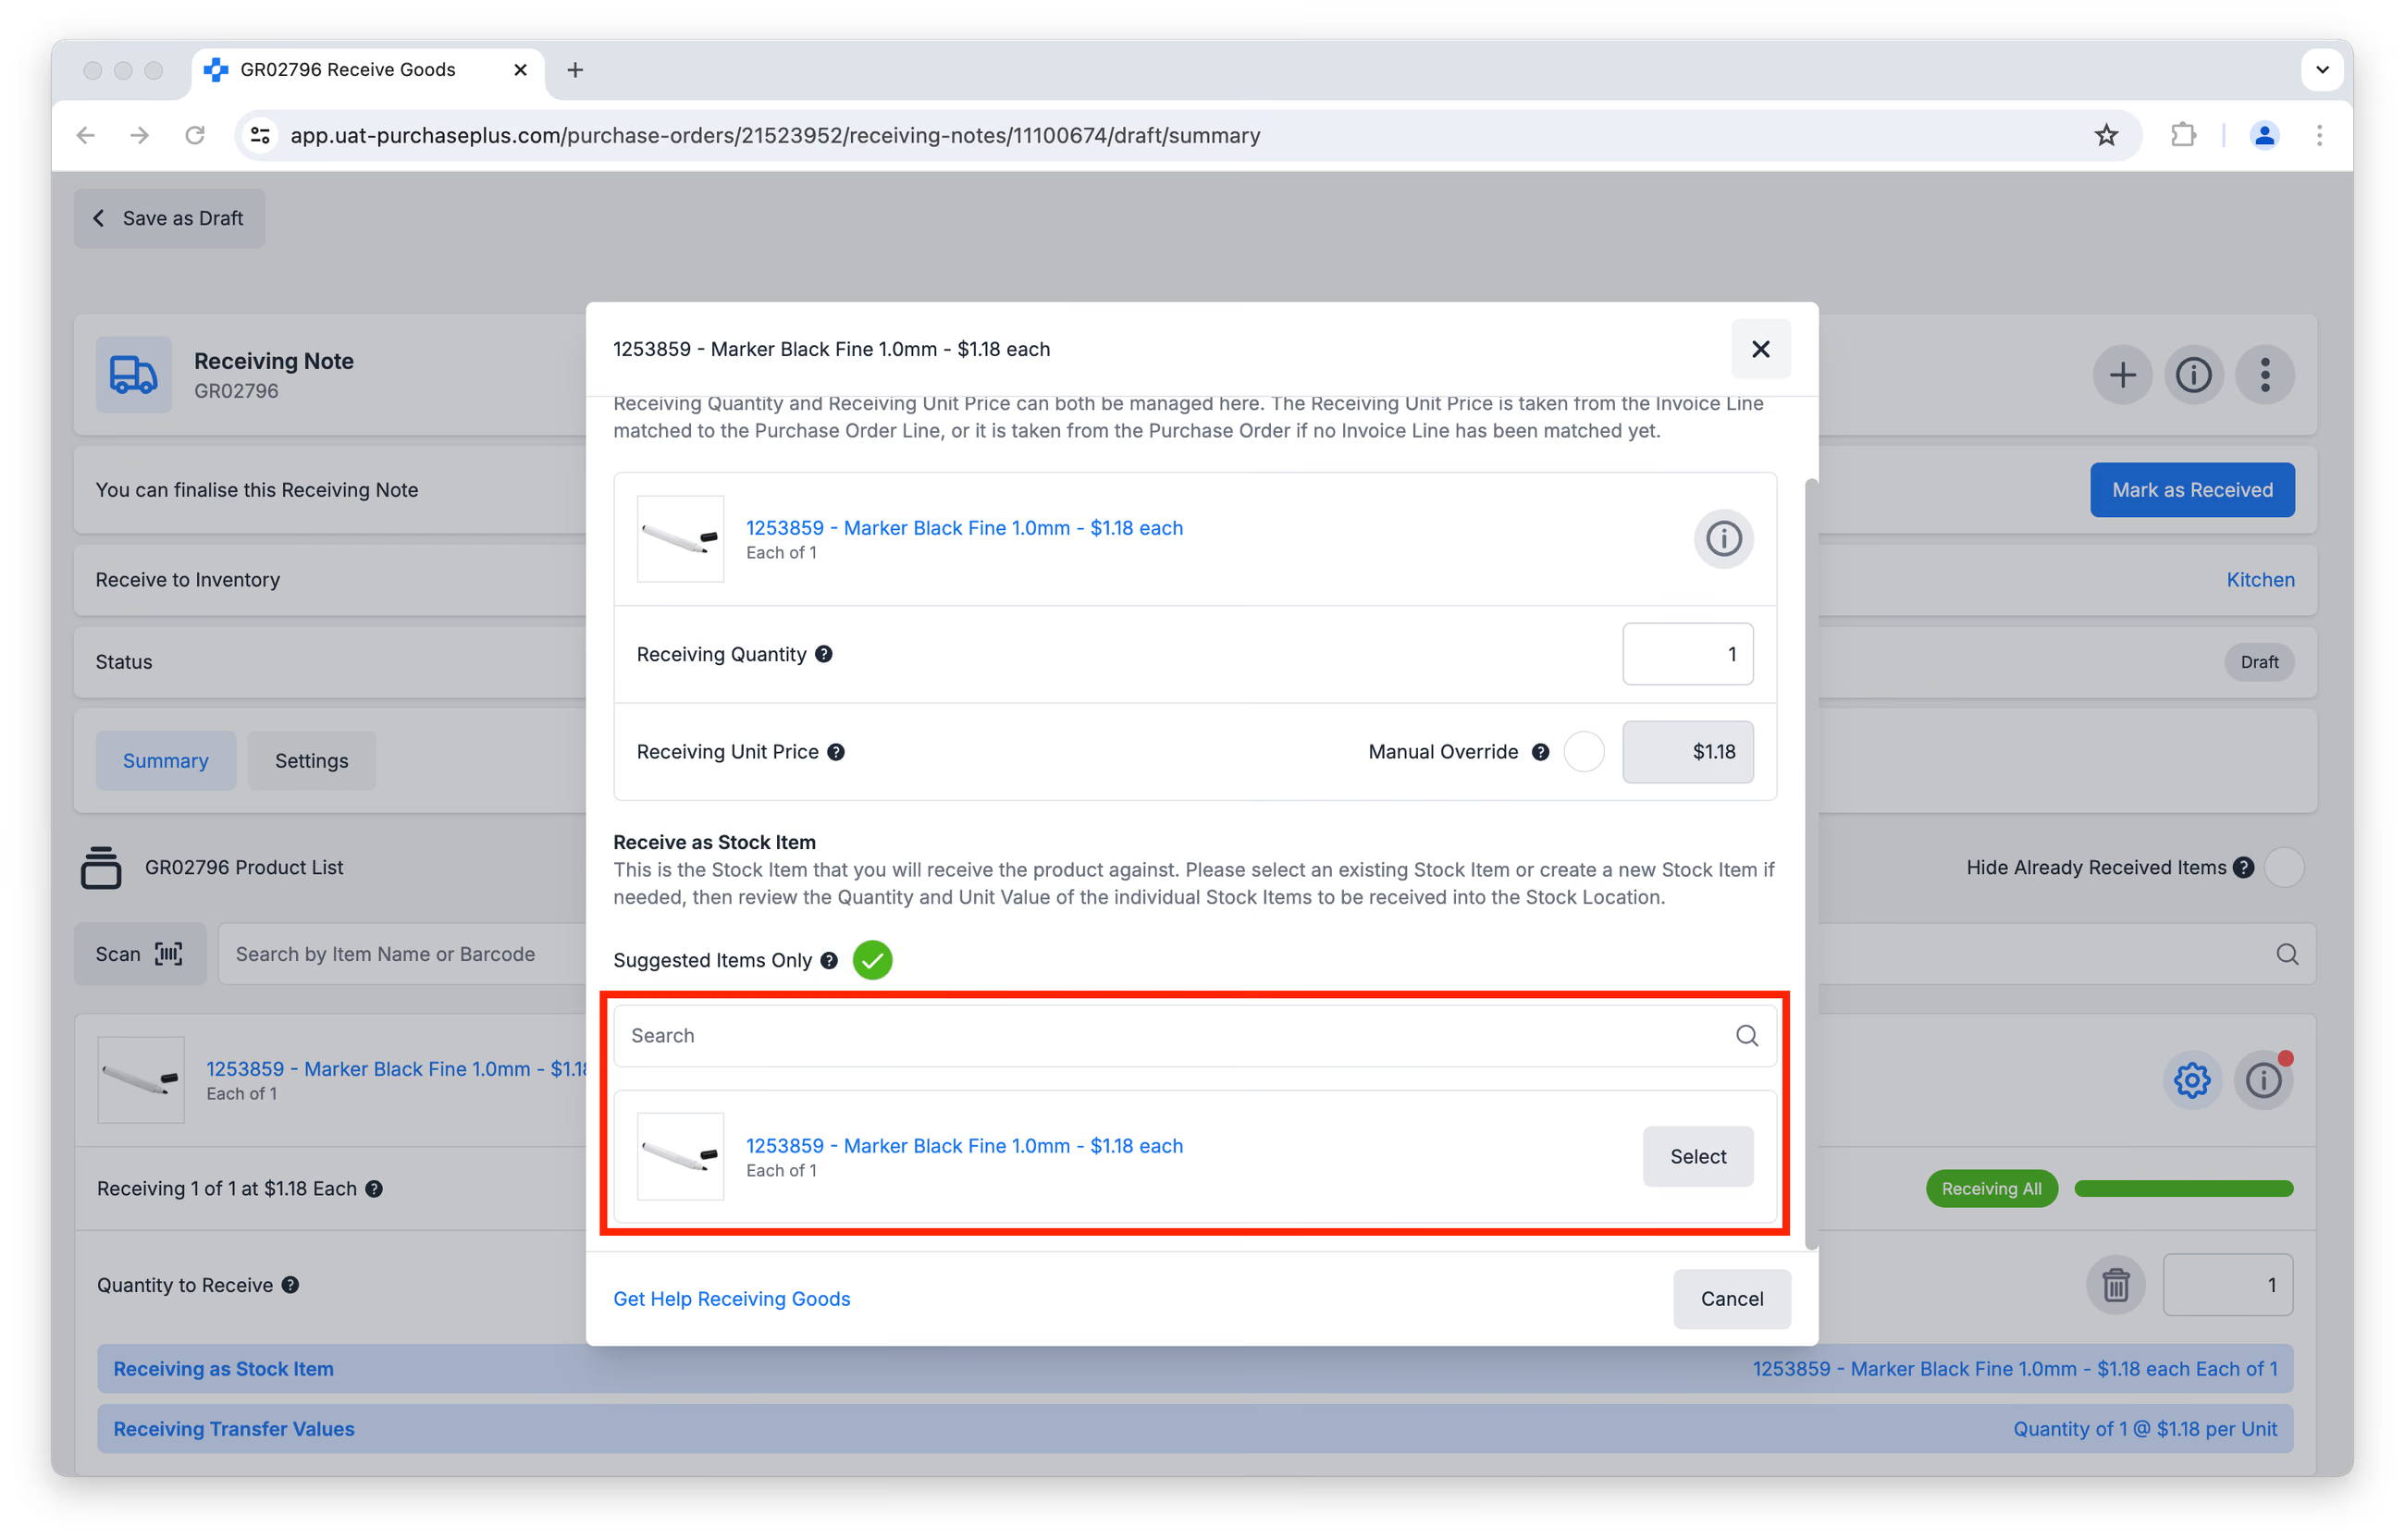
Click [Apply Changes].
Step 4: Click [Mark as Received] to finalised the Receiving Note. The identified Stock Items will be incremented by the Receiving Quantity in the target Stock Location via a Stock Receipt Transfer.
Please note: When a Stock Location has an In Progress Stocktake, Stock Receipts Transfers into Inventory are not completed automatically. Rather, users must locate the Stock Receipt Transfer and manually [Mark as Complete] when they are ready to do so.
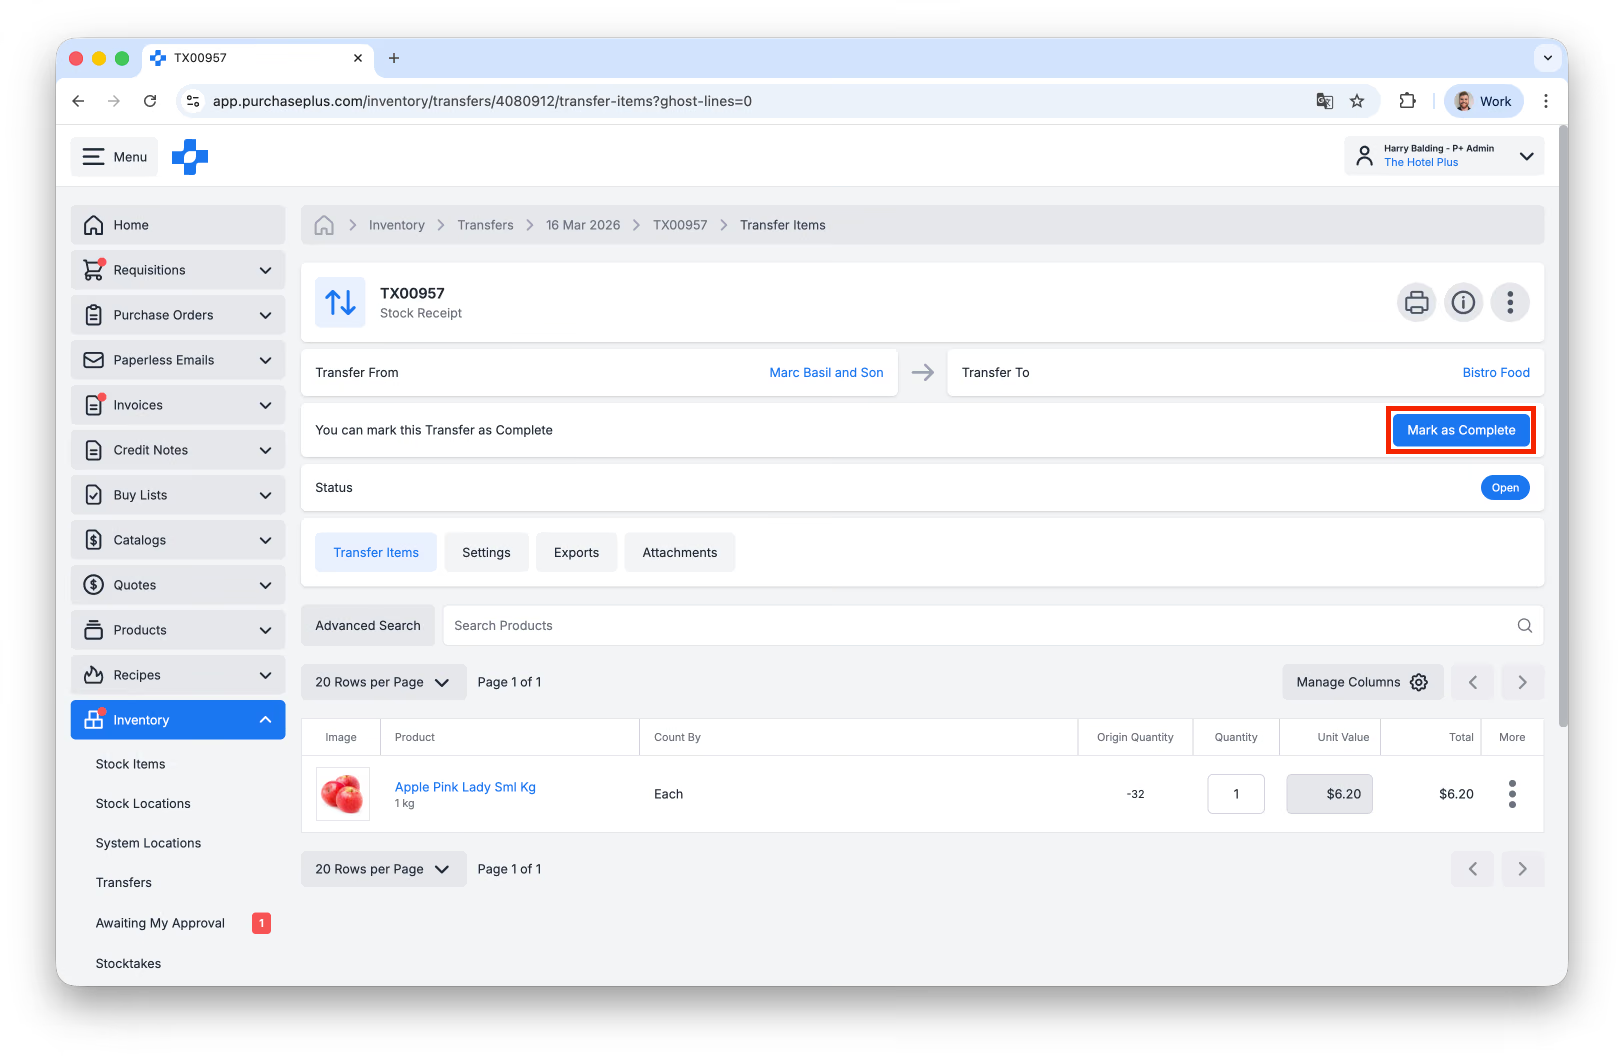
Once the Stocktake is Complete, Stock Receipts into Inventory are automatic again.
Returning Stock to a Supplier
Once Stock has been Received to Inventory, its Stock Level can only be adjusted with Transfers.
In the scenario where Stock needs to be returned to a Supplier, please follow these steps.
First, create a new Transfer of the type 'Stock Adjustment', make the Origin Location the Stock Location in which the stock was originally received, and make the Destination Location the Supplier that the Stock is returning to:
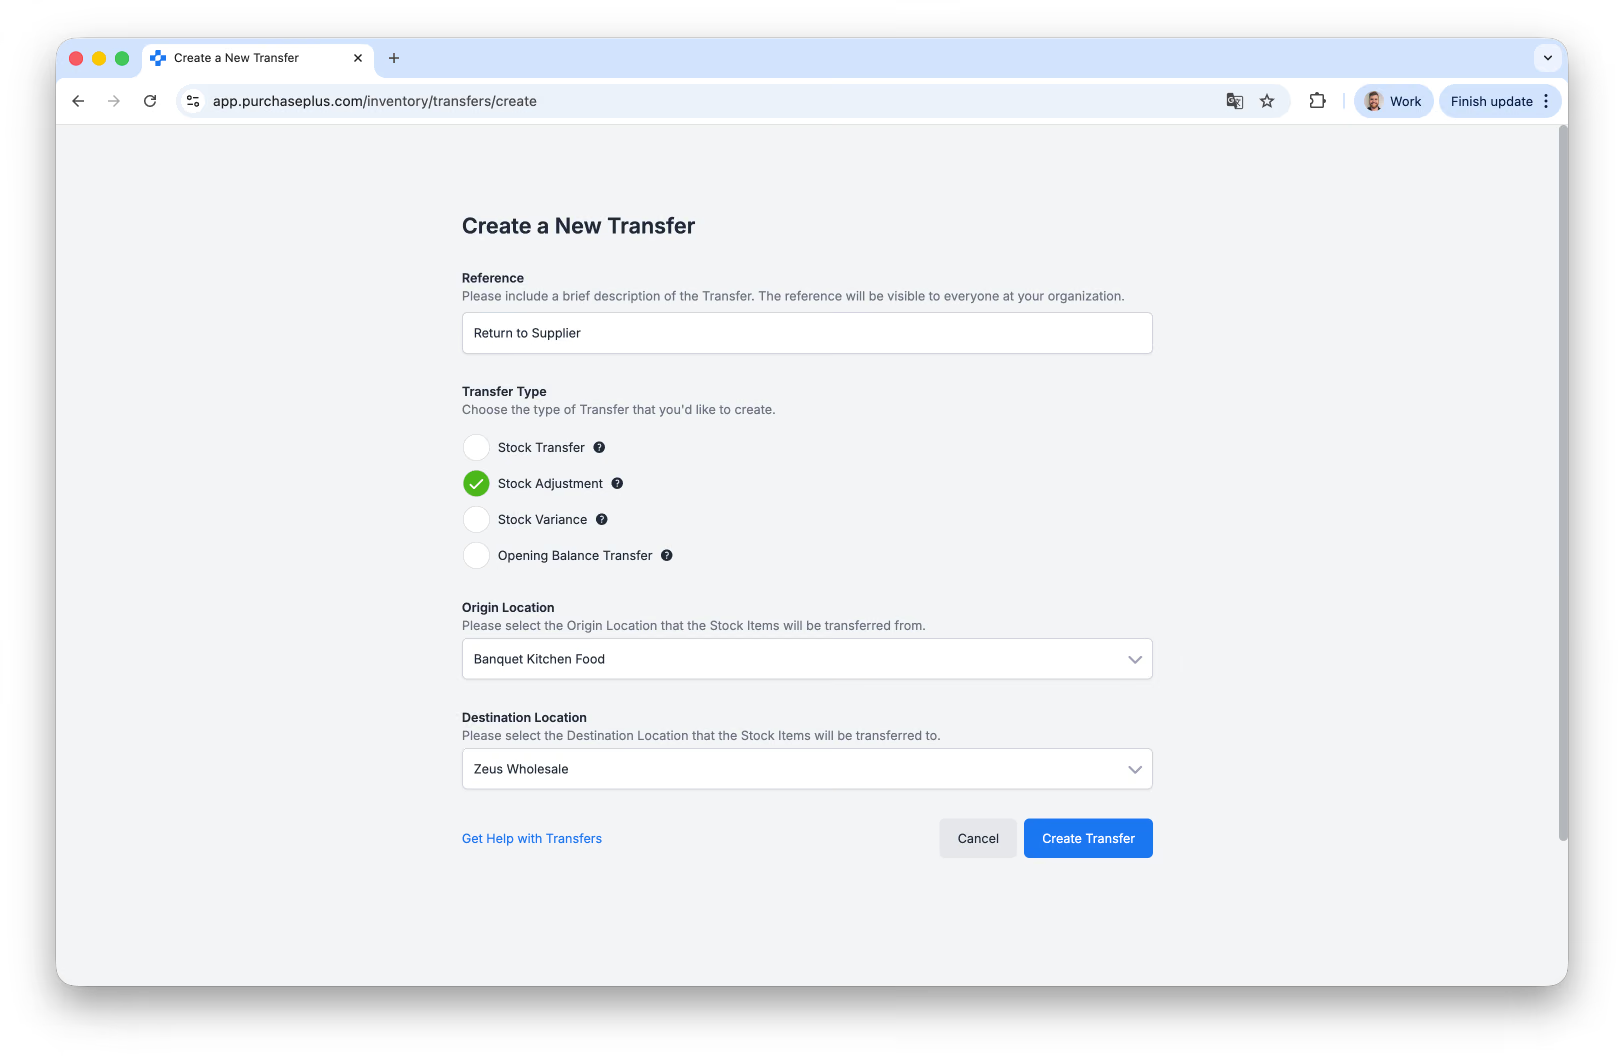
Then, search for the Stock Items to be returned to the Supplier. Specify the Quantity to be returned, and then repeat for each Stock Item being returned. You can use the [[Hide Zero Quantity Items]](/docs/for-purchasers/introduction-to-inventory-transfers#HideZeroQuantity) filter to make reviewing the Transfer easier.
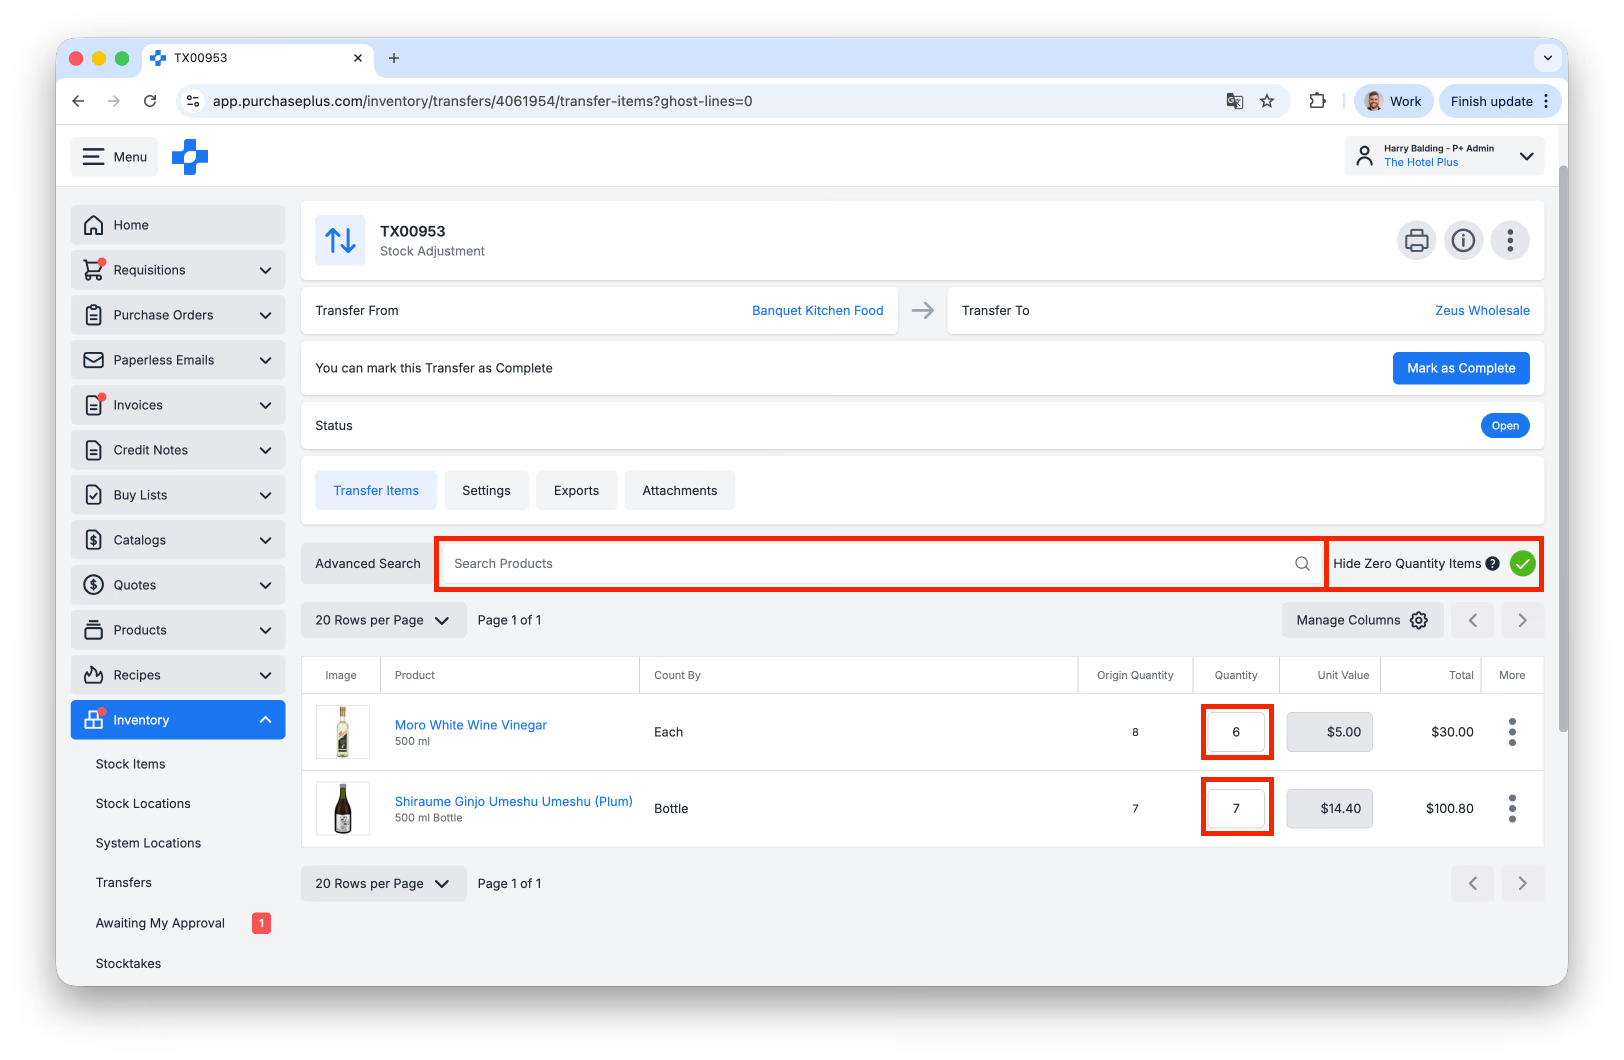
Once you have added all of the Stock Items and Quantities to the Transfer, you can submit the Transfer for Approval, or [Mark as Complete] (depending on your user permissions):
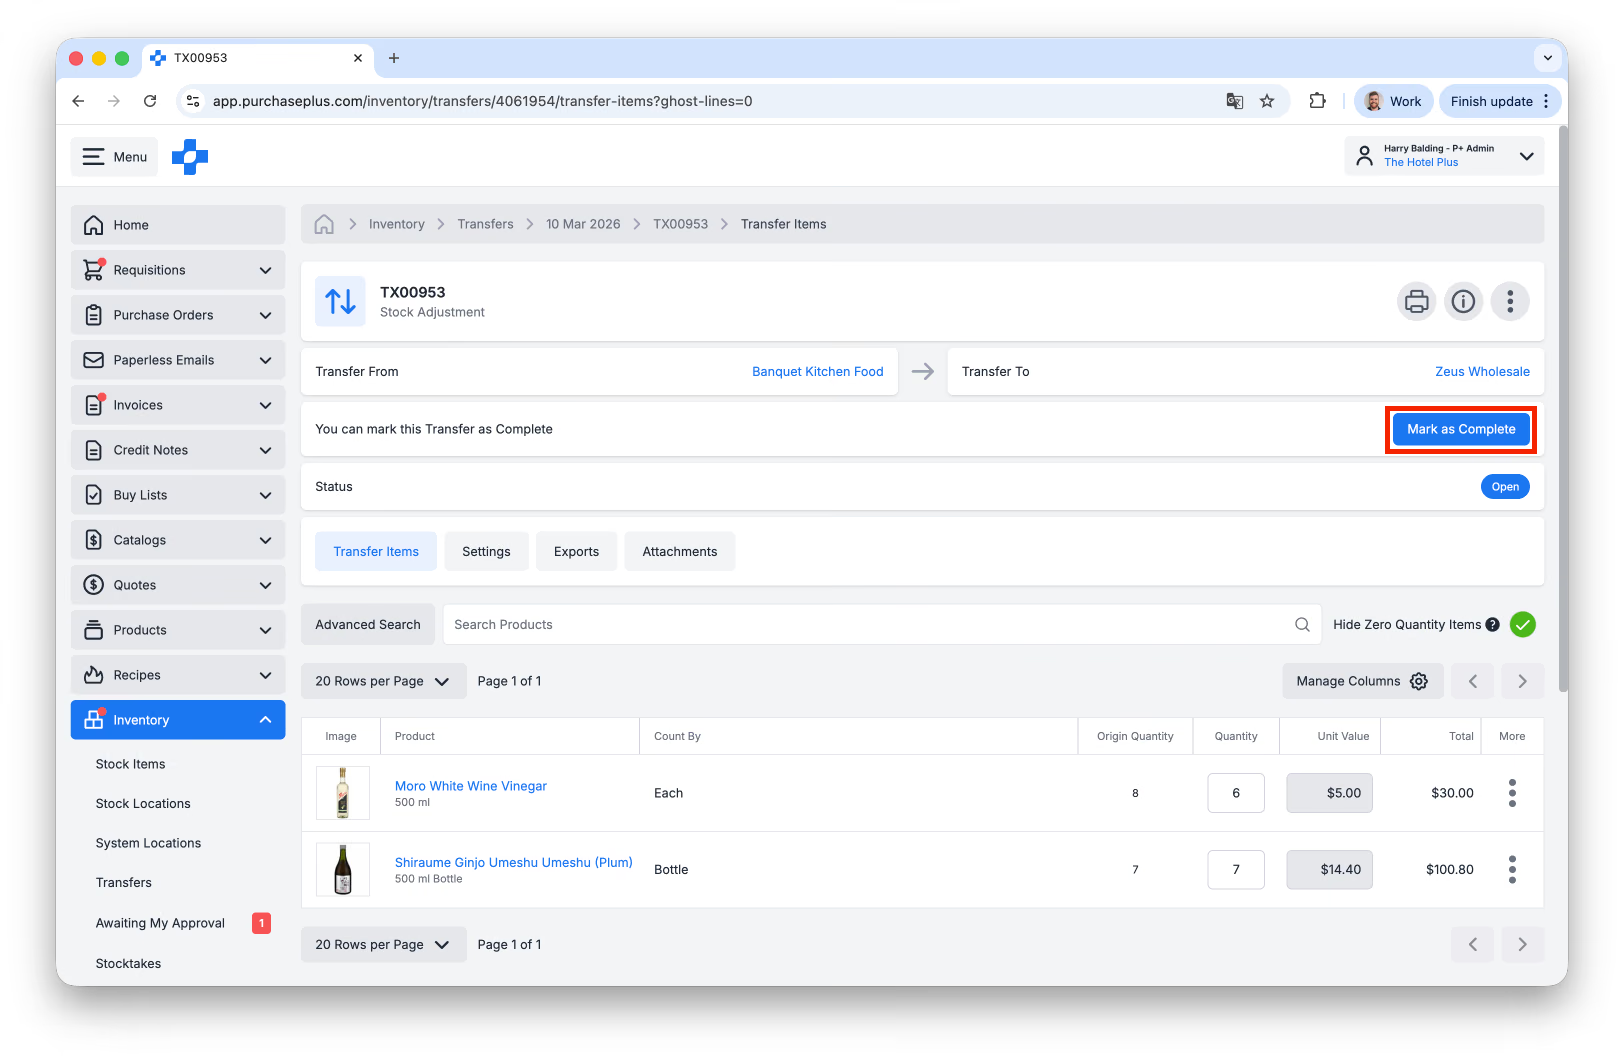
Once the Transfer is Marked as Complete, the Stock Levels will be adjusted correctly in PurchasePlus. However, communication with the Supplier and Courier (if required) will need to occur off-platform.