

Create Products
Create Products
PurchasePlus has a full-time team of Supplier specialists, many of whom have worked in Supplier businesses like yours. We know how important your customer relationships are, and our team's number one focus is to help you to be successful on our platform.
When you join PurchasePlus as a Supplier, one of the first jobs to be done is to populate your account with all the Products, Prices, and Catalogs that you would like to offer your customers on PurchasePlus.
There are two primary methods by which you can create new Products in PurchasePlus: populating in the New Product Template (spreadsheet) and sending it to us so we can create the Products in Bulk, or Creating Products one-by-one by yourself in the UI.
Creating New Products in Bulk
The most effective way to create multiple products is to use the New Product Template spreadsheet, which can be accessed and downloaded using this link.
Simply populate the template with your Product, Price and Catalog information, send it to us. Our friendly Catalogs team will upload the Products to your account - matching them to our Master Catalog items where appropriate.
To request our Catalog Team create new Products and add them to your account on your behalf, please follow these steps:
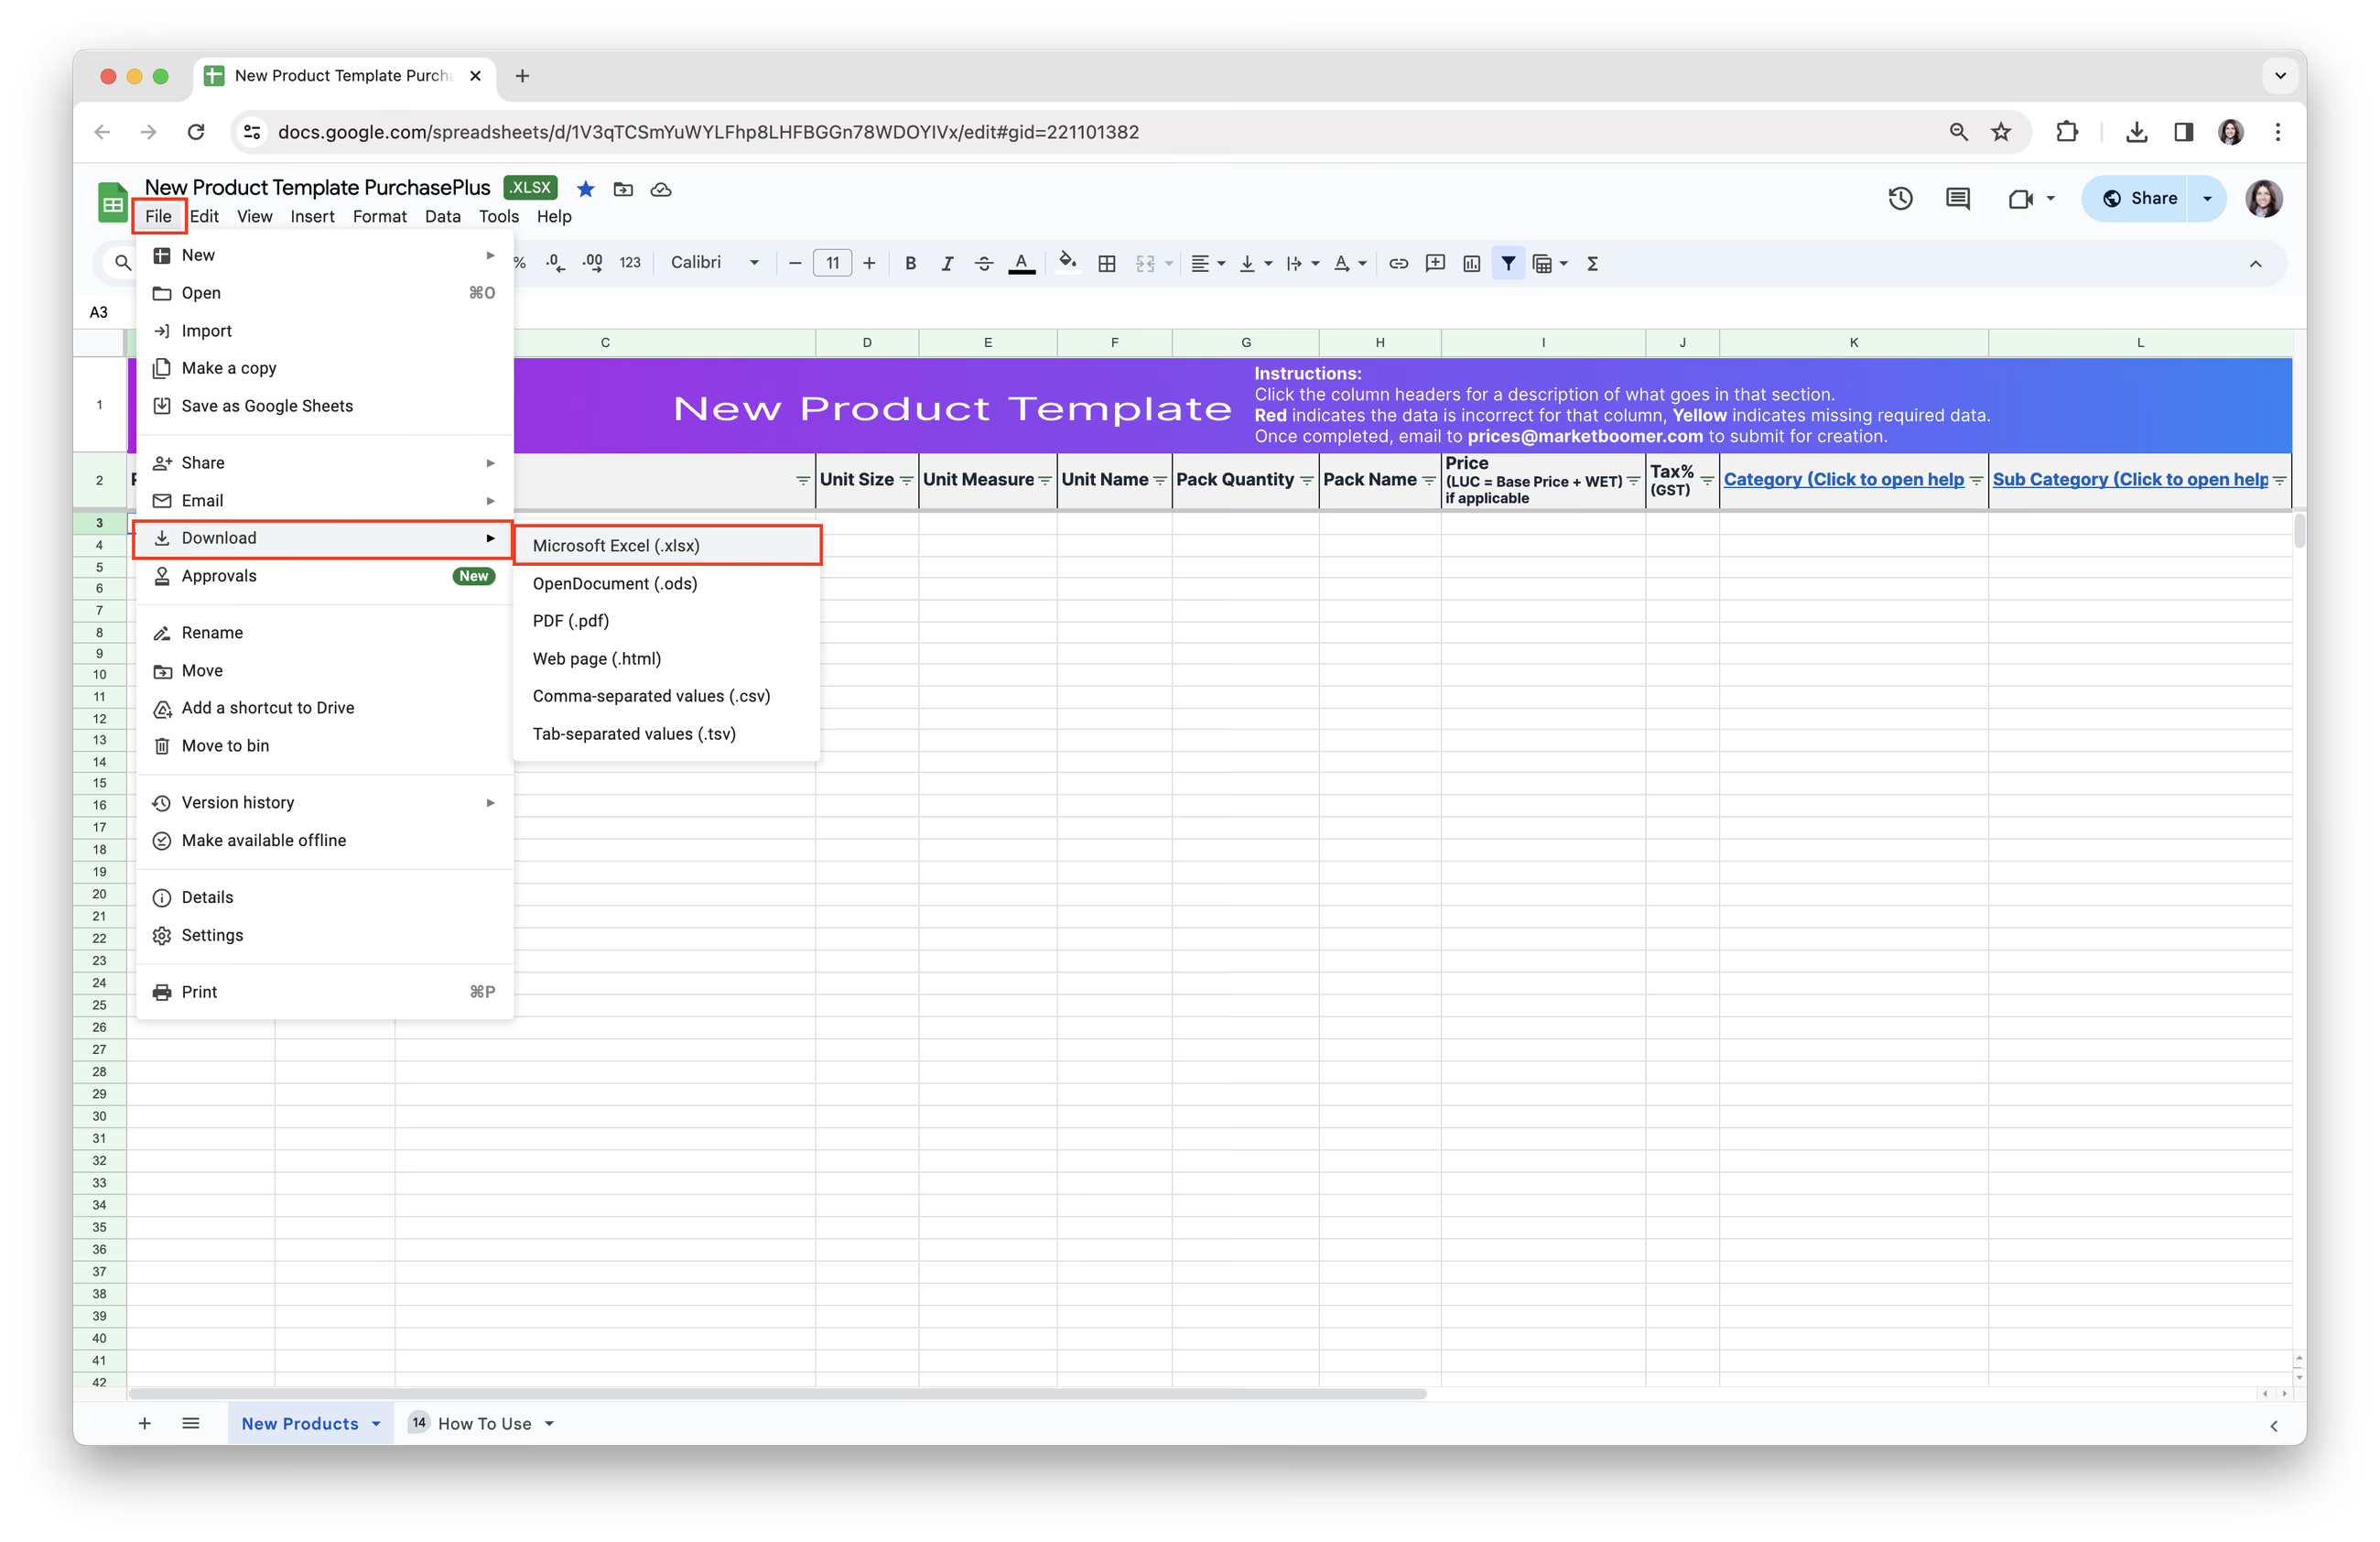
Step 1. Download the New Product Template. Click [File] → [Download] → select [Microsoft Excel (xlsx)].
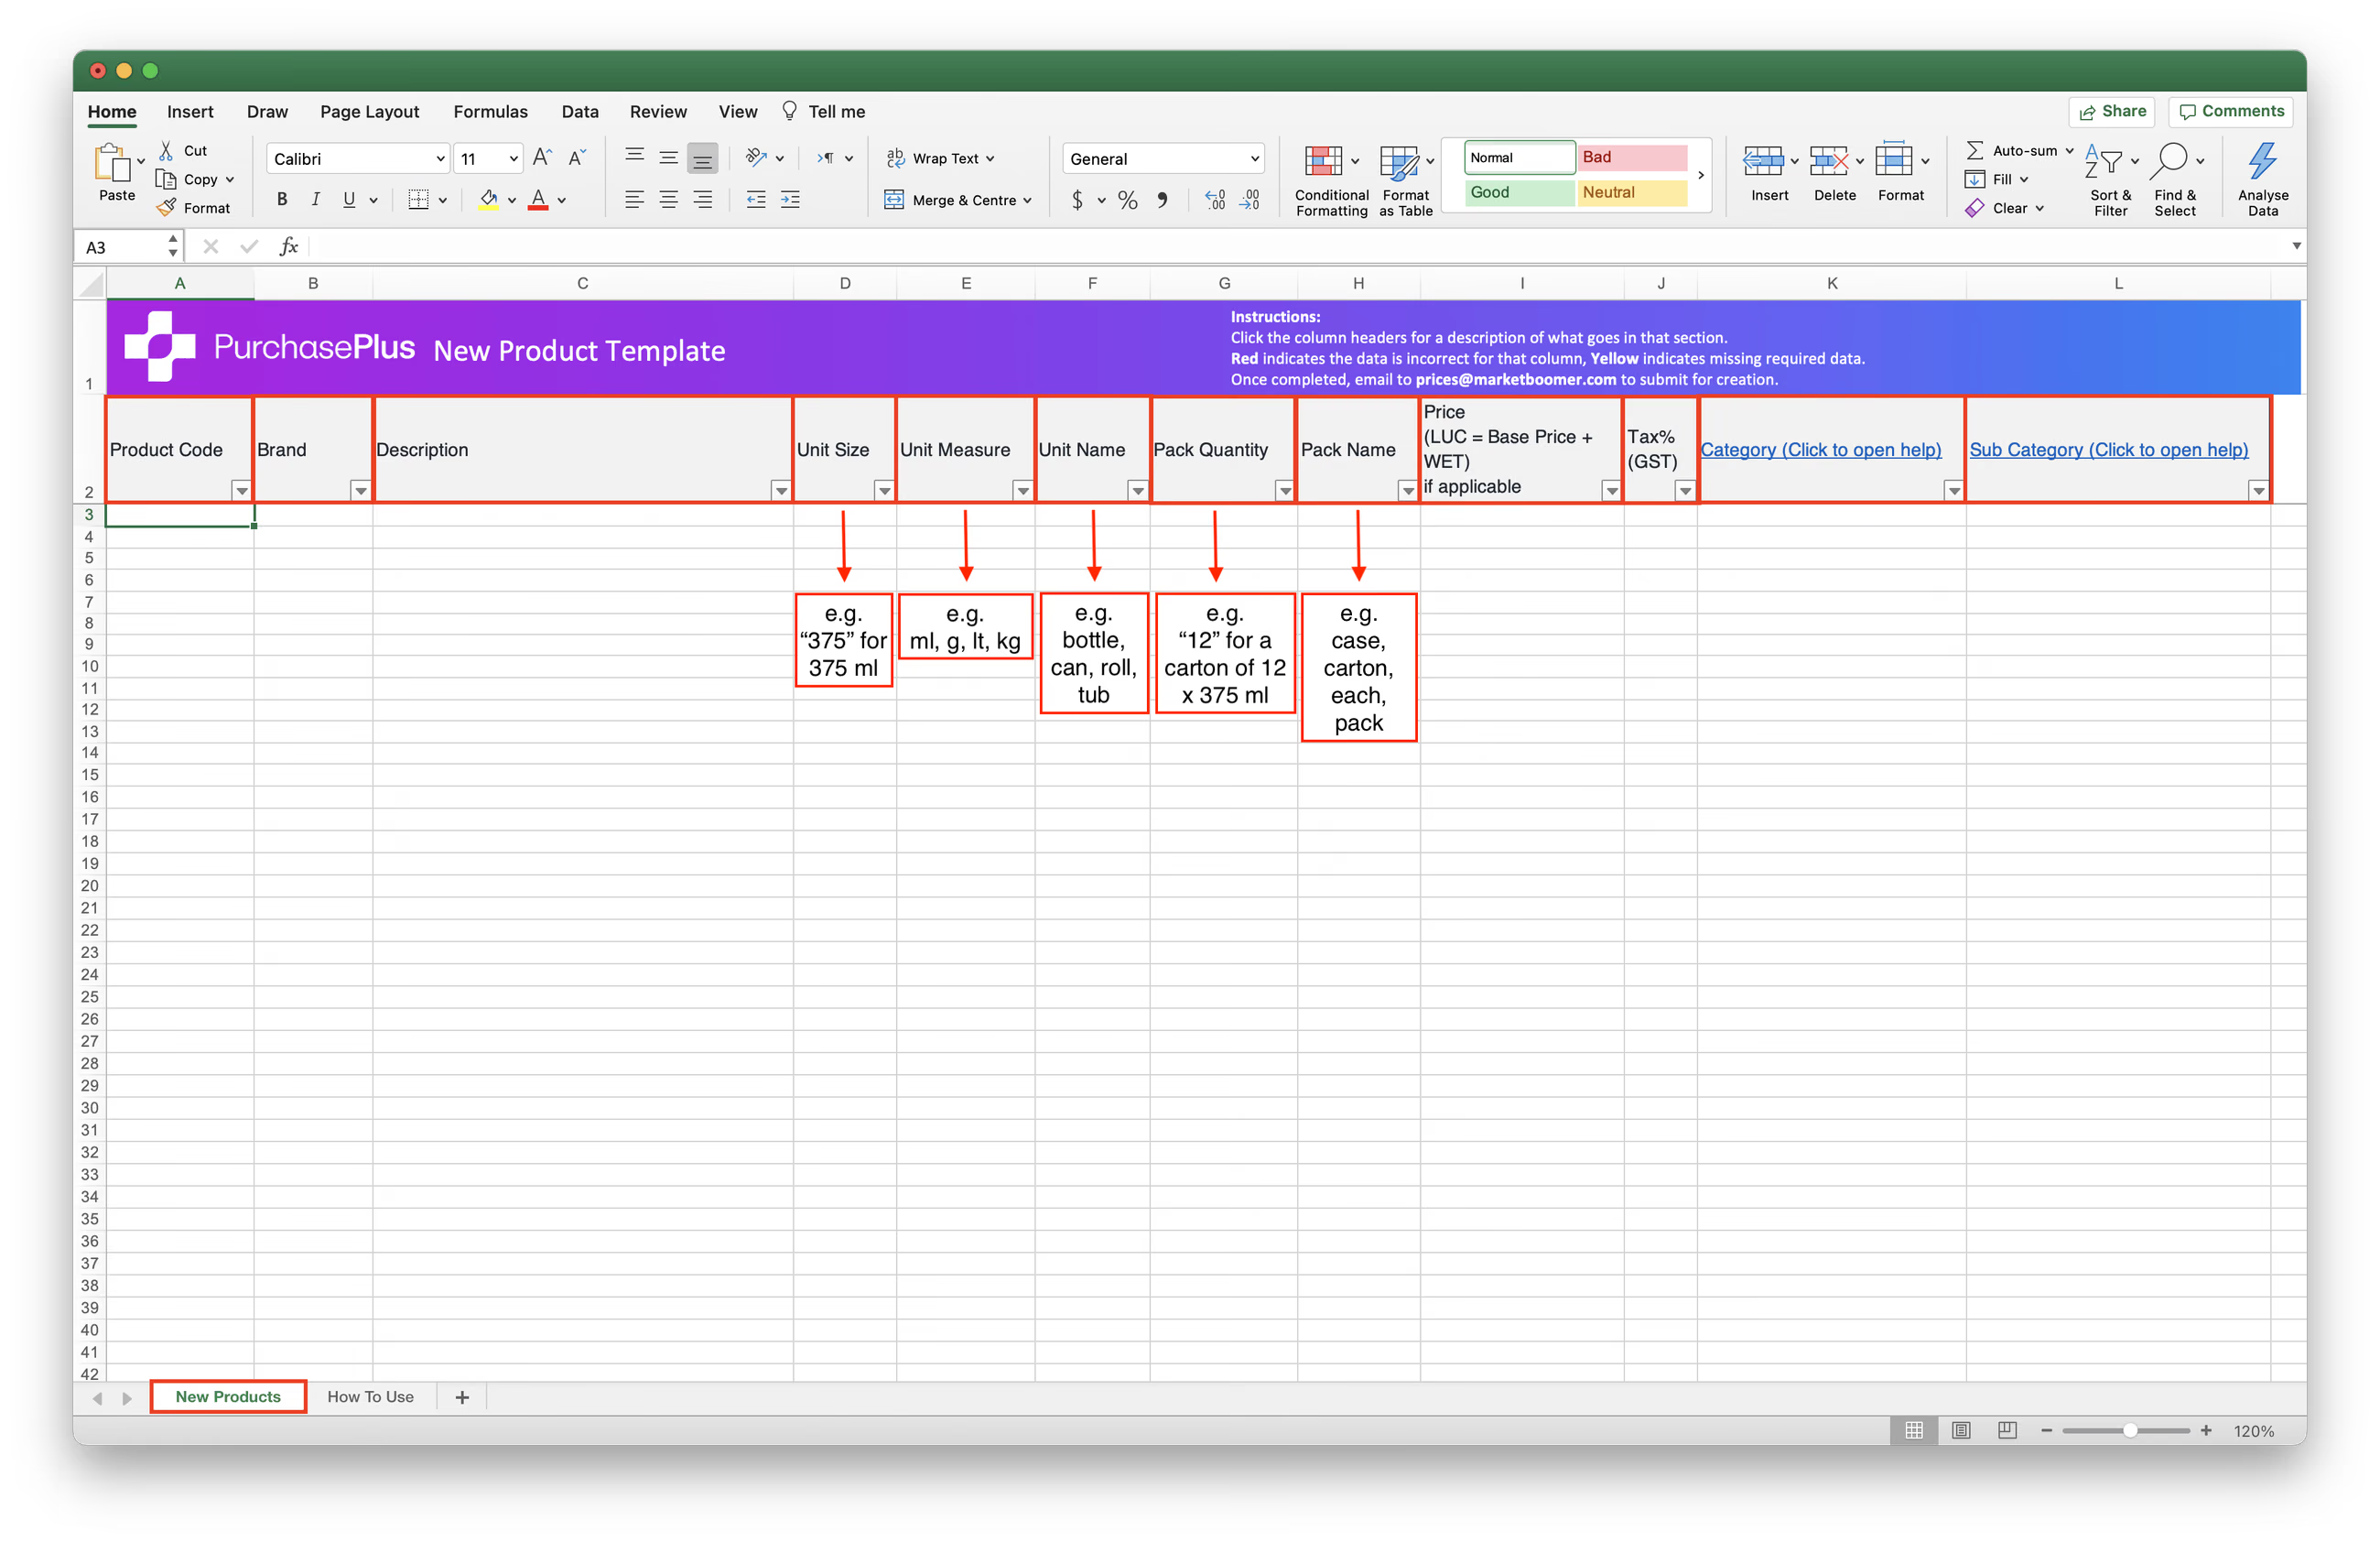
2. Complete each column, as required.
- [Product Code]: Your Product Code / SKU Code.
- [Brand]: Product Brand. Produce items can't have brands.
- [Description]: Description/ Name of the Product, not including the Brand name. This should not include Quantity or Size information, unless it is describing the physical dimensions of the product.
- [Unit Size]: Single Product weight or volume value, e.g. “375” for a 375ml can.
- [Unit Measure]: Unit of Measure used for the Unit Size, e.g. ml, g, lt, kg.
- [Unit Name]: Name of the Unit of a single item, e.g. bottle, can, roll, tub. This cell can be blank.
- [Pack Quantity]: Quantity of Products per order, e.g. “12” for a Carton of 12 x 375ml Cans.
h: [Pack Name]: Name given to the Pack that the item is contained in, e.g. case, carton, each, pack.
i: [Price (LUC = Base Price + WET) if applicable]: Sale Price ex tax. Price is LUC (Landed Unit Cost)= Base Price + WET. No $ symbol needed.
j: [Tax% (GST)]: Tax is GST. No % symbol needed.
k&l: [Category] & [Sub Category]: Categories and Sub Categories are listed in this article: PurchasePlus Product Categories & Sub Categories List. Note - If your Product doesn't fit into any existing Category, inform us, and we'll consider it for future updates.
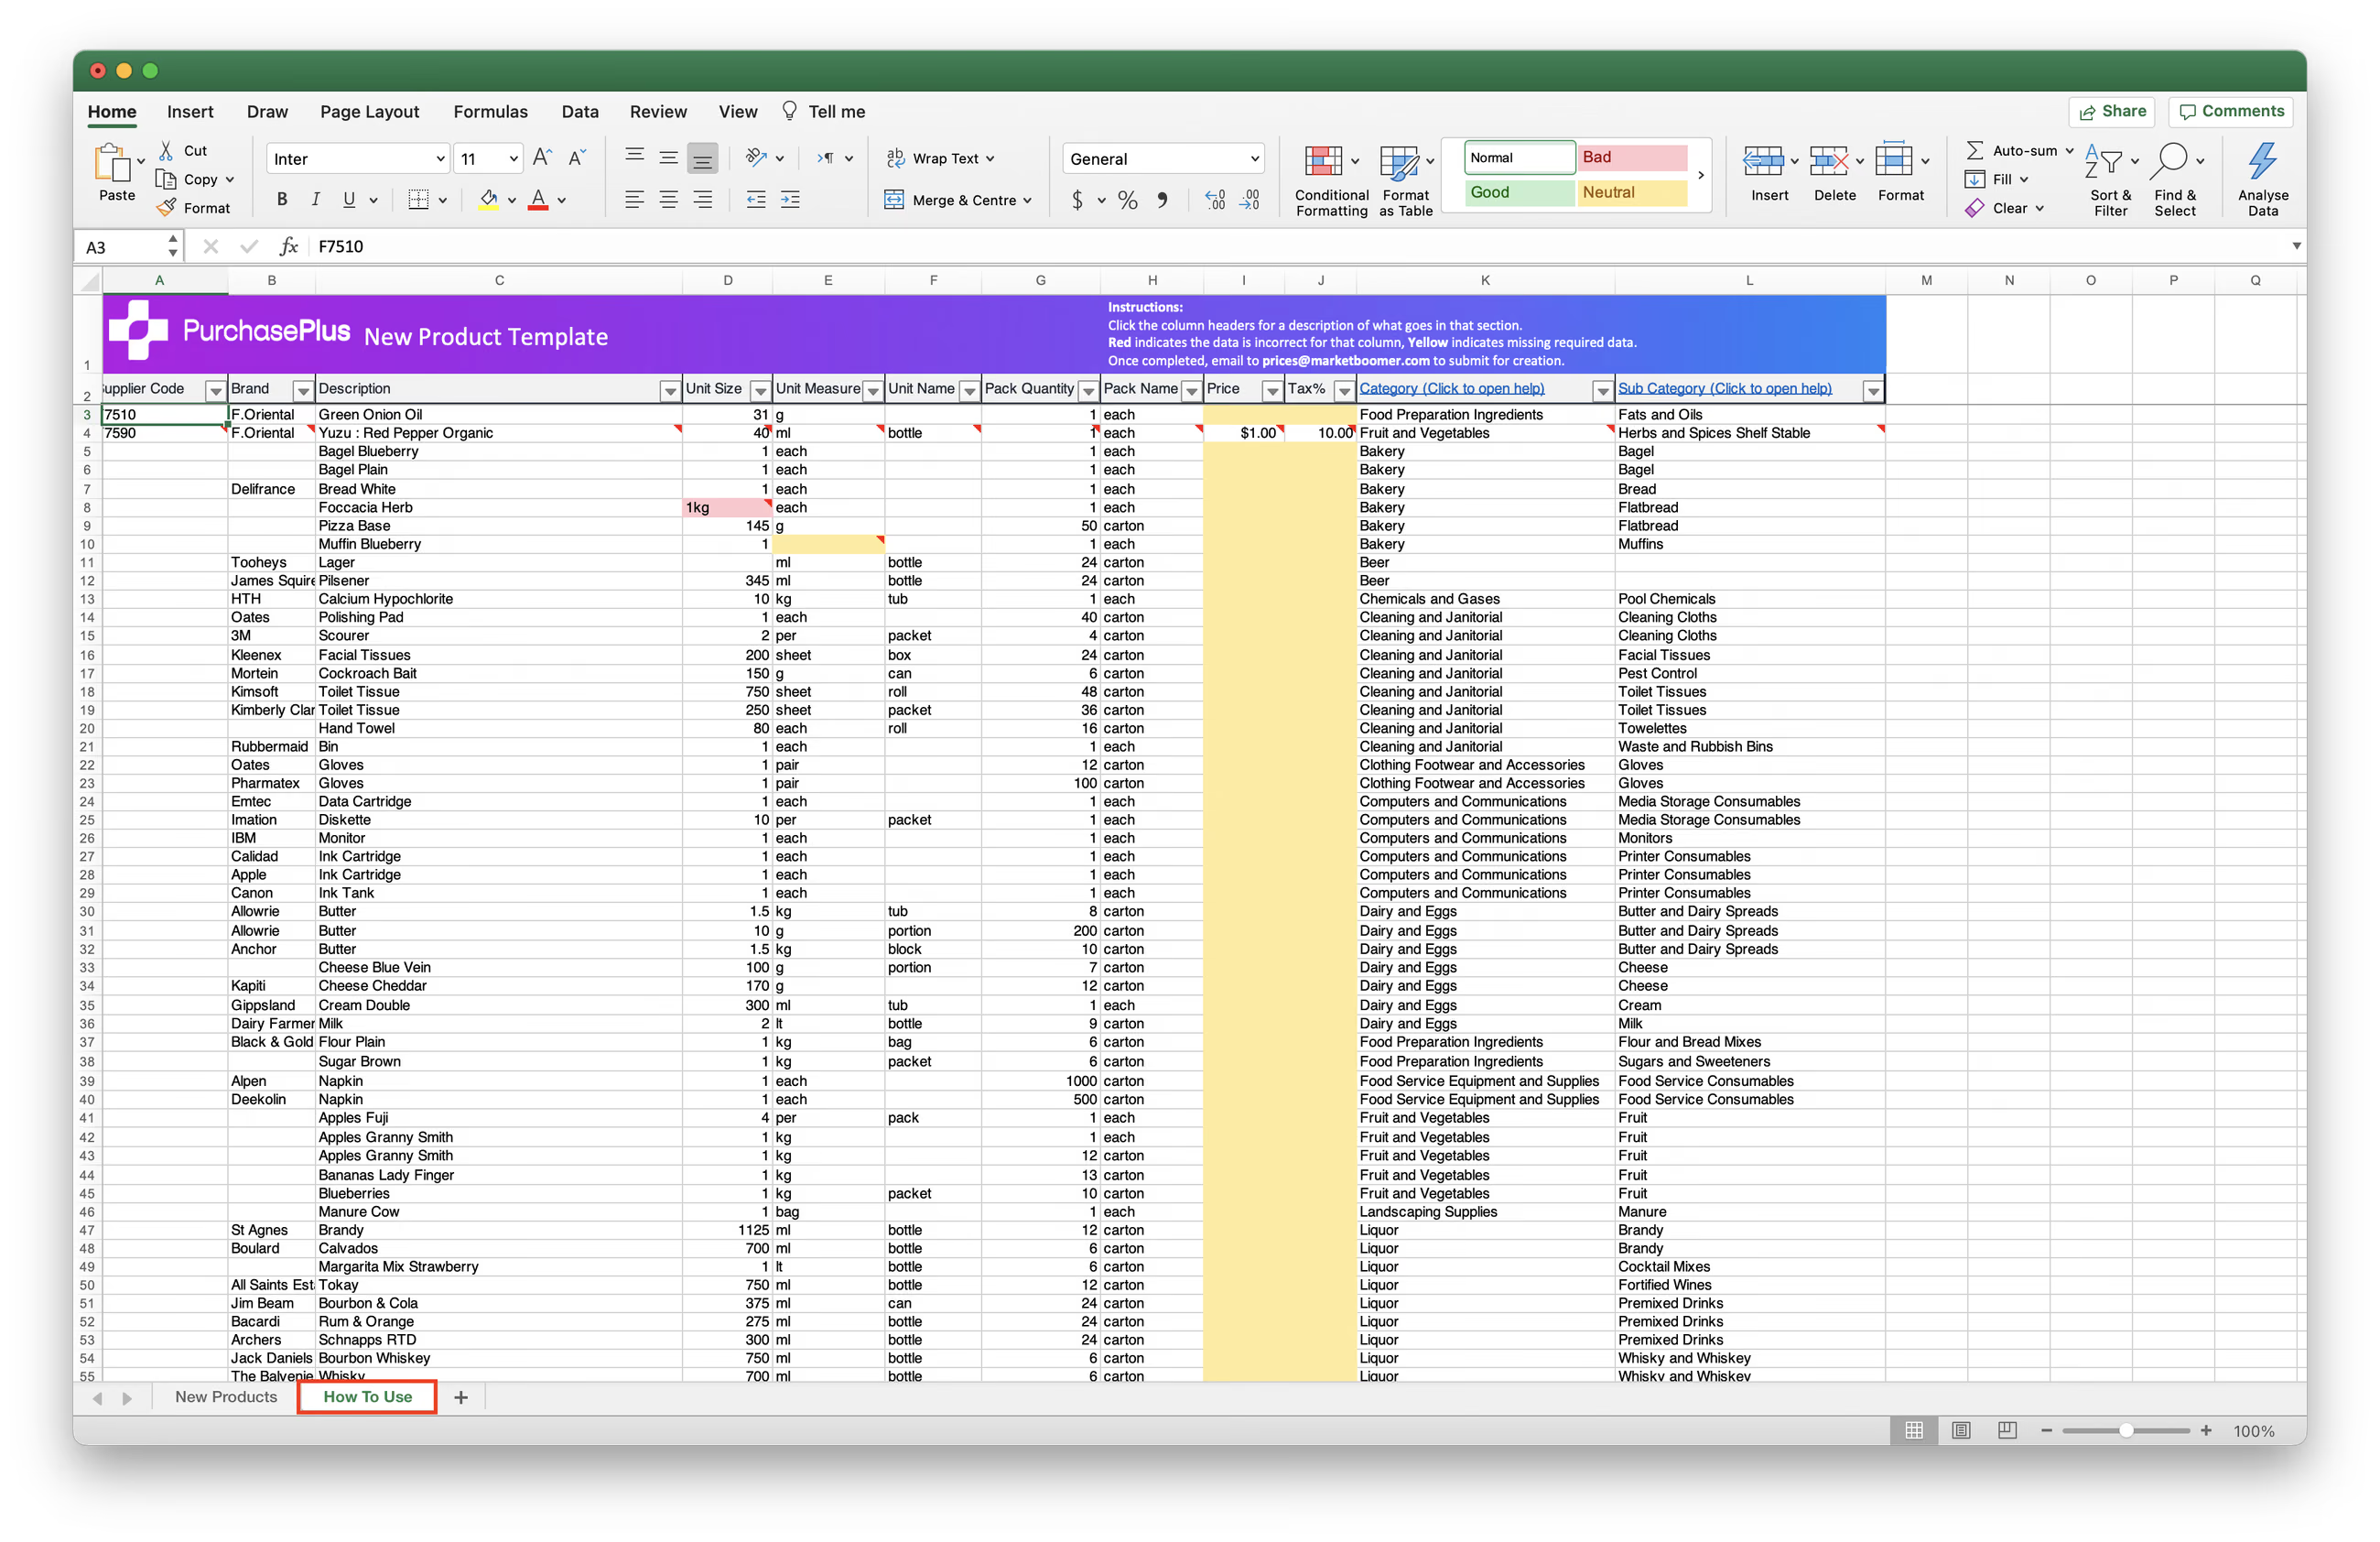
 3. Check the [How To Use] tab for examples and guidance.
- A red cell indicates incorrectly formatted data.
- A yellow cell indicates that required data is missing.
3. Submit Your Request by emailing the completed template to prices@purchaseplus.com. To help us process requests faster and avoid any missed updates, please submit each catalogue request in a separate email and clearly specify the target Catalog.
Matching to Master Vs Bespoke Products
Often when we are creating new Products on behalf of Suppliers, there is an obvious 'match' to a Master Product that exists in our Product Database. For example, if you are creating and adding '375mL Can of Coca Cola' to your Catalog, we will match it to our existing Master Product called '375mL Coca Cola'.
Matching your Products to our PurchasePlus Master Products means that your customers (Purchasers with whom you have an Enabled Trade Relationship) that are shopping for generic Master Products (e.g. Plain Flour 500g) will be able to see your quoted price for this item - even if our Master Product has a slightly different description to your Product.
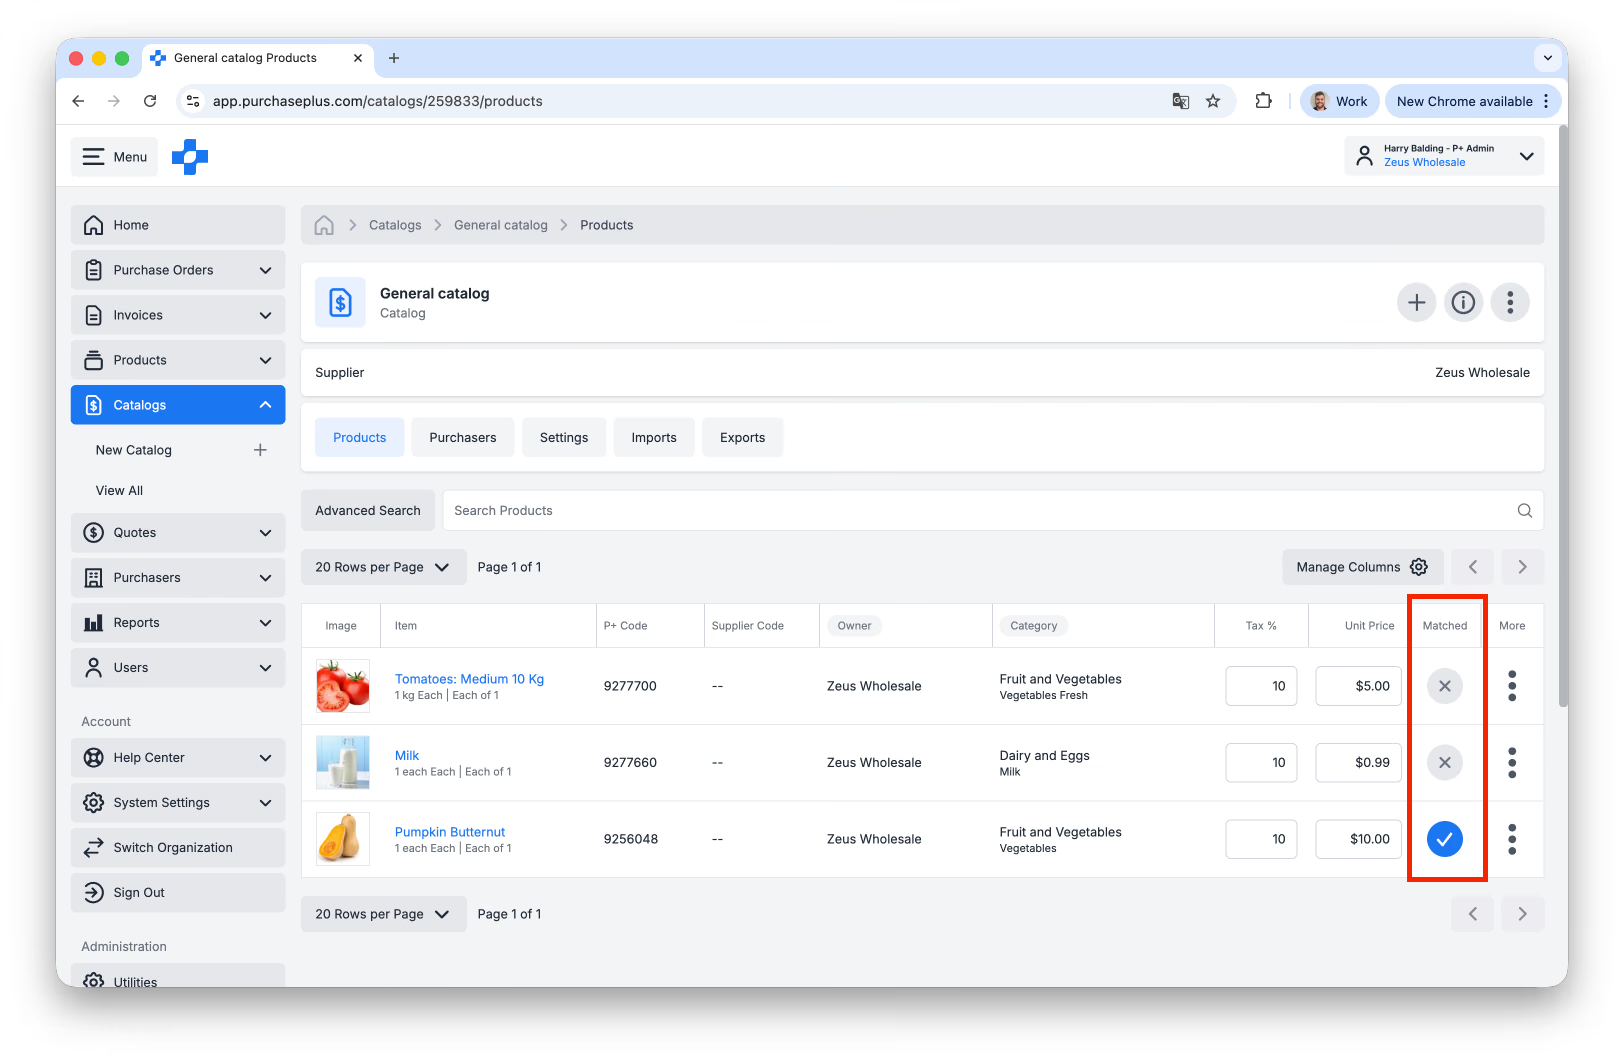
A Product that has been Matched to Master will appear in your [Products] and [Catalogs] areas with a blue checkmark in the 'Matched' column:
If however you are creating a bespoke product (i.e. one that is unique to your business) and we do not have an existing Master Product in our Database, it is extremely important that you populate the New Product Template with a value in every column for the Product (e.g. Unit Measure, Pack Name, etc). We won't be able to create the Product(s) without these data.
Learn more about Product Ownership in PurchasePlus.
One by one
Supplier Users can also create New Products in the User Interface without contacting PurchasePlus. When a Supplier creates a Product, the new Product will be 'Owned' by their Organisation, and can be edited as often as required*, added to Catalogs, and more.
* = Until the Product is matched to master, in which case our Catalog Team needs to be involved. Additionally, we recommend against making significant changes to existing Products, as all changes incur changes to historical product data also. Small changes to non-master-matched Products are acceptable, and the Catalog Team is available to assist with significant changes to non-master-matched Products.
To Create a New Product in the UI, Supplier Users must have the 'Manage Products' permission enabled by an Administrator within their Organisation or by a PurchasePlus Administrator.
Before You Start: Search for Existing Products
Before Creating a New Product, it is highly recommended that you first Search for an existing product, so as not to create a duplicate.
Simply click on [Products] → [View All]. Use the search bar to determine if your new product exists in PurchasePlus already:
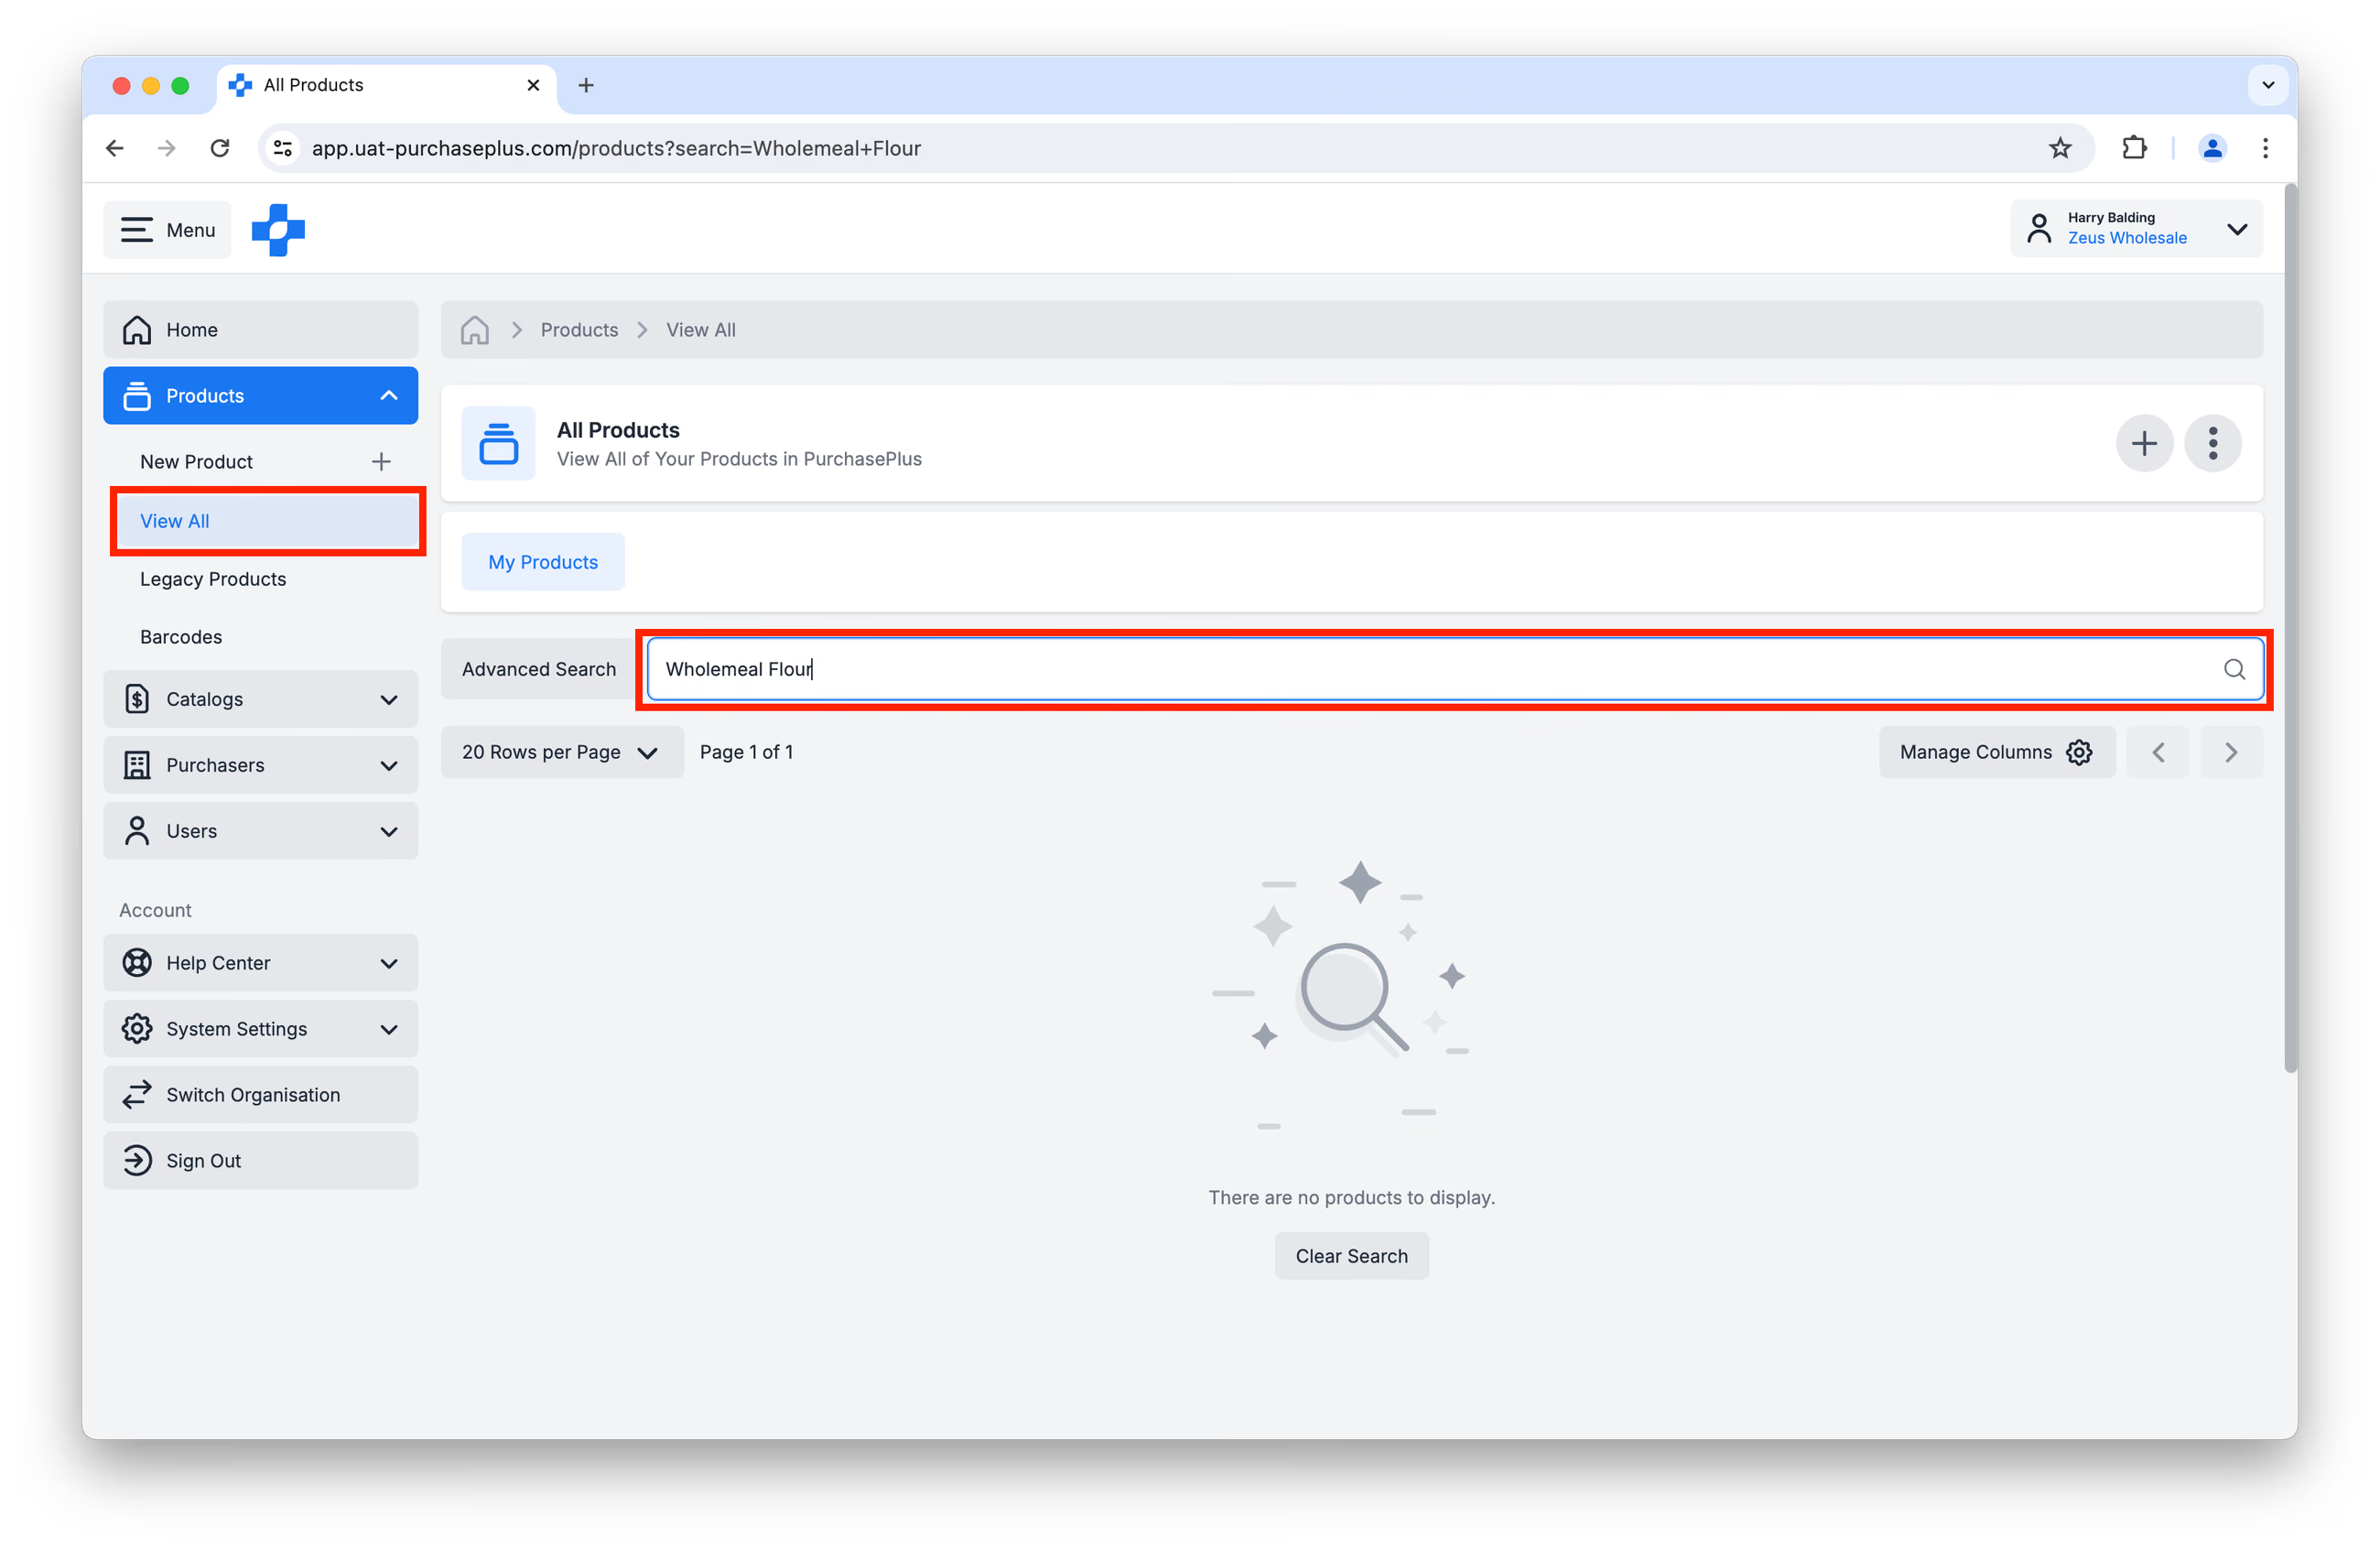
If you cannot find the Product in question, proceed to Create a New Product.
Create a New Product
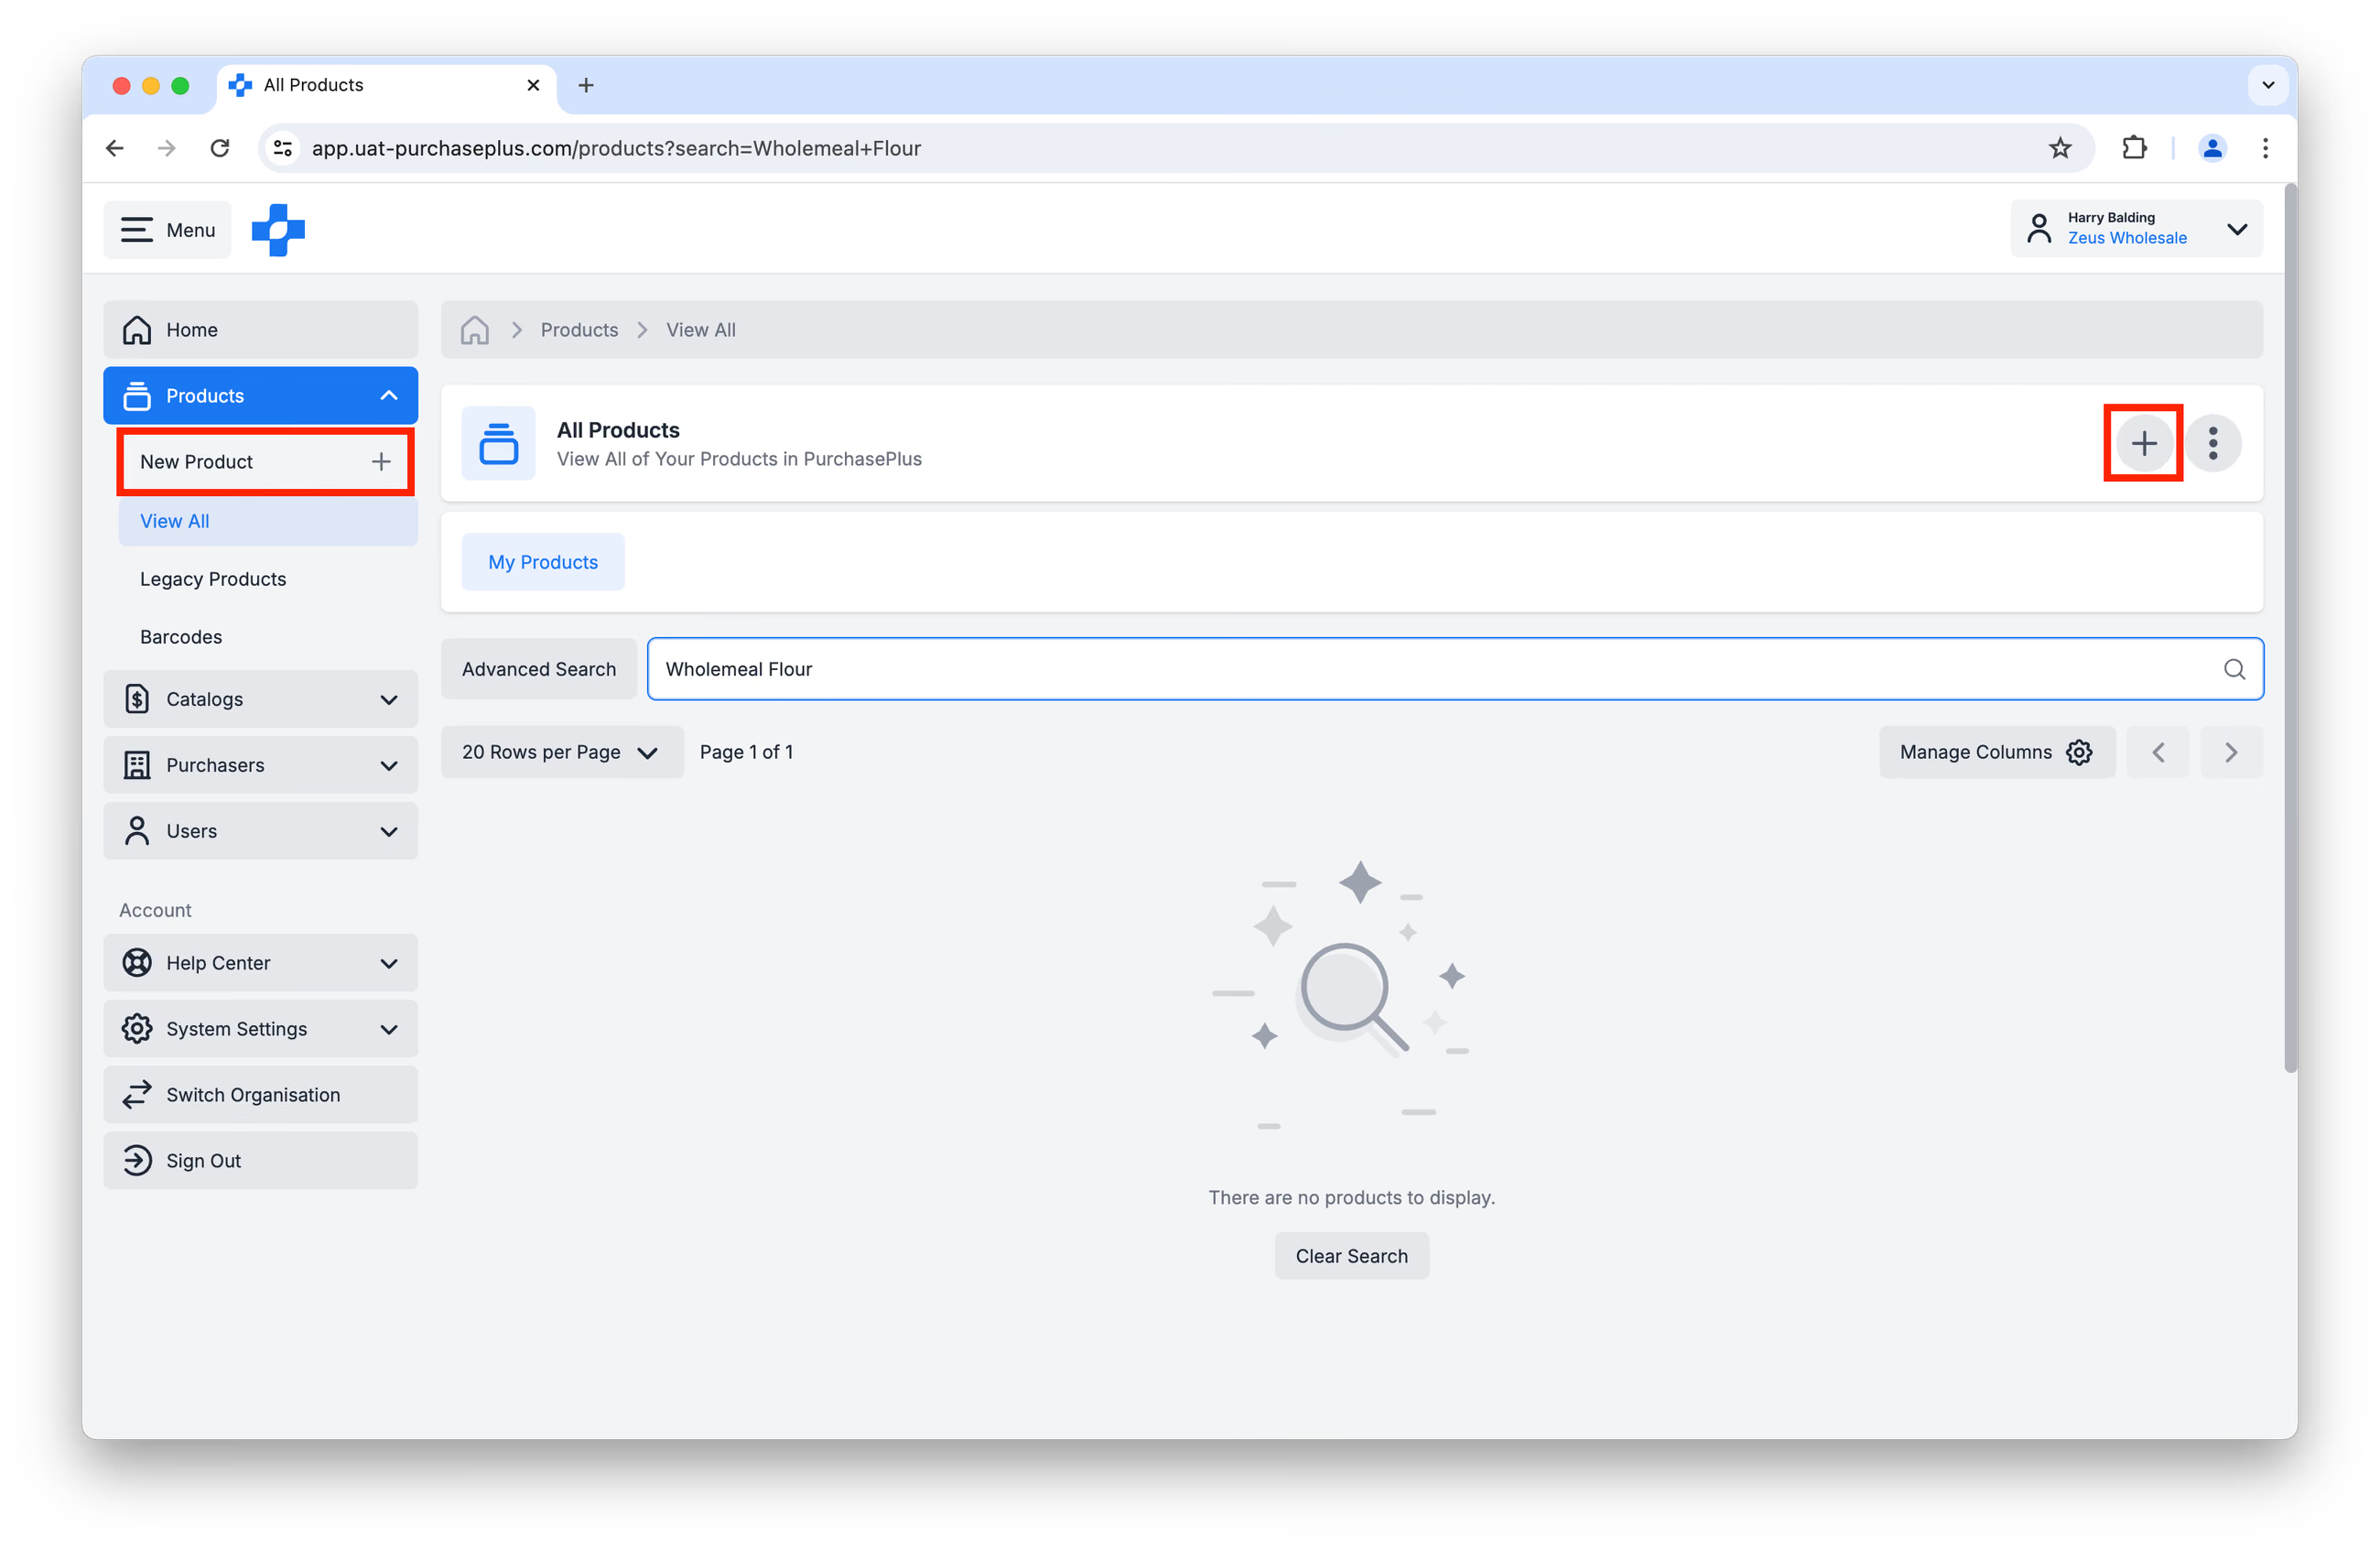
Step 1: Click on [Products] → [New Product] in either the Side Navigation bar or the header of the page:
Step 2: Enter your Product details in the resulting window. Please fill out every required field:
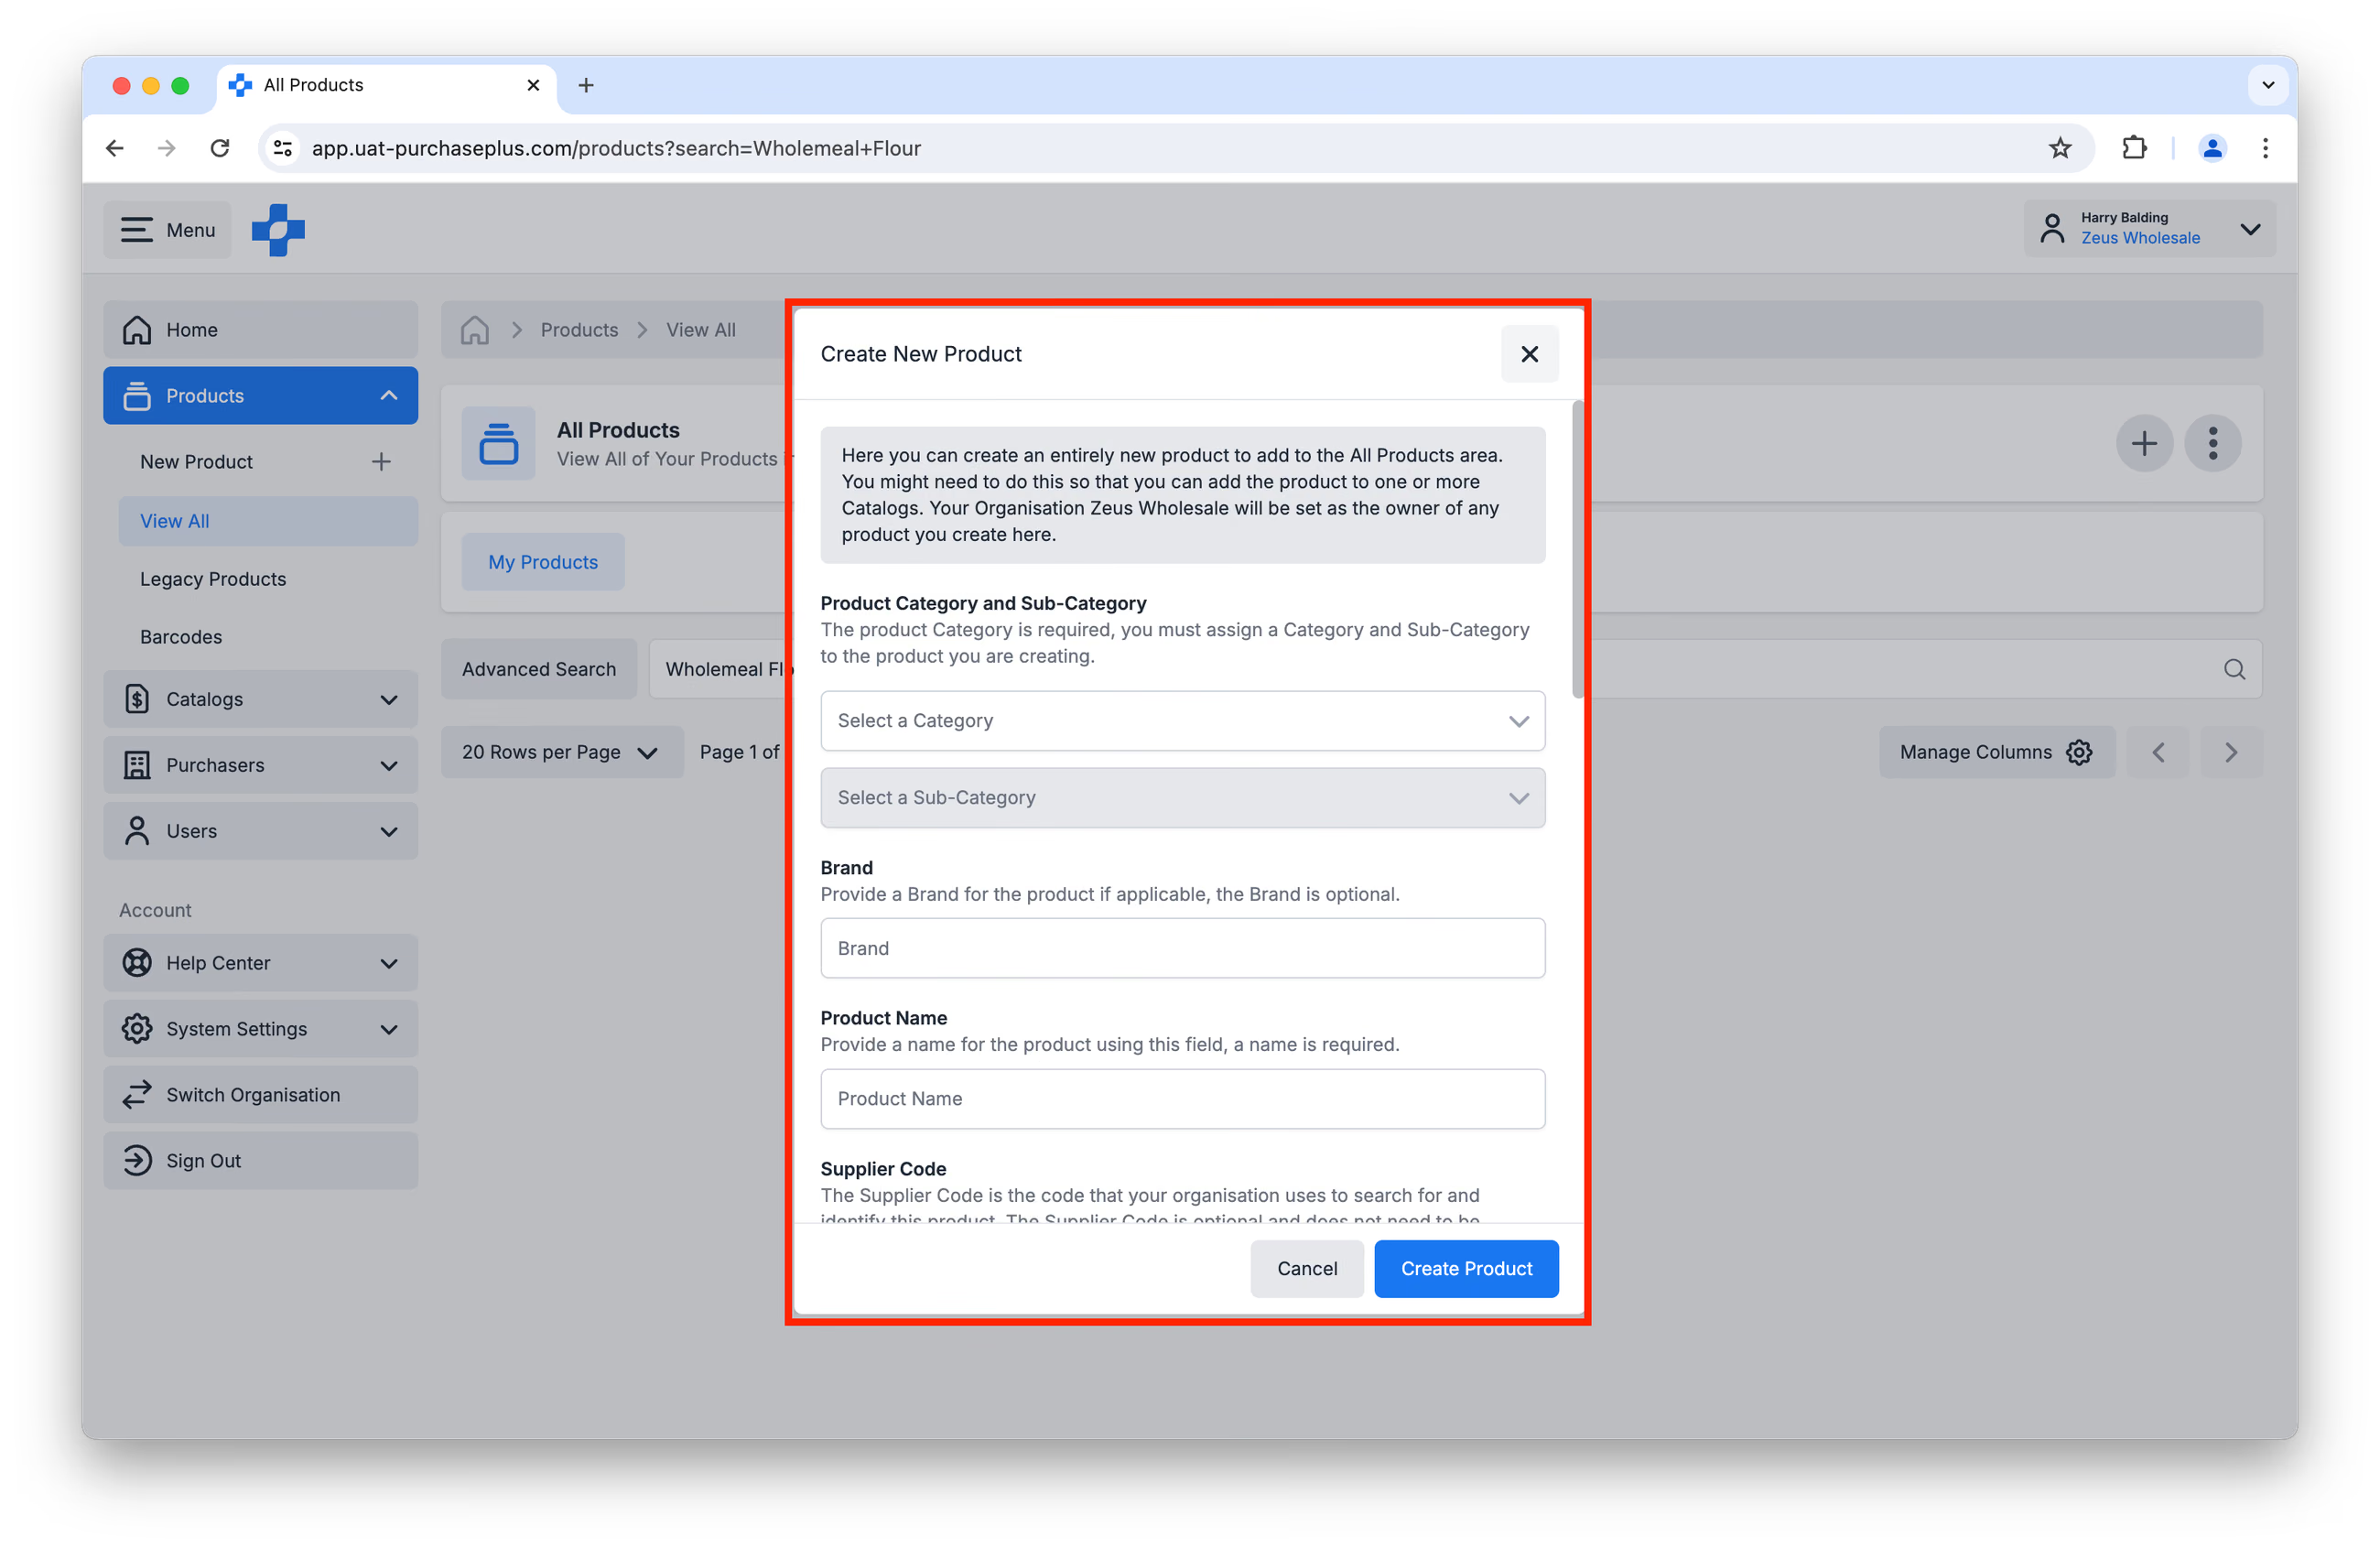
- Required: Category and Subcategory. Learn more about the available Categories and Subcategories.
- Optional: Brand.
- Required: Product Name. Use a consistent naming convention for the Products you create. We recommend the following practices:
- Avoid abbreviations and long descriptions. Include only the information that is required to differentiate the product from a similar product.
- Use Title Case (i.e. not all capitals or all lower case, but capitalising each word) in your descriptions.
- Examples:
- Chicken Breast - Cooked Sliced
- Beef Rump - Grass Fed 5-Star
- Crab Meat - Cooked [Imported]
- Submersible Water Pump - 350W
- Optional: Supplier Code. This is the code you use internally to search for and identify this Product.
- Optional: External ID. This is a code that you may use in an additional external system for identifying this Product. PurchasePlus does not accept special characters (including spaces) for this field, aside from:
- hyphen,
- underscore, and
- period.
To ensure your account is Integration-Ready and to prevent duplicate products, it is a best practice to assign a unique Supplier Code/External ID to every product. This enhances compatibility with our API and removes any confusion during future price or product updates. Learn more about integrating with PurchasePlus for product and catalog management.
- Required: Unit Size and Sell Pack.
- Getting the Unit and Sell Pack Information right is extremely important, as it determines Purchasing volumes for the Purchasers.
- The Unit Information describes the smallest instance of the product, that is contained within the Sell Pack. The "1 Each" example below is used when the product has no specific Unit Information, such as an Office Chair. In the Office Chair example, you can also leave the Item Pack Name empty.
| Unit Size | Unit of Measure | Item Pack Name |
|---|---|---|
| 1 | Each | |
| 375 | ml | Can |
| 750 | ml | Bottle |
| 1 | kg | Bag |
- The Sell Pack and Sell Pack Quantity is what will be ordered for each Quantity of "1" that is added to a Requisition. The "Each of 1" example below is used when there is no specific Sell Pack applicable, such as an Office Chair.
| Sell Pack Name | Sell Pack Quantity |
|---|---|
| Each | 1 |
| Carton | 24 |
| Box | 1000 |
| Bag | 10 |
- You may wish to refer to the Unit Pack, Unit of Measure and Sell Pack Glossary for more information.
Step 3: Review the Product Preview at the bottom of the form, and click [Create Product] when you are ready: 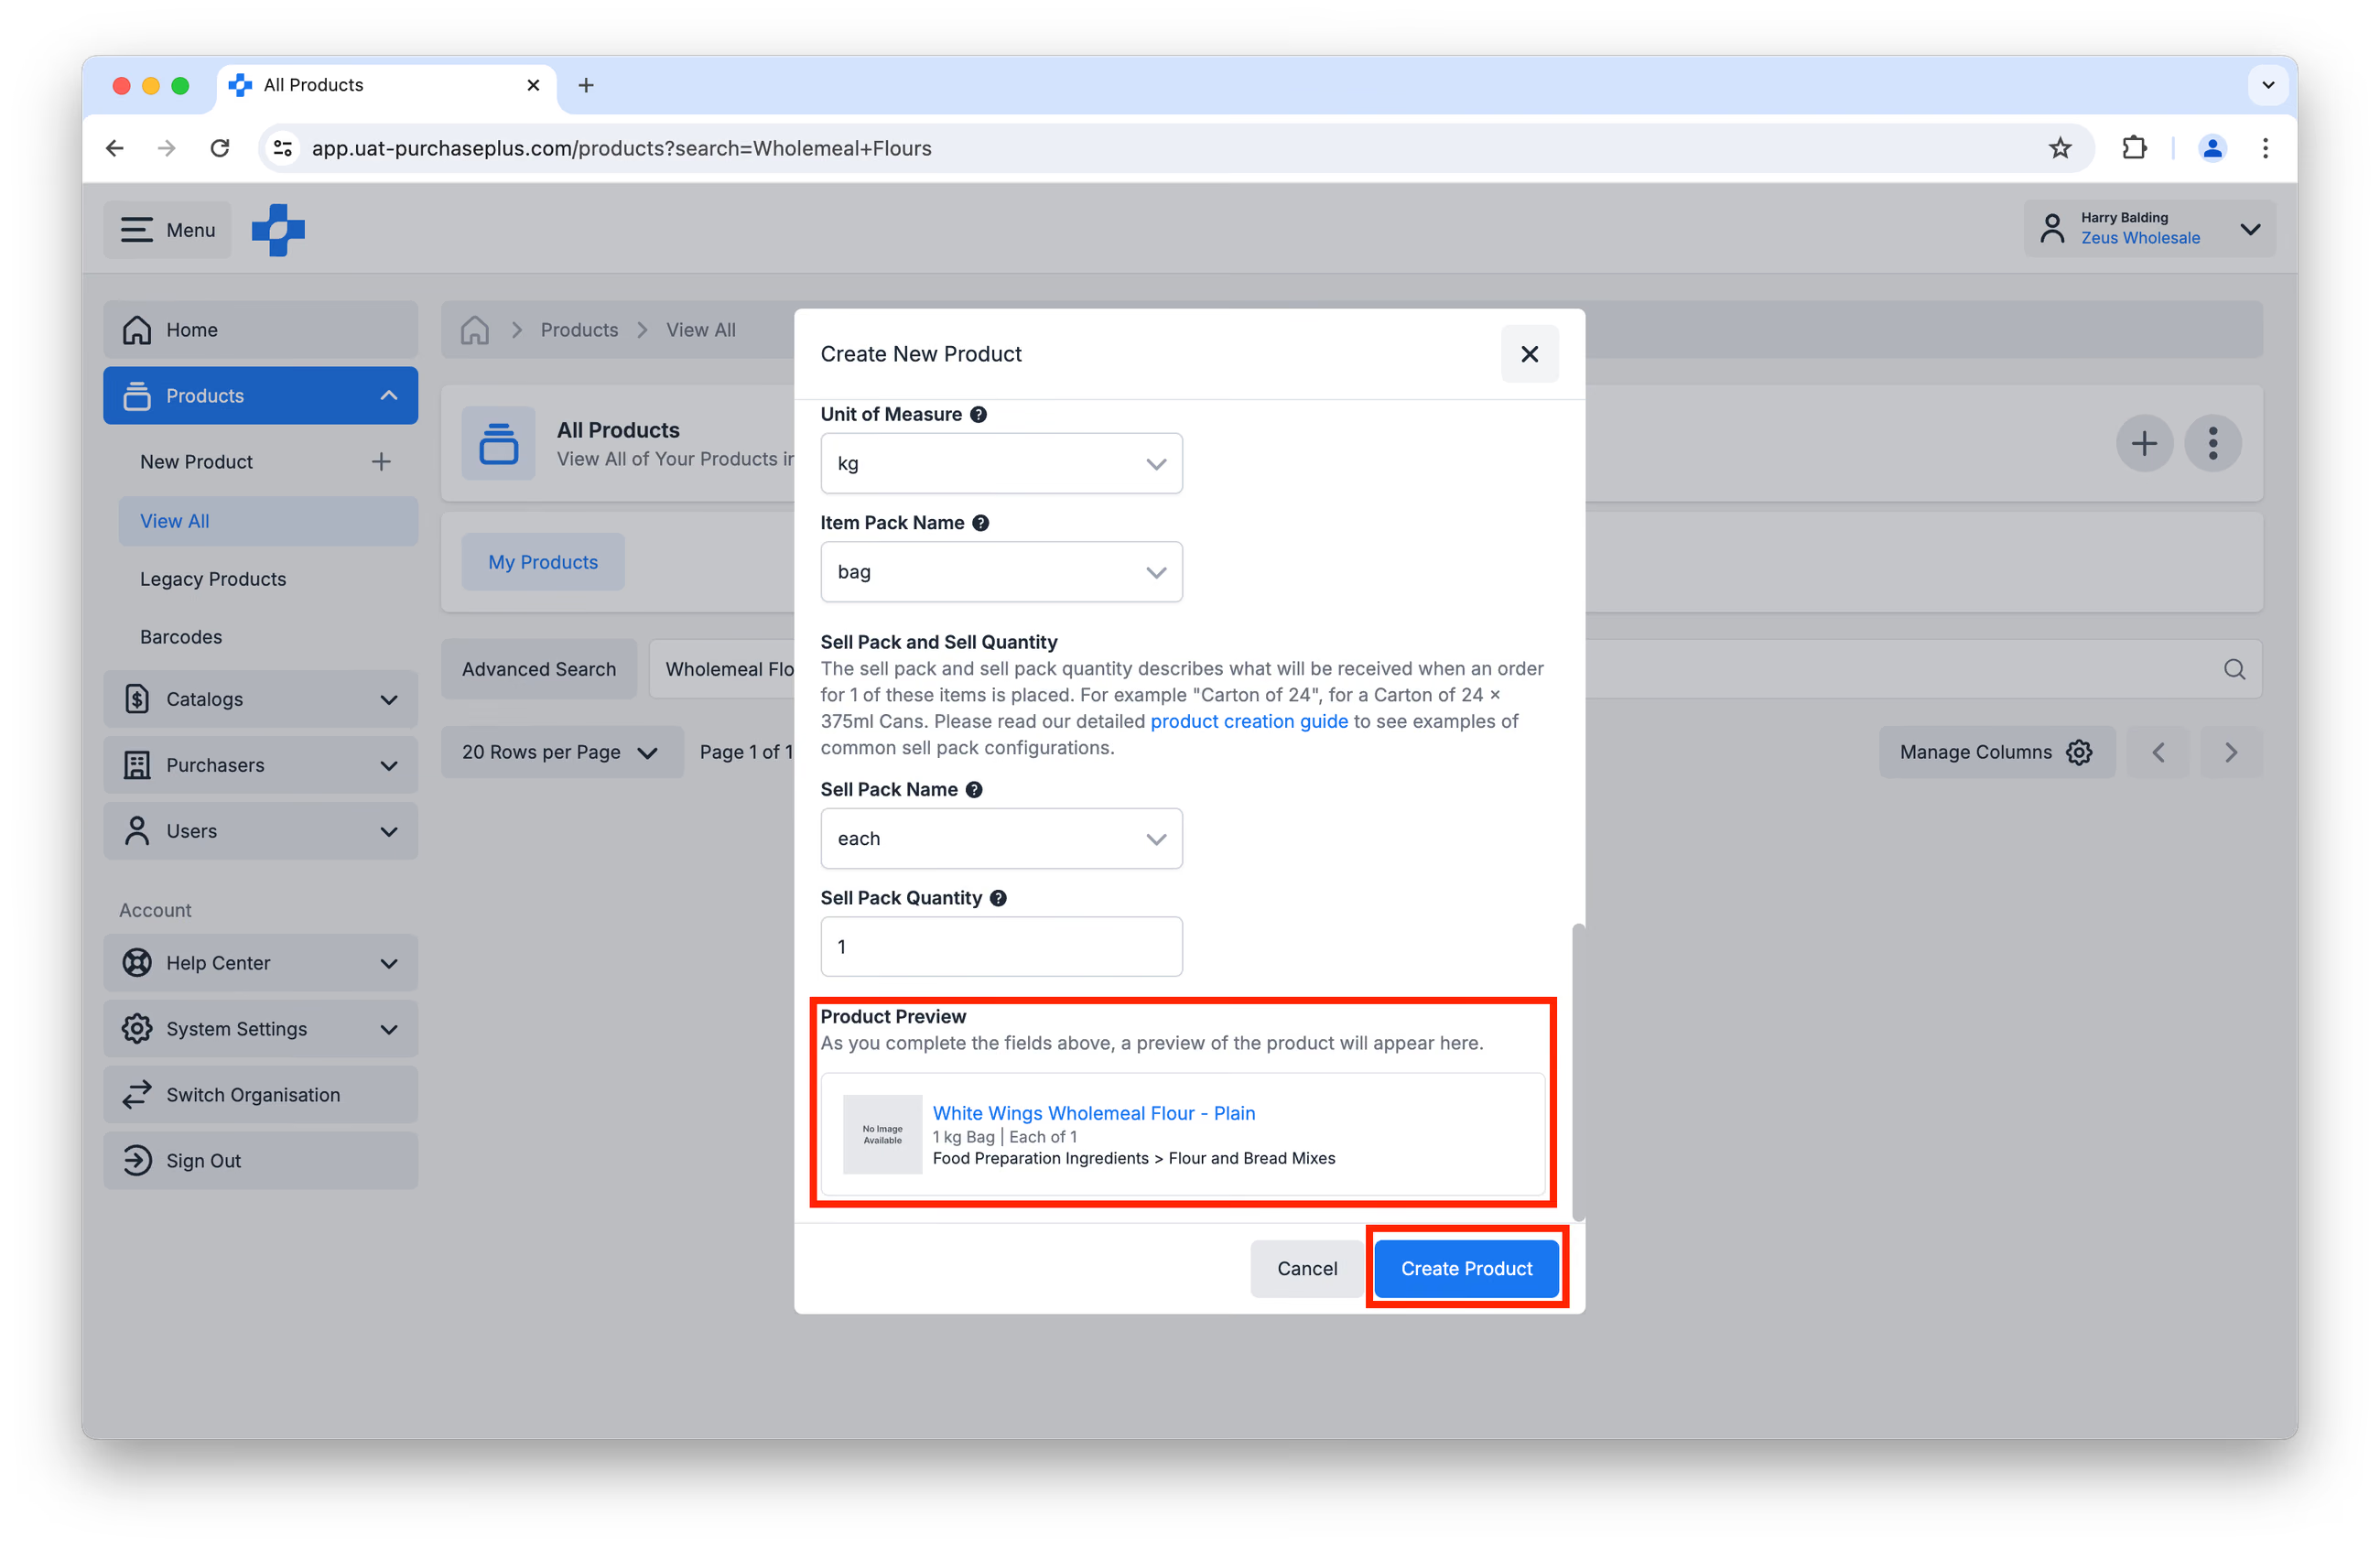
Step 4: You can now visit the Product by clicking [Products] → [View All] and searching for the Product. There are a number of actions you may wish to take once the Product has been created, for example:
- upload a Product Image,
- add a Long Description for the Product which can be displayed to your Purchasers to provide more information. Long Descriptions are only visible to Purchasers when they specifically click into a Product, so it's important to use this section primarily for additional information like specifications or compliance, and not critical order information (for example, lead times),
- edit some details about the product, like Supplier Code, Unit Size, and more.
Add the New Product to a Catalog
Once you have created the new Product, you may add it to one of more Catalogs, assuming you have the 'Manage Catalogs' permission.
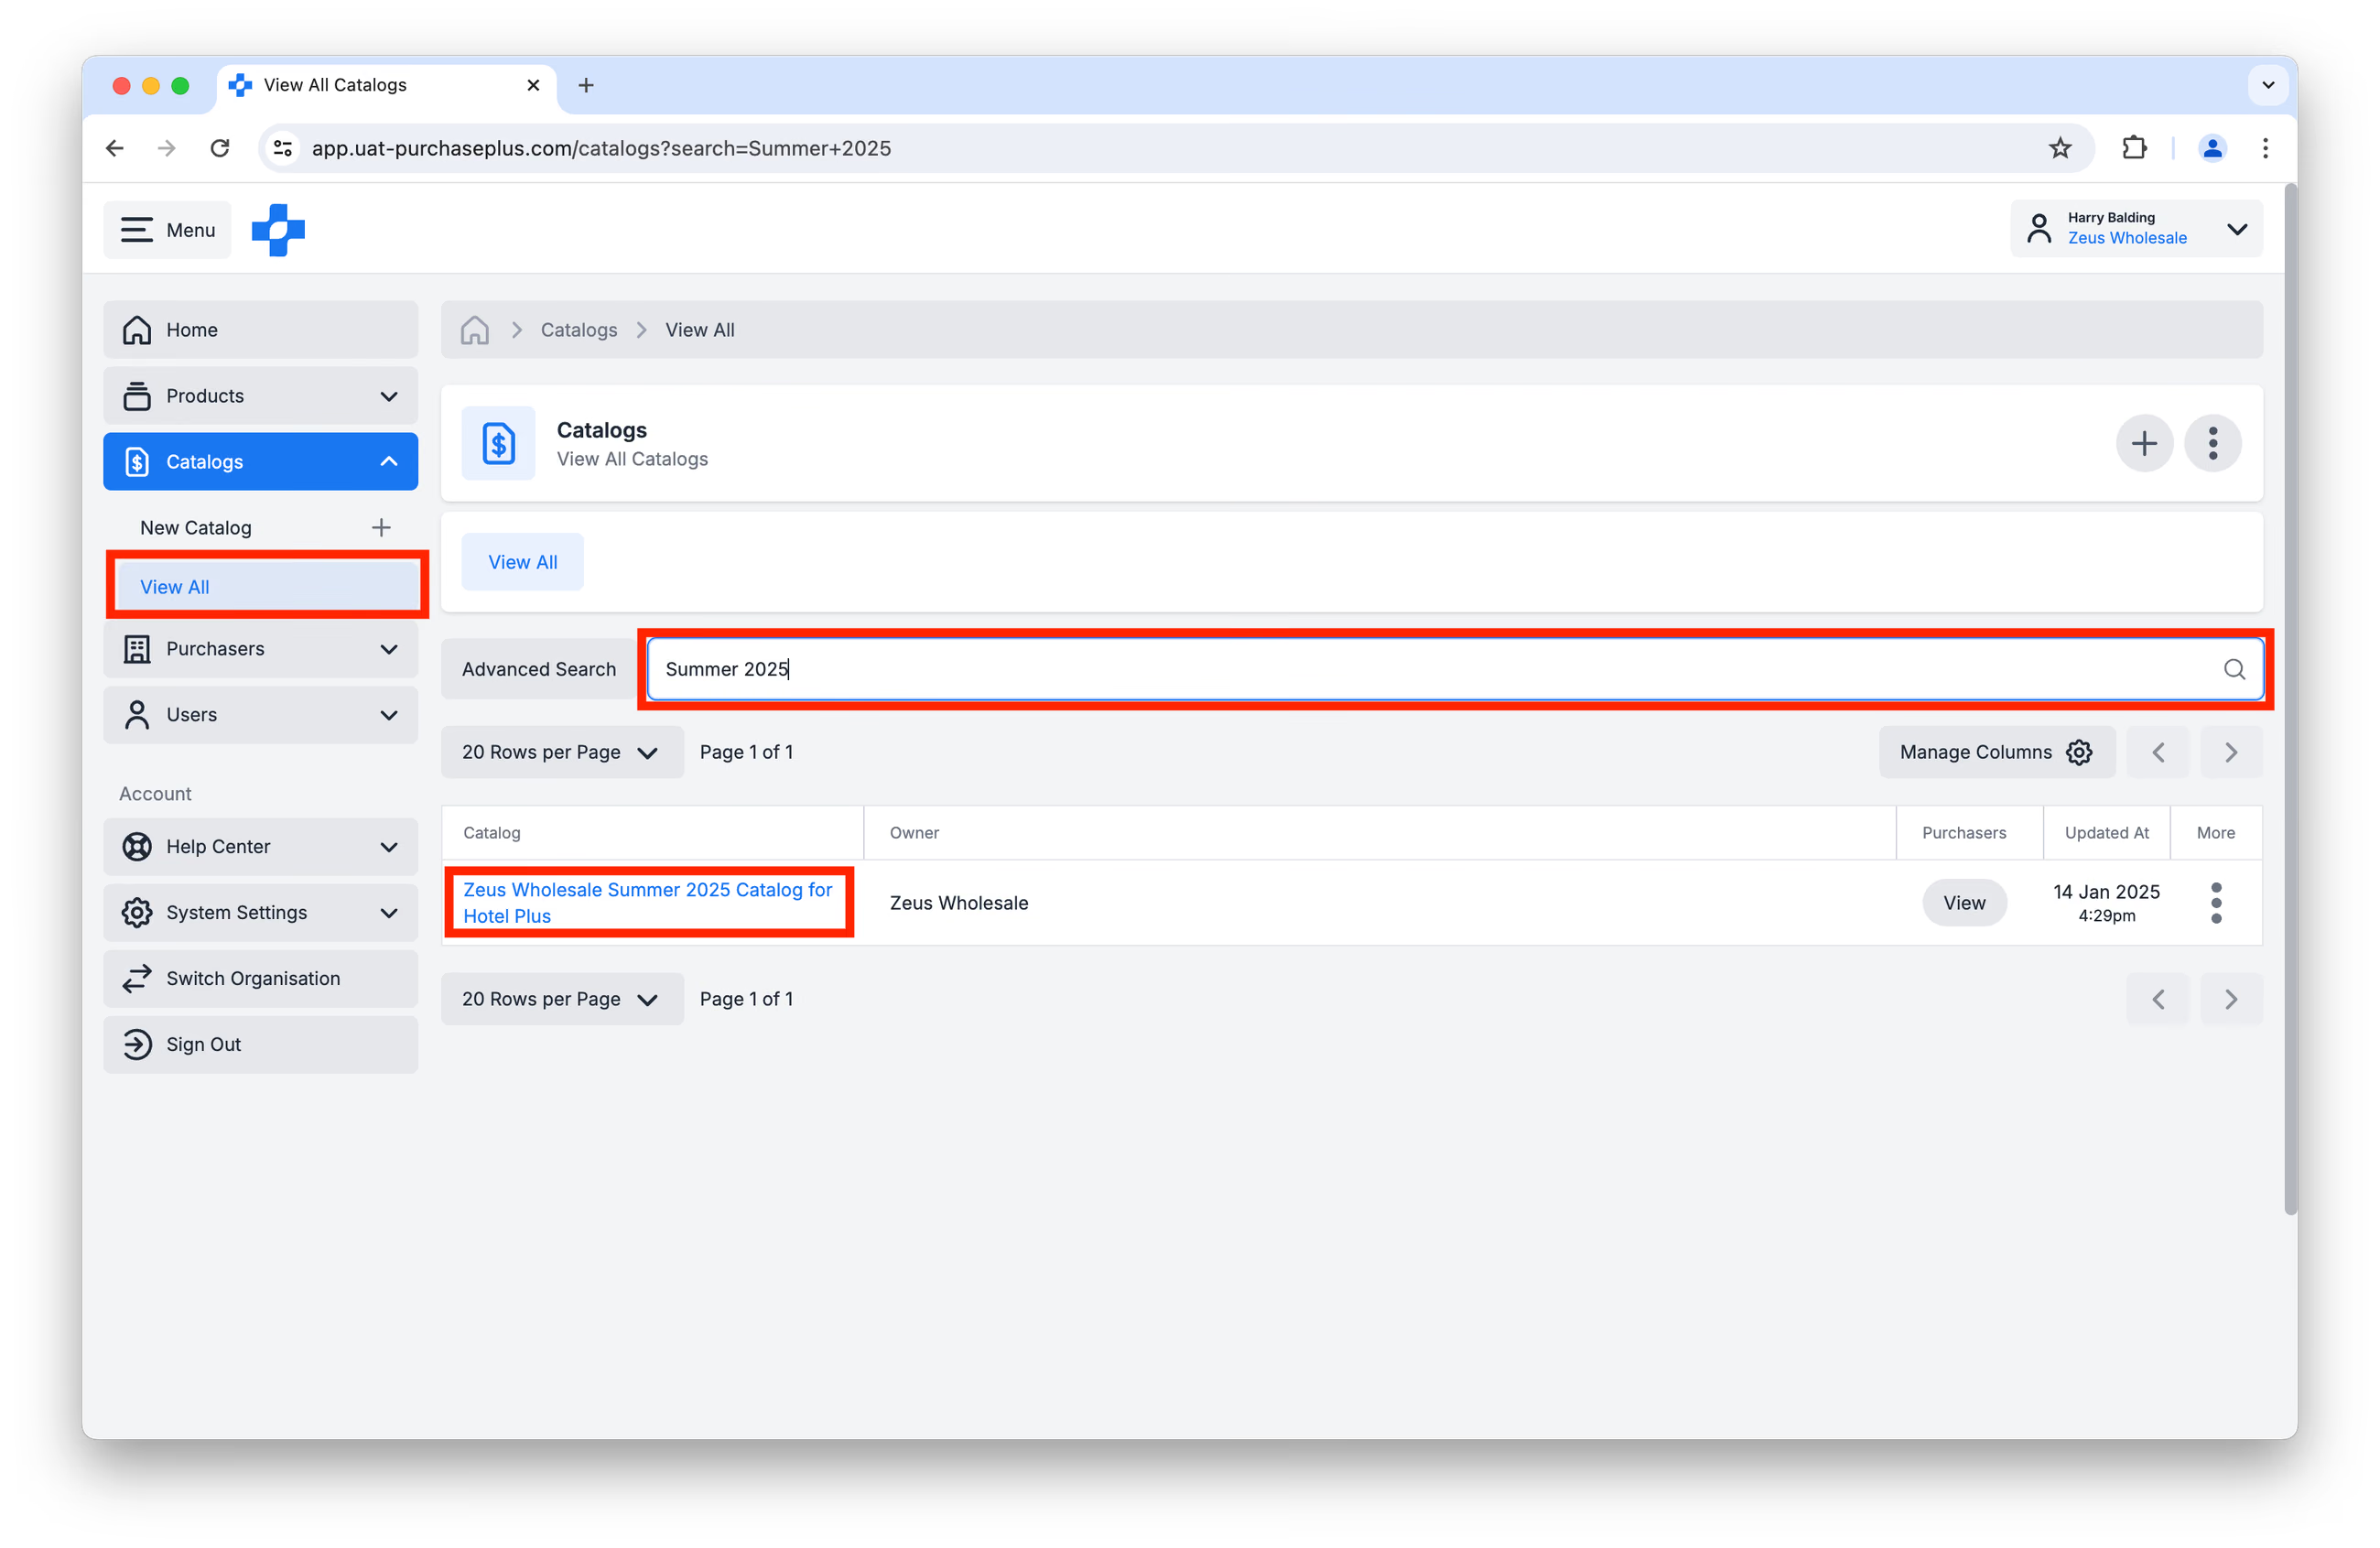
Step 1: Visit [Catalogs] → [View All] and search for the specific Catalog to which you would like to add the new Product. Click on the name of the Catalog:
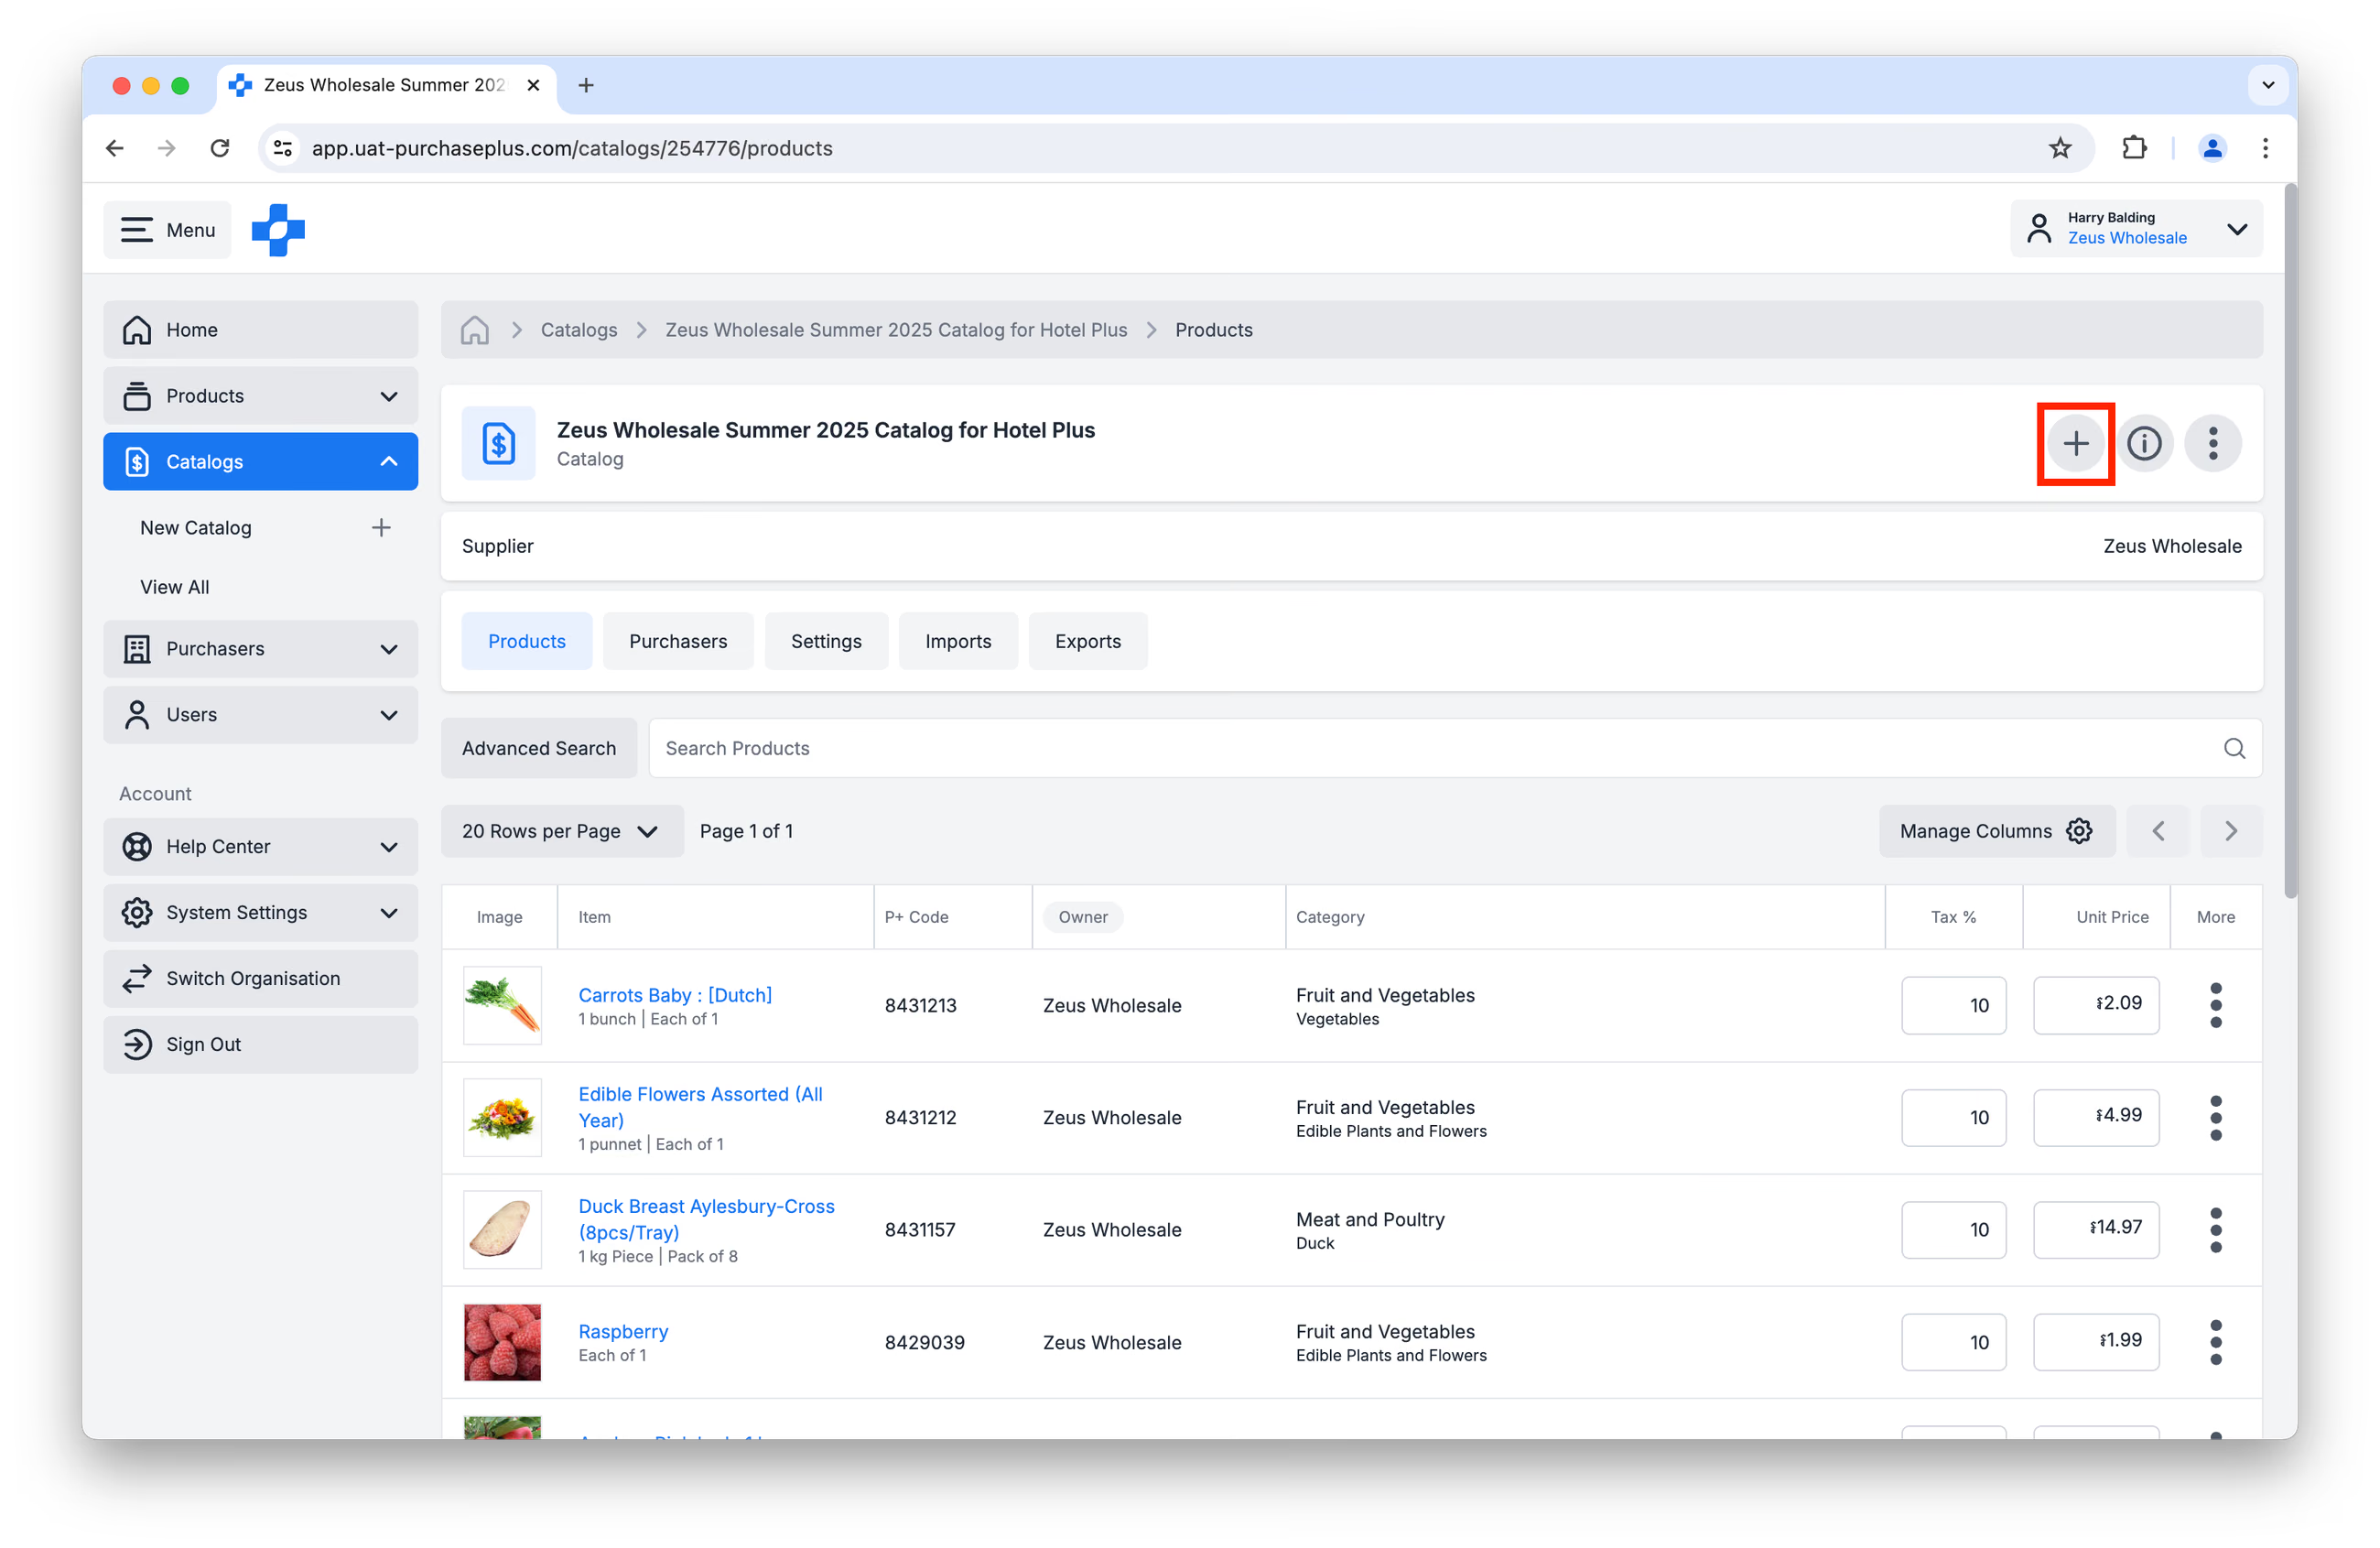
Step 2: Click the [Add a Product] button:
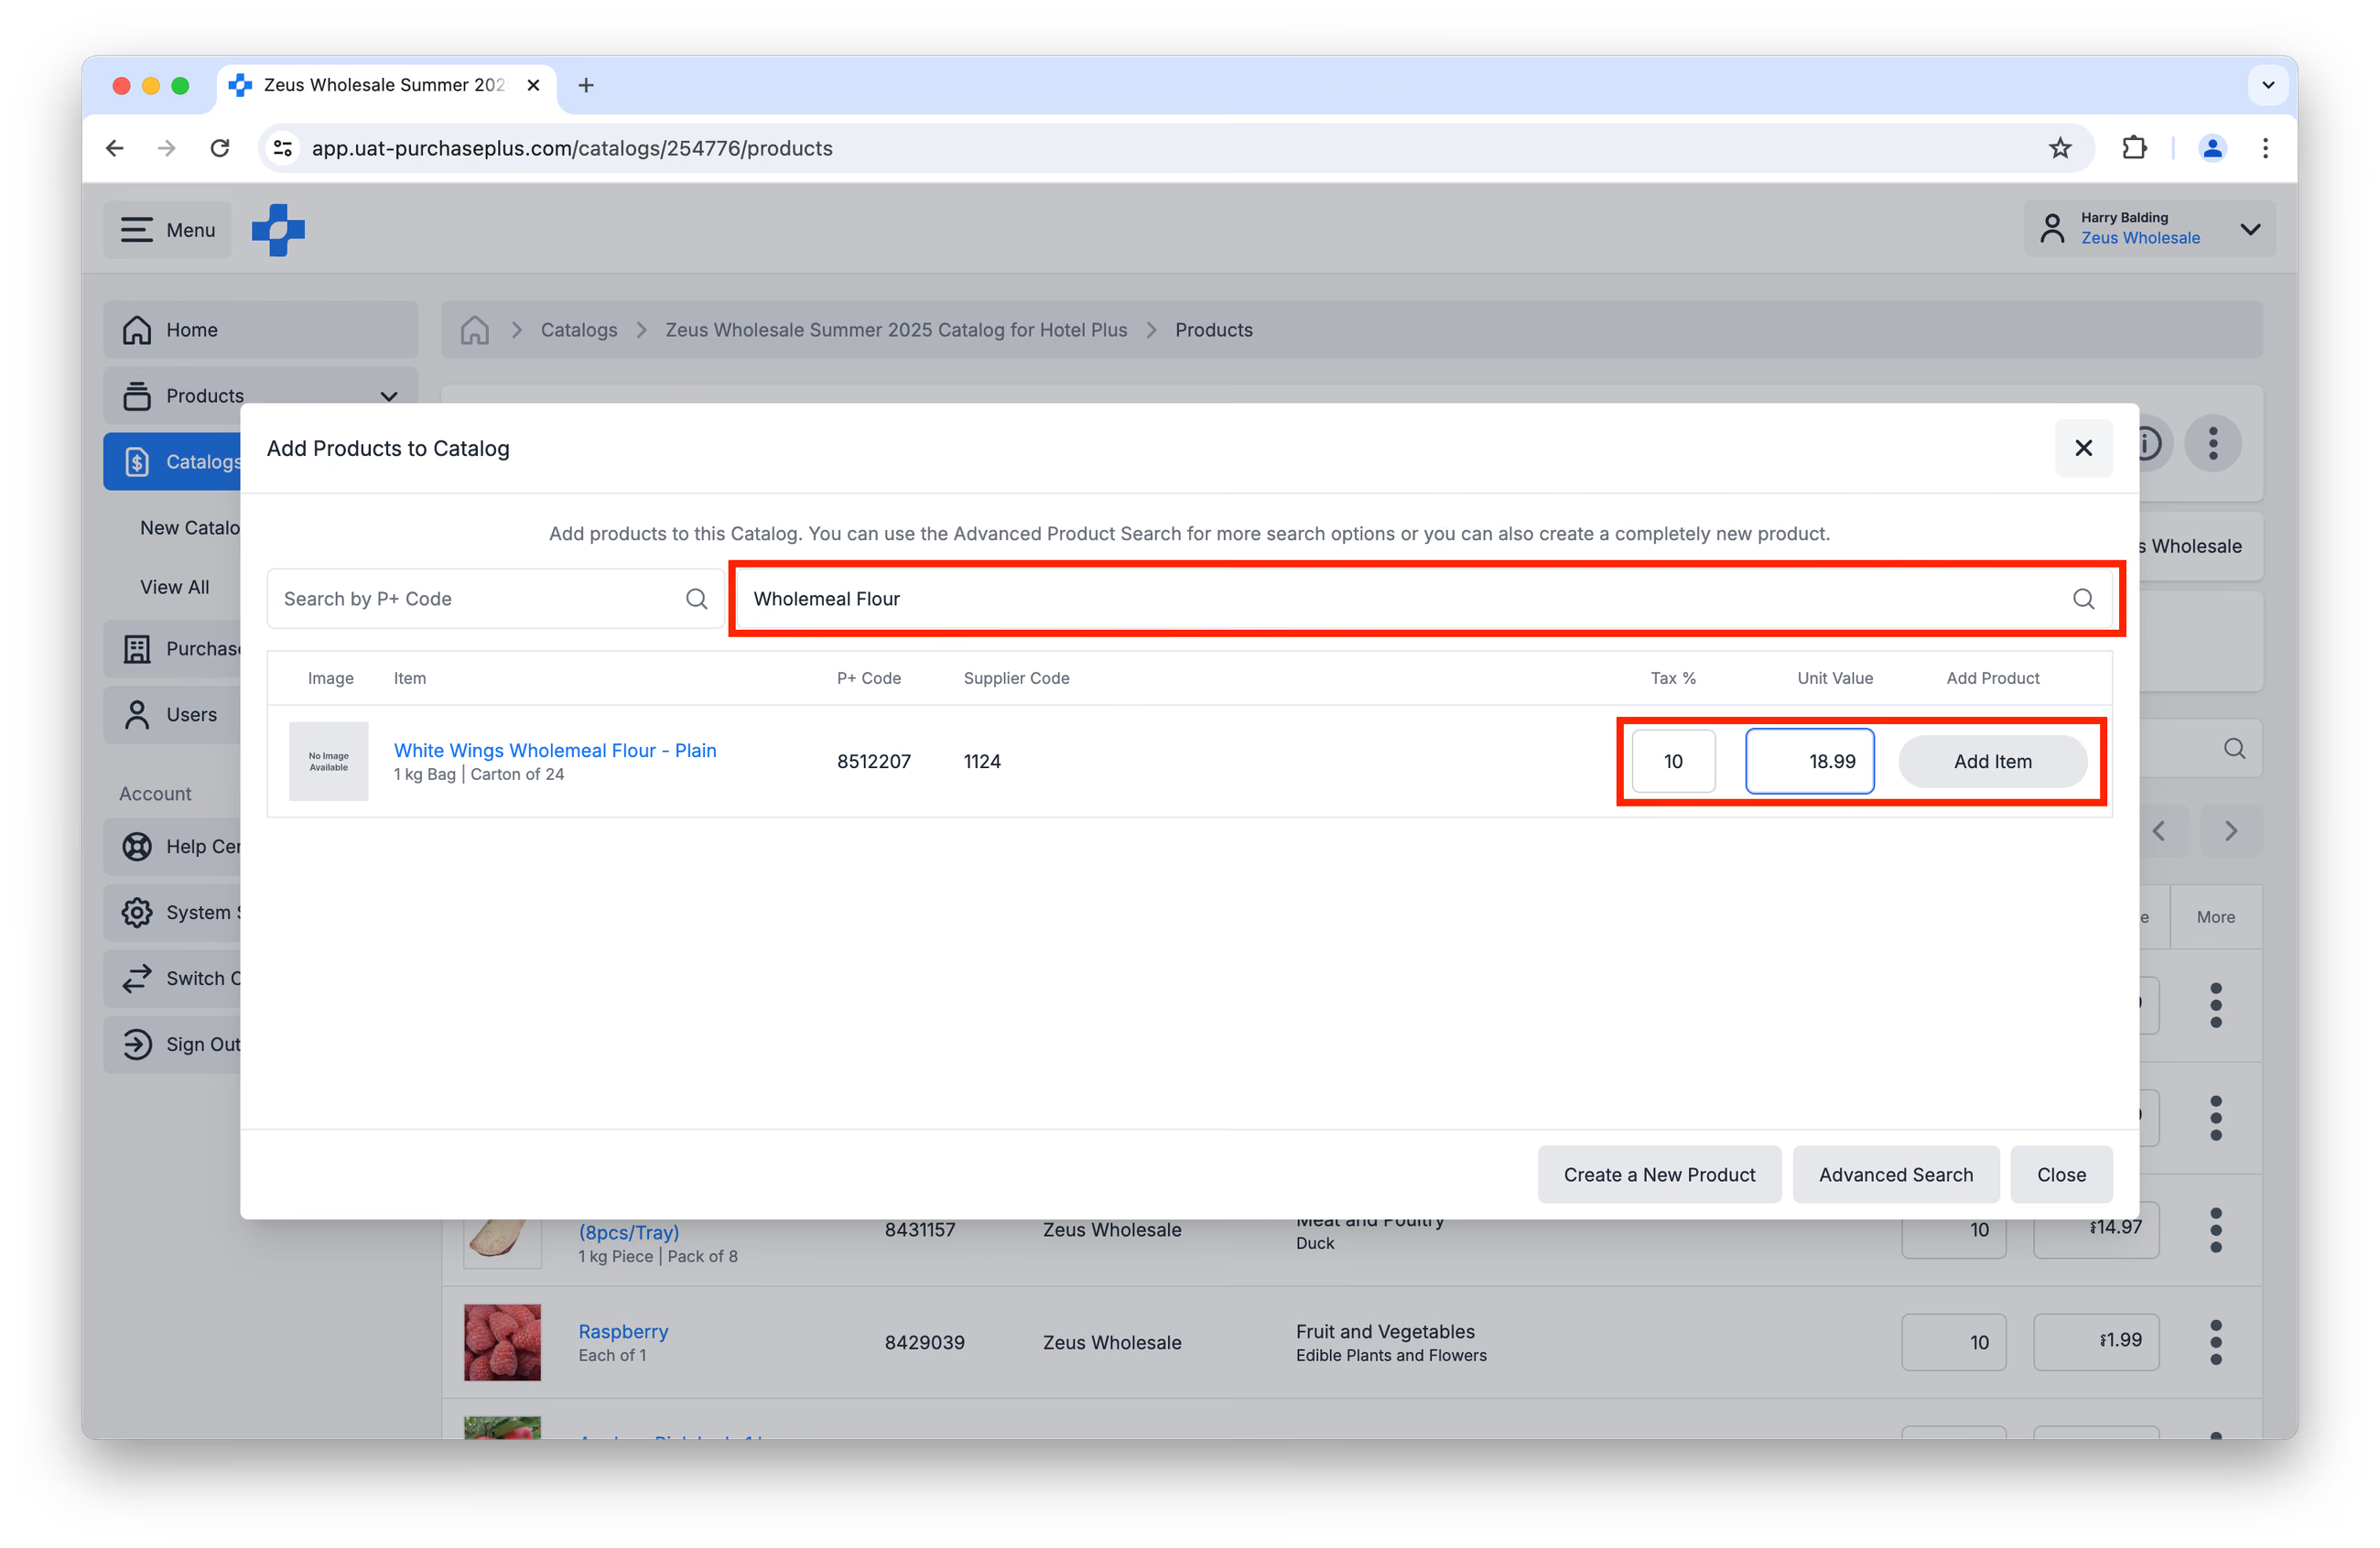
Step 3: Search for the Product you would like to add to your Catalog. Add the Tax % (GST) and Unit Value (ex-Tax). Click [Add Item].
Step 4: Repeat Steps 1-3 for each Catalog to which you would like to add the Product.